How To Draw A Tulip
 Welcome to this wonderfully crafted guide on how to draw a tulip, an iconic spring flower beloved across the globe for its vibrant colors and elegant structure. Sharpen your pencils and dust off that sketch pad as we delve into the world of art and nature. This engaging and informative journey comprises three invaluable sections; we'll start by exploring the fascinating basics of a tulip's structure, showcasing the symmetrical elegance and distinct features that make this flower a joy to depict. Once we've understood the anatomy of our subject, we'll then progress to a comprehensive, step-by-step guide to drawing a tulip, aiding you in translating these structural elements into art form. Lastly, the grandeur of your tulip isn't complete without its mesmerizing hues; hence, the final section is dedicated to enhancing your creation with appropriate colors and ambient backgrounds. By immersing yourself in this rich learning experience, you'll be well equipped not only to draw a striking tulip but also understand the art of observation and imitation. So let us begin this thrilling journey and delve into understanding the basics of a tulip’s structure.
1. Understanding The Basics of Tulip Structure
Delving into the heart of a tulip, one begins to understand its intricate structure and design. Understanding the basic anatomy of a tulip opens up a whole new world of botanical artistry, and as we explore the nature of this iconic flower, we will be focusing on its essential parts, studying its petal formation, and discovering the unique features of different tulip types that impact how they are drawn. To initially comprehend the complexity of a tulip's structure, we must first recognize the essential parts that make up this beautiful flower. From the stem that holds it upright, the leaves that provide nourishment, to the bloom that captivates us with its vibrant colors, each part has a role to play in ensuring the survival and continuance of the tulip. Once we begin to understand these components, we can delve into the fascinating process of how petals form part of the tulip’s structure. It’s through this in-depth exploration that we truly appreciate the beauty of what nature has bestowed upon us. Thus, join us on this journey to recognize the essential parts of a tulip and open your eyes to the marvel of floral structure and form.
1.1 Recognizing The Essential Parts of a Tulip
Tulips are not only beautiful but they also contain fascinating structures and components that form its entirety. As part of comprehending the basics of the tulip structure, it is paramount to recognize the essential parts of a tulip. Tulips are composed of six distinct elements - the stem, leaf, petals, sepals, pistils, and stamen. The stem serves as the primary support system of the tulip, ensuring it stands tall and strong. On the stem, you will find the leaf, which is wide, long, and curved, thus lending additional support to the tulip while distinctly contributing to its aesthetic appeal. Tulip flowers feature three petals and three sepals. However, unlike many other flowers where the sepals are visibly different, tulips have evolved such that the sepals resemble petals – this phenomenon is termed ‘tepals’. These six tepals form a portion of its striking beauty, beguiling garden enthusiasts and botanists alike with a wide array of colors ranging from vibrant reds to calming pastels in Spring. The stamen is the male reproductive part of the tulip and typically consists of a long, filament-like structure topped with a pollen-filled anther. The pistils, on the other hand, are the female reproductive components composed of the ovary, style, and stigma. The pistil is distinguished by its long, slender shape ending in a knob-like stigma, where pollen germination takes place. Recognizing and understanding these elemental parts of a tulip aids in drawing a tulip realistically, allowing one to capture not just the visible aesthetics but also the functional structures that result in the tulip’s alluring charm. The understanding of the tulip's structure transcends beyond drawing; it enlightens us on the fascinating and diverse adaptability that exists within plant life. Ultimately, recognizing these essential parts not only provides a deeper appreciation for the tulip’s beauty but also serves as a foundation for those venturing into botanical illustration and garden care. The tulip, with its simple yet complex structure, is a testament to the nature’s intricate craftsmanship.
1.2 Studying the Petal Formation of Tulips
Studying the petal formation of tulips is a crucial part of understanding the structure of these fascinating flowers. The tulip is renowned for its unique bulbous shape and vibrant colors, an aesthetic appeal that is significantly attributed to its distinctive petal structure. Typically, a tulip has three outer petals and three inner ones, although the term 'petal' may be used collectively for all six identical segments. The petals are the primary subjects of artistic representation, as they carry the brilliant coloration and defining features of the bloom. Analyzing the petal arrangement, one may uncover a fascinating blend of complexity and simplicity. When seen from above, a tulip displays a star-shaped pattern, with each petal overlapping the adjacent ones at the base, before tapering upwards and outwards. This arrangement affords a unique outline which is as enticing as it is demanding to replicate in drawings. Observing tulips from different angles also reveals a dynamic range of forms, as the petals' curvature creates an interplay of light and shadow, offering varying visual textures. This curvature isn't random but has been optimized by nature to track the sun's path, enabling each petal to maximize light absorption for photosynthesis. This ingenious design aspect permits the tulip petals not only to be major contributors to the plant's sustenance but also to express a vibrant color symphony in environments rich in sunlight. In the process of drawing a tulip, it is critical to capture the interplay between the smooth surfaces and sharp edges of the petals, their overlap, and the way they encase the flower's inner structures. Although tulips may seem simple, the subtle interplay of lines, curves, and colors in petal formation can be a challenge to replicate. However, once mastered, it provides an artist with a rich repertoire to explore different aspects of color rendering, shading, and texturing. But one should not merely see tulips as static entities. Instead, consider their life cycle, which significantly influences petal formation. In the spirit of zeitgeist realism, artists need to incorporate elements like the gentle unfurling of buds, the full bloom with wide-open petals, or the wilting stage when petals droop and colors fade. Each stage carries its own emotion and evokes different responses, making tulips an incredibly diverse subject to study and represent artistically. By learning the subtleties in studying the petal formation of tulips, you take a crucial step in understanding the basics of tulip structure, paving the way for better botanical illustrations.
1.3 Differences in Tulip Types and Their Impact on Drawing
Understanding the distinction between different types of tulips can significantly improve your tulip drawing skills. The primary 1.3 differences in tulip types to focus on include the aspects of their petals, stems, and overall structure. For instance, the Darwin Hybrid Tulips, known for vibrant colors and large, robust bloom, have a mostly oval shape. Their petals are generally uniform, offering an easier drawing experience for beginners. In contrast, Parrot Tulips, appreciated for their flamboyant and feathered petals, introduce a higher level of intricacy — making them a challenge to depict accurately. Another worthwhile mention is the Lily-Flowered Tulips. Distinguished by long, slender stems and pointed petals, they can test your skill in creating perspective and proportion in your drawings. Each tulip type also has an impact on the artwork based on the season it represents. For example, Classic Dutch Tulips, often associated with spring's vibrance, can add life and color to your canvas that can help to attract viewers who are welcoming the warmer weather. On the other hand, Fosteriana Tulips, known as the 'Emperor Tulips,' bloom in the early spring, adding a touch of vibrant colors after a long winter. Such seasonal attributes can provide context and depth to your artwork, while also broadening the emotional connection with viewers. By understanding these differences and their impact, you elevate your drawing skillsets, making your tulip illustrations not just artistic representations, but also expressive narratives of these beautiful harbingers of spring.
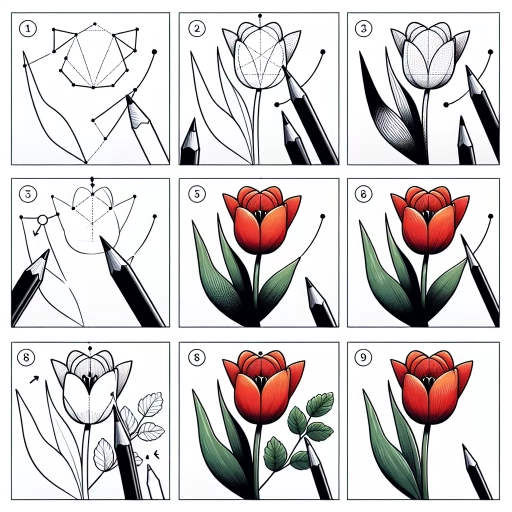
2. Step by Step Guide to Drawing a Tulip
Drawing a tulip might seem daunting at first glance, but with the right guidance and a step-by-step method, anyone can create an appealing, lifelike representation of this beautiful flower. This comprehensive guide aims not only to unravel the complexities of sketching a tulip but to also infuse the process with a sense of fun and creativity. With a focus on preparing your materials and sketching an initial outline, we will first lay the foundation for your drawing. This will be followed by imparting insights into adding crucial details and textures that will bring authenticity to your tulip sketch. Lastly, we'll delve into the art of applying finishing touches and advanced shading techniques, which can significantly enhance the depth and realism of your drawing. By the end, you'll be equipped with a tested, efficient approach to drawing a tulip—one that simplifies each step, ultimately making the experience rewarding and fulfilling. So, let's begin this artistic venture by discussing how to properly prepare your materials and sketch an effective outline.
2.1 Preparing Your Materials and Sketching an Outline
Preparing your materials and sketching an outline is an integral part of the tulip drawing process. Before bringing your envisioned tulip to life on paper, it's critical to gather the necessary tools and create an initial sketch. You'll need quality drawing paper that won't easily crease or tear under the pressure of your pencil strokes. Also, procure an array of pencils with varying hardness levels. A harder pencil like an HB would be perfect for the initial sketch, while softer pencils like 2B or 4B are ideal for darker, more defined lines during detailing. An eraser is crucial for correcting any errors while sketching an outline for your tulip. Additionally, a pencil sharpener is a must-have for maintaining sharp points for fine details. Do not forget the inclusion of colored pencils or watercolors if you plan on adding color to your art. The significance of quality materials cannot be overstated as these foundational tools play a vital role in creating a flawless final product. When it comes to sketching your initial outline, take your time, and let your creativity flow. Begin by observing a real tulip or a photo if available. Notice the curves, lengths, and overall shape of the petals and the interaction with the stem and leaves. Capture this in a light sketch, using gentle strokes. Remember, this is your preliminary plan, so it does not need to be perfect. Strive to capture the basic form of the tulip - the classic 'egg' shape of the bulbous center, the tapering stem, and the outlines of the leaves curling elegantly at the base. A pro tip is to break down these complex shapes into simpler geometrical shapes, making the sketching process more manageable. Once you have your basic outline, you can start adding details, one petal at a time. This initial preparation phase of the tulip drawing process sets the stage for your artwork's success. The effort you put into the right tools and a concise outline is what turns your blank canvas into a blooming masterpiece. Therefore, don't rush these initial steps. Instead, enjoy this grounding process, for it is the foundation on which your tulip will bloom to life on paper.
2.2 Adding Details and Textures to Your Tulip
Creating beautiful tulips that spring off the page is more than just sketching an outline or filling in the color; it's about adding the right details and textures. Thankfully, you don't need to be Van Gogh to bring your tulip to life. This guide will walk you through the steps to add realism to your floral drawings. In step 2.2, we focus on adding details and textures that will make your tulip bloom on paper. Start by equipping yourself with a variety of pencils, as they will be your key tools here. Fine pencils work best for delicate lines, while medium or dark pencils help in creating depth and shadows. Now, examine a real tulip, or picture of one, to familiarize yourself with the finer details you're about to draw. Begin by adding more definite, harsh lines on the top of each petal—the part of the petal that's attached to the stem. Remember, tulips aren't flat; the petals have depth. Therefore, these lines at the top part of the petal help to show that it's folding over and wrapping around the bud. Next, observe the minor veins on the petal. These are what you'll replicate to give texture to your drawing. They usually start from the bottom of the petals and go upward. However, not all veins go up straight, some curve slightly outward as they move upward. Draw these veins on the petals, ensuring they are somewhat asymmetrical and not extraordinarily pronounced to keep it natural-looking. After you've sketched in these details, the next part is to play with shadow and light. Look again at your reference photo or real tulip. Notice where the shadows fall, and how the light sources affect these shadows. Darken the areas where shadows appear but remember to do so gradually. Don't press down too hard with your pencil. By adopting a light hand and gradually adding intensity, it'll be easier to manage any misplacement of shadows. Additionally, textures offer more authenticity to your drawing. For this, a tortillon or blending stump becomes handy to smudge and soften the pencil lines slightly, replicating the soft, texture of a real tulip petal. However, note that the lines shouldn’t disappear completely, as they are essential for depicting the petal's structure. Following these steps will ensure that your tulips are not only intelligibly drawn but also artistically expressive, bursting with life and realism. Mastering the art of adding details and textures can truly elevate your sketch from a basic outline to a stunningly detailed masterpiece.
2.3 Finishing Touches and Shading Techniques
2.3 Finishing Touches and Shading Techniques
As we progress on our journey of illustrating a tulip, a critical stage that enhances the overall aesthetic of your artwork and contributes substantially to its realism is the application of finishing touches and shading techniques. This stage plays a pivotal role in distinguishing variations in depth, complementing the structure and texture of the tulip, and giving it a dynamic and lifelike appearance. One of the elemental techniques of shading in drawing is known as hatching. This simple, yet effective, technique involves the creation of series of parallel lines that vary in density and thickness to depict the play of light and shadow, thereby bringing out the three-dimensionality of the tulip. Closer lines contribute to a denser, darker shade, aiding in illustrating the tulip's natural folds and crevices. Meanwhile, lines farther apart suggest a softer, lighter shade, accurately showcasing the tulip’s outer, light-kissed petal surfaces. Another important shading technique to master is cross-hatching. By intersecting sets of lines at different angles, it provides a richer, deeper sense of depth and tonal variation. This technique is particularly useful when depicting the tulip's buds and stems, where darker, deeper shades are essential to emphasize their curvature and solid texture. The smudging technique helps in blending these shades, providing a smoother transition between light and dark aspects of the tulip. This strategy is essential to emulate the soft and delicate quality of the tulip petals, which are critical in perfecting its overall illustration. In terms of finishing touches, some detail-oriented methods can be used for refining your drawing. The use of an eraser to remove unnecessary lines and soften the shaded areas helps to create a clean, polished appearance. Furthermore, the addition of highlights through lighter pencil strokes, especially along the edges of the tulip petals, adds a sense of freshness, mimicking how sunlight naturally glistens on them. These finishing nuances, combined with the strategic shading techniques, join forces to enrich your tulip illustration and reflect it in all its vibrant, three-dimensional glory. This combination of various finishing touches and shading techniques engages the viewers' eye, providing both a visual feast and a tactile sense of the tulip’s textured nature, thus perfecting the Step by Step Guide to Drawing a Tulip. Remember that mastery in these methods not only adds depth to your drawings but also brings an intimate connection between the observer and the observed, enhancing the overall artistic experience.3. Enhancing Your Tulip Drawing With Colors and Backgrounds
In the vibrant realm of art, mastering the art of tulip drawing goes beyond accurate shapes and forms; it delves into the world of color and ambiance. To truly breathe life into your tulip drawing, three factors play a pivotal role, namely, choosing the right colors, creating a standout background, and mastering color blending and layering techniques. Enhancing your tulip illustration is a dance between these elements, each one contributing an integral piece to your artistic puzzle. Choosing the right colors for your tulip drawing is a quest for harmony and contrast. The world of color is diverse, and your choice can determine the overall mood of your drawing. A vibrant red tulip, for example, could signify passion and energy, while a soft pastel pink might evoke feelings of tenderness and love. Similarly, a standout background can elevate your tulip's presence. Be it a summer meadow, a tranquil garden, or simply an abstract blend of hues, your background should serve to augment your subject, not overpower it. Lastly, blending and layering techniques are crucial for achieving dimensional, realistic effect. Insightful use of these techniques can help you give depth and texture to your tulip, transforming it into a three-dimensional entity on a two-dimensional canvas. Let's venture first into the realm of colors and discover how the right color palette can be a game-changer in your tulip drawing. Seizing the power of color, we can unlock the full potential of our tulip illustrations and bring them to vibrant life. So, take a deep breath and prepare to explore the critical process of choosing the right colors for your tulip drawing.
3.1 Choosing the Right Colors for Your Tulip Drawing
3.1 Choosing the Right Colors for Your Tulip Drawing
When it comes to enhancing your tulip drawing with captivating colors and backgrounds, selecting the correct shades for your masterpiece is pivotal. This step is more than just picking up the hue that first catches your eye. In fact, it's a strategic, intricate process where you gradually breathe life into your black-and-white sketch, shaping it into a vibrant, evocative work of art. Tulips have a broad spectrum of colors which further expands your options, ranging from the soft white and pastel pinks to the vibrant reds, blazing oranges, golden yellows, and even multi-colored varieties. Each hue sets a distinct emotional impact, so it's essential to hover over this multi-faceted tulip color palette and pick shades that correspond with the emotion or message you're aiming to express. Be aware that whilst traditional tulips are renowned for their bold single colors, some species break the mold with their striking blends and streaks. If you wish to emulate their mesmerizing beauty into your drawing, a good understanding of color theory can greatly assist. This includes knowing how to create secondary colors by combining primaries, as well as how to use complementary colors to add depth and create contrasts that make your drawing pop. Don’t forget about the subtlety of tone or the intensity of color. A tip here would be to start off lightly and layer the colors gradually to achieve the desired intensity. This allows you to have better control over your artwork and avoid overwhelming your drawing with too much color too soon. Lastly, consider the color of your background. A common strategy is to employ contrasting backgrounds to make your tulip stand out. Alternatively, a harmonious background, one that employs analogous or related colors, can bring about a tranquil, balanced feel to your art. In conclusion, understanding and choosing the right colors for your tulip drawing essentially adds depth, dimension, and character to your artwork, transforming it from a mere sketch to a vibrant story waiting to be narrated. So as you take pencil to paper, remember that each stroke of color is a stroke of emotion, personality, and life.3.2 Adding a Background to Make Your Tulip Standout
The adoption of a suitable background can take your artistic representation of a tulip from ordinary to extraordinary, offering it the significance it deserves. In section 3.2 Adding a Background to Make Your Tulip Standout, we delve into this crucial aspect of artistry that often gets relegated to the back burner. Enhancing your tulip drawing with colors and background is not an afterthought but an integral part of the artistic process that adds depth and perspective to your work. Consider the tulip, a splendid creation of nature that stands tall amidst an expanse of green, making a statement with its vibrant colors. Now translate this image onto paper. The tulip, irrespective of how beautifully rendered, appears incomplete without the echo of its natural surroundings. Enter the importance of an adeptly portrayed background which serves to highlight your subject, making your tulip standout. Take a moment to contemplate on the surroundings where your tulip blooms. Is it a solitary sentinel in a lush garden, or does it sway in harmony with a sea of fellow tulips in a vast field? The background you choose can dramatically alter the mood and story of your drawing. Use pastel tones to bring out a peaceful daytime scene, or choose a setting sun scenario with dramatic shades of oranges and purples to portray an intense visual. Beyond color, remember to consider texture. The buttery smoothness of a tulip petal stands in stark contrast to the rough bark of a tree trunk or the delicate lacework of leaves. Playing with these varying textures within your background provides depth and simultaneity adds to the visual interest of your piece. Your choice of background should not be a distraction but rather a means of foregrounding your subject. Subdued shades of green and brown, balanced with hints of sparkling morning dew or shadowy spaces, can augment subtlety and add a third dimension to your drawing. Master the art of balance in your background to accentuate the vibrance of the tulip in the foreground. So, as you embark on the journey of enhancing your tulip drawing with colors and backgrounds, remember the critical role the background plays in your narrative. It can either make your tulip stand out or recede into oblivion. The power is in your hands, and the choices you make will create a beautiful and captivating image. Use your artistic vision to create a background that gives your tulip a stage to shine and recount its story.
3.3 Techniques for Blending and Layering Colors
3.3 Techniques for Blending and Layering Colors: To breathe life into your tulip sketch, precision in blending and layering colors is vital. Remember, achieving visual depth and realism hinges on your mastery of these techniques. Start by selecting the range of colors you'll need for your tulip, typically a combination of pinks, reds, or yellows for the petals and greens for the stem and leaves. Begin with the lightest hues as base layers, forming the main color tone of your tulip. The magic of blending and layering colors rests in graduating from light to dark. Layer the darker shades on the lighter base, following the grain of the petal, to create depth and transition within the texture of the tulip. Observe how light interacts with the tulip - how it brightens certain sections and casts others into shadows - replicating this interplay brings more realism to your art piece. Usage of varied pencil pressures assists in driving attention to specific parts of your artwork. Firmer pressures deepen color tones, ideal for shadowed sections, while lighter strokes are perfect for conveying the light-kissed areas of your tulip. Smudging is an additional technique to achieve lustrous, silky textures synonymous with tulip petals. Use a smudge stick or a cotton ball for this results in a smooth, blended finish, avoiding harsh lines or visible strokes. When it comes to the background, opt for contrasting colors to make your tulip pop. Compositionally positioning cooler blue or purple hues, which are complementary to reds, pinks, and yellows, helps your tulip stand out vibrantly. However, keep blending soft to maintain focus on your primary subject, the tulip. Layer complementary colors in multiple gradients to bring dynamism and depth to your background while giving your tulip a visually appealing stage to shine. To summarize, mastering the techniques of blending and layering colors can significantly elevate your tulip drawing. The strategy of building color from light to dark, the interplay between light and shadow, the utility of different pencil pressures, and the artful control of smudging, contribute in creating a mesmerising piece of art. The smart choice of background colors not only highlights your subject but also adds to the overall aesthetic of the artwork. So, harness these techniques and watch your tulip spring to life.