How To Draw A Owl
 Mastering the art of drawing an owl is more than just sketching a round body with two large eyes. It requires understanding specific elements of owl anatomy, unique sketching techniques, and constructing a lively, captivating final artwork. This enlightening, step-by-step article aims to take you on an artistic journey through each of these stages. First, it will peer into the unique features of owl anatomy, helping you capture the essence of this enigmatic bird realistically and accurately. Next, it will gently guide your hands through the essential sketching techniques perfected by professional artists. Lastly, to breathe life into your artwork, the article will unveil secrets to transforming your sketch from a picture to a living creature. As we embark on this creative adventure, the primary step towards mastering this formidable subject starts with understanding owl anatomy for accurate drawing. Let's dive in and begin layering our canvas with wisdom.
Understanding Owl Anatomy for Accurate Drawing
Understanding the intricate anatomy of an owl can significantly enhance your approach to accurately drawing this fascinating creature. This in-depth exploration is not only helpful for artists, but also for bird enthusiasts or anyone seeking a closer connection with the natural world. This article will illuminate key aspects to focus on when observing, understanding, and eventually depicting these nocturnal raptors. You'll gain insights into the distinctive physical characteristics of owls. This will be followed by an analysis of the fundamental body proportions that underpin their aesthetic appeal. Lastly, we will venture into the detailing of owl features which will lend authenticity to your drawings. Our first stop on this exciting journey is observing the physical characteristics of owls. By honing your ability to examine and interpret these features, you'll open a new dimension in your artistic endeavors, capturing the beauty and majesty of owls like never before.
Observing the Physical Characteristics of Owls
Observing the physical characteristics of owls is a fundamental step in understanding owl anatomy for accurate drawing. Owls are night creatures known for their mesmerizing and captivating beauty; their anatomical structure is nothing short of an artistic marvel that artists should keenly observe before diving into the drawing process. Firstly, a noteworthy characteristic of owls that defines their silhouette from other birds is their rounded body and large head, which is made even more unique due to the absence of a visible neck. The size of the owl's head allows for larger eyes. These extensive eyes, which are framed by distinctive circular facial disks, dominate their faces and are essentially purpose-built for remarkable night vision. But unlike humans, owl's eyes are immobile, forcing them to turn their heads for a change of view. Riveting to their physical description is their curved, sharply pointed beak, located right in the center of the facial disk. This beak design equips owls with the ideal tool for tearing apart prey. Not to forget, owls are enriched with a dense and soft feather coating in various shades and patterns. Observing this detail is crucial as it highlights the owl's adeptness for stealth and warmth. Equally essential to the aesthetic appeal is the owl's talon-equipped feet. Owls have zygodactyl feet: two toes forward, two toes backward, providing a stronger grip on their prey. Finally, their expansive, elegant wings which extend beyond their bodies when unfurled, make for a spectacular sight. Their wing shape aids them in noiseless flights, making them excellent silent hunters - a unique detail to remember when capturing the essence of these nocturnal creatures within a piece of art. Understanding these physical characteristics and ensuring their accurate representation is a fundamental part of the owl drawing process. Artists looking to realistically depict owls should pay close attention to these features, as they combine to give owls their fantastic and mysterious appeal. With these characteristics, artists can render beautiful and accurate representations of owls, making the drawings not only visually pleasing but educationally informative as well. Excellently drawn owls can effectively communicate the beauty, prowess, and uniqueness of these magnificent creatures, and with this knowledge, you are prepared to do precisely that.
Identifying Basic Owl Body Proportions
Identifying and understanding the basic body proportions of an owl can greatly enhance the accuracy of your drawing. It's important to realize that owls are not identical in their body structure; there are over 200 species of owls, each with unique anatomical proportions. Nonetheless, some common attributes intersect most species which artists can focus on. Start by observing the head of the owl - it is larger in proportion to its body than that of most birds. This is due to the owl’s large eyes and broad facial disk, shaped almost like a heart or an inverted U. These features are packed into a head that can rotate up to 270 degrees, providing owls with phenomenal nocturnal vision and hearing capabilities. Moving downwards, note the robust, rounded bodies of owls - an outcome of dense feather coverage. Unlike other birds characterized by slim bodied and long neck proportions, the neck of an owl is typically short and hidden by feathers, making the head appear to be attached directly to the body. Owls' wings are broad but compact when not in flight, often extending just a little beyond the tail. Next, turn your attention to the owl’s feet, bearing in mind that these powerful structures are specifically designed for hunting. They have four sharp-taloned toes, usually with three facing forward and one backward. However, owls have a flexible toe that can move to face backward or forward, offering a stronger grip on prey. Comparing these distinct characteristics with other birds will reveal a distinctive proportion pattern that makes owl species remarkably unique. By mastering these basic proportions, your owl drawings will not only reflect technical precision but also possess an authentic feel to them. Remember, focusing on accurate proportions first gives you a reliable basis to introduce finer details and textures that bring the splendid owl anatomy to life.
Focusing on Detailing Owl Features Accurately
Meticulously capturing the true essence of an owl in your drawing entails an understanding and close focus on the finer points of an owl's anatomy. It's these subtle details that bring your artwork to life and add a pinch of verisimilitude to your interpretation. Firstly, let's address the owl's spherical facial structure and its compelling eyes. Set in a round, flat face, their large eyes, glanced in gold or green, lend an air of piercing intensity. The eyes often induce awe, but it is essential to remember that they are nearly immobile within their sockets. Thus, an owl's gaze usually aligns with the direction of the beak. However, they make up with an ability to turn their heads as far as 270 degrees to capture their surroundings. Next in line, is the beak, sharp yet concealed. Nestled in the heart-shaped facial disc, the beak is typically hooked at the tip, adapted for tearing into prey but often obfuscated by feathers. Include these slight coverings in your drawing to enhance its authenticity. Now, let's travel down to their feathers. Owls are particularly renowned for their plush, layered feathers. The individual feathers may appear softer and fluffier than those of other birds due to the unique arrangement of the feather barbs. On the wings, these feathers elongate, have tips "fringed" with a wavy pattern, thereby helping the owl to fly without making a sound—a paramount feature to include in your sketches to give your owl that stealth appearance. Lastly, owls' legs are their silent weapons; hence, a proper emphasis on them is vital. Much longer than they seem, their legs are heavily feathered for protection against prey, giving them a somewhat fluffy appearance. The talons, like their beak, are sharp and curved—effective tools for seizing and dismembering prey. Remember the rough texture on the edges of the talons; it's this detail that can add depth to your drawing. By focusing on these details and incorporating it into your work, your owl drawing will be more accurate, lively, and compelling to both amateur fans and bird enthusiasts. Keep in mind that every species of owl has unique features worth teasing out; therefore, your keen observation and appreciation of these subtle nuances are key to perfecting your owl anatomy portrayal. So, budding artists, as you embark on your journey to portray this nocturnal marvel, remember this - detailing is not merely about precision; it also adds a layer of credibility to your art. Hone in your focus on these finer points of an owl's anatomy, sketch with patience and precision, and you will end up with a piece of art that is not just a drawing but an embodiment of the mystical creature, capturing the spectator's eye and heart alike.
Techniques for Sketching an Owl
Sketching an Owl can be a truly delightful process, especially if you carefully employ certain techniques to bring your drawing to life. The art of accurately depicting an owl in sketch centers around three key fundamentals. First, we consider "Using Basic Shapes as a Guiding Framework." This technique refines what can seem like a daunting task into manageable portions, making the activity less complex. Secondly, it's crucial to "Develop Shading and Texturing Techniques for Feathers." An owl is renowned for its distinct plumage, and shading and texturing these features appropriately can significantly enhance the credibility of your sketch. Lastly, "Creating Depth and Dimension with Lighting" plays a significant role in transforming your flat sketch into a realistic recreation of an owl. By manipulating light and shadows, you can simulate a three-dimensional effect in your artwork. As we dive deeper, we'll start by focusing on the simplicity yet effectiveness of Using Basic Shapes as a Guiding Framework, ensuring that even beginners can start their artistic journey with complete confidence.
Using Basic Shapes as a Guiding Framework
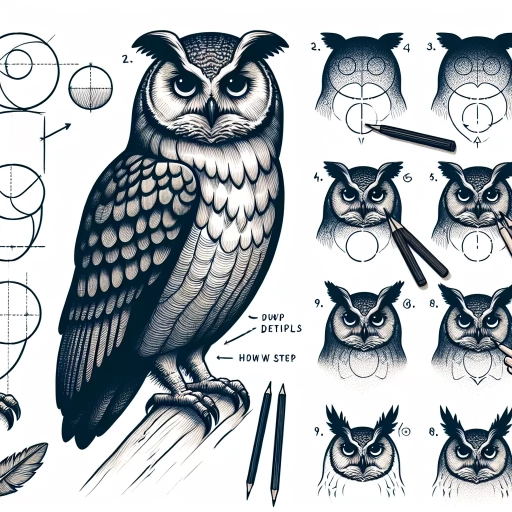
Using basic shapes as a guiding framework is a paramount technique when it comes to sketching an owl. In fact, it's a method that simplifies complex subjects into manageable entities, breaking them down into rudimentary geometric forms. Before you start imprinting any exquisite details such as its mesmerizing eyes or the fluff of its feathers, perceive an owl as a combination of casual circles, ovals, and triangles. Start by drawing an oval for the owl’s head and body, followed by smaller circles for its distinct eyes. A simple downward triangle right beneath the circles is perfect for the beak. This skill of seeing through intricate shapes, identifying fundamental forms beneath, is an effective approach used by professional artists. It enables you to map the overall structure and silhouette of the owl before venturing into delicate details. It also provides balance and proportion to your sketch, ensuring each part of the owl maintains symmetrical relative to other parts. Moreover, using basic shapes can help you visualize the final image better and correct any proportional inaccuracies right from the early phases of your sketch. It is here that you break your owl down into segments, positioning and sizing them appropriately to achieve a natural, realistic appearance. Hence, recognizing and commencing with basic shapes not only streamlines the drawing process but also bolsters the accuracy and visual appeal of your owl sketch. Whether you're a novice artist exploring the realm of sketching or a proficient illustrator refining your skills, the guiding framework of basic shapes always proves invaluable. Notably, your owl doesn't have to follow these shapes to the tee. Remember, real creative essence stems from natural variation, the unique quirks and individualistic features you add. Each circle, oval, or triangle you draw will serve as a guide, giving your owl its captivating underlying structure while leaving ample room for you to express your artistic interpretation. By mastering the technique of using basic shapes as a guiding framework, you can gradually and systematically increase the complexity and detail level of your sketches. You'll see an impressive improvement in not just your owl's representation, but in how you approach drawing any subject. Regardless of how detailed or stylized your final owl sketch may be, it all starts with elementary shapes. Herein lies the formidable power of using simple shapes as your starting point - it scaffolds the rest of your creative process, provides a clear roadmap for your sketch's direction, and plants the seeds for an engaging and captivating piece of art - your very own sketched owl.
Developing Shading and Texturing Techniques for Feathers
Developing Shading and Texturing Techniques for Feathers forms an integral part of the larger-picture task of sketching an owl. This stage demands a keen understanding of how the owl's plumage moves, looks in different lights, and differs from one part of its body to another. When beginning to shade and texture the feathers of your owl sketch, consider that the texture will not be uniform. Depending on whether you're detailing the soft down of the chest or the sleek pinions of the wing, your approach must change accordingly. For the softer, downy feathers, the shade should be lighter and the lines softer and fluffier. The use of smudging technique works miraculously in this part. By maintaining a lighter hand on the sketch, you can ensure a fuller, puffy result that mimics the feel of real down. On the other side, the wing feathers are comparatively structured with a hard spine and are layered closely together. Adopt a bolder, darker shading pattern here, with lines that mimic the individual feather's striation. When it comes to texturing, even light and shadow play vital roles. Both need to be handled delicately as the layering or depth of feathers can create complex lighting effects. Depending on the direction of light in your composition, create a contrast that adds depth to the feather's appearance. Highlight certain areas lighter, shade other areas darker, and create gradients for a realistic effect. Further, remember to check references to study the color and patterns of owl feathers closely. They usually have intricate patterns and color mixes like brown, white, and black, depending on species. Consider adding these patterns lightly at first, then building upon them, adding more detail and boldness as you proceed. Lastly, is the art of layering that comes into play when creating a realistic depiction of the feathers of an owl. Birds typically have several layers of feathers, each with distinctive characteristics. By mastering the layering technique, your sketch can bring life to the particular depth of an owl’s plumage. Drawing an owl is a captivating challenge that demands one to pay attention to even minute nuances. By applying careful shading and texturing techniques, your feathers will flow seamlessly and realistically, contributing greatly to the overall impact of your owl sketch. Moreover, creating a visually realistic owl sketch goes beyond merely instructional; it is about capturing the spirit and essence of this wise bird and translating that into a piece of art on your canvas.
Creating Depth and Dimension with Lighting
Understanding the role lighting plays in constructing depth and dimension is crucial when sketching an owl, or any other object for that matter. Lighting, when used effectively, can transform a flat, two-dimensional sketch into a vibrant, seething portrait that breathes life and captures the essence of the subject. Begin by recognizing the fundamental principles of lighting. Different lighting conditions can have a significant impact on the perception of the owl's shape and form. These conditions include direct lighting, which can strengthen the contrast and emphasize the texture of the feathers, and ambient lighting, which softens shadows and diffuses tones, making the silhouette of the owl more distinguishable. Let us consider sketching an owl under the glow of a setting sun. Start by determining where the light source is coming from, in this case, directly behind the owl. This results in a silhouette-effect, where the rim light traces over the outline of the owl, illuminating its feathers and features from the back, creating an ethereal glow. Be sure to saturate your sketch in shadows while leaving the fringes bright to achieve a realistic depth. In the instance where we want to demonstrate the intricate details of the owl's feathers and expressive eyes, a strong, direct light from top or side would be more beneficial. Play with the values to capture the shadows that appear on the face and under the wings of the owl. Intense lighting will accentuate the texture, portraying the delicate softness of the feathers, and the fluffiness of the owl's body. For a more atmospheric and moody rendering, try working with diffused or soft lighting. This type of light source reduces the harshness of shadows and highlights, providing a wide range of mid-tones. In this scenario, the visibility of the background enhances, wrapping the owl within its environment naturally. Lighting is a transformative tool, a silent storyteller that conjures emotion and depth. By harnessing its potential, you can guide the viewer's eye throughout the canvas and emphasize the elements you deem essential, such as the intensity in the owl's gaze or the intricate texture of its feathers. Mastering the art of lighting in sketching will enable you to breathe a three-dimensional life into your two-dimensional owl sketch, propelling it from mere outlines and shapes to a captivatingly realistic portrayal.
Bringing Life to Your Owl Drawing
Creating artwork that captivates, stirs emotions, and paints a reality onto a piece of canvas is the quintessence of drawing. Even the seemingly simple task of bringing life to an owl drawing requires an intricate balance of detailing, a reasonable representation of the environment, and finishing touches that beam distinction. Expressing emotions through the owl's eye detailing is a crucial aspect of infusing life into your drawing. Eyes, often referred to as the 'windows to the soul,' can mirror a broad spectrum of emotions. Is your owl curious, wary, or content? The detailing in its eyes can communicate this quite elegantly. Another element that lends an air of authenticity to your owl drawing is designing a natural and realistic background environment. A sketch of the owl's natural habitat not only complements the central figure but also offers a chance to narrate its story. Is the owl perched on a quiet tree branch, or is it sweeping down to catch its prey in moonlight? Your owl's environment can be a compelling subplot in itself. Lastly, adding the final touch-ups and highlights to your drawing can significantly impact the overall realistic effect. A stroke here and a dab of colour there can add depth and vibrancy, taking your owl drawing from flat to fab. Let's take a more in-depth look at expressing emotions through the owl's eye detailing.
Expressing Emotions Through Owl's Eye Detailing
Expressing emotions through the fine detailing of an owl's eyes helps to bring vitality and character into your owl drawing, enhancing its overall appeal while telling a unique story. The eyes of the owl do much more than just reflect light and shadows; they carry the weight of its emotions and showcase its extraordinary wisdom and mystique. As an artist, you have the power to give these magnificent creatures a voice or a sentiment, by just a few strokes of your pencil. For one to master the art of translating emotions through an owl's eye, a key understanding of its basic elements is vital. Owls, often celebrated for their sharp vision, have large, symmetrical eyes that exude a deep sense of curiosity and awareness. The size and placement of the eyes on the face play a key part in showing the owl's keen observational abilities and nocturnal nature. Therefore, larger, more prominent eyes, often with dilated pupils, can hint at a strong, focused demeanor, suggesting the owl's commanding presence. The color and shading of the eyes are another critical area to detail. Here, creativity is your limitless playground. Realistic drawings often stick to a palette of browns and blacks, reflecting the natural colors of the owl. However, artists looking to infuse more emotion could experiment with color tones. Blues, greens, or even reds add a hint of mysticism, symbolizing wonder, tranquillity or intensity, respectively. The key is to balance the color intensity across the eye, making the pupil the darkest area while lighter shades sparkle around the rim, emulating the reflective nature of an owl's eyes. Broadly speaking, the intensity of the lines drawn also impacts the conveyed emotions. Sharp lines portray eagerness, intensity, or surprise, while softer, smoozy lines can suggest calmness, pensiveness, or melancholy. These nuances, although subtle, add layers of depth to the owl's personality. Lastly, but certainly crucially, accessory details like 'catchlights' – the sparkles in the pupils, or the fine lines in the iris and around the eyes, help bring a sense of realism and relatability to the drawing. They make the owl's gaze more humane - like it's carrying a narrative of its own, adding a final touch to its emotional portrayal. Altogether, the decision of how the owl's eyes should look rests entirely upon you, the artist. You have the potential to string together the power of observation, technique, creativity, and emotion to create a detailed owl's eye that is more than just a drawing — it's a stunning window to a world full of enigma, wisdom, and poignant stories waiting to be told.
Designing a Natural and Realistic Background Environment
Creating a natural and realistic background environment is a pivotal step in the process of bringing life to your owl drawing. This particular task enhances the overall artwork by adding depth and plausibility to the drawn owl, making it appear not as an isolated figure, but as part of a vivid, natural world. To achieve an authentic and believable background, there are critical design elements you must employ. Begin with understanding the owl's natural habitat. Is it a forest-dwelling great horned owl or a barn owl that thrives in open country and desert regions? The choice of environment should mirror the chosen owl species to warrant a believable scenario. Look for visual references or, if possible, observe the natural habitat in person, and take note of the details—a leafless branch on a moonlit night or the dusty hue of a rustic barn, for instance. When it comes to designing, the key is in the subtle detailing. Integrate elements like trees with rugged bark, dense foliage, a silent creek, or abandoned barn structures, depending on your owl's habitat. Pay attention not only to the major elements but also to the minutiae—small rocks, grass blades, or the texture of the tree trunk where the owl may perch. Use the principle of atmospheric perspective—things appear smaller and less detailed the further they are. This creates depth in your drawing, a 3-dimensional effect, making your drawing all the more life-like. The interplay of light and shadow is also instrumental in rendering a natural ambiance. Shadows cast by the moonlight or subtle hints of sunlight seeping through the thick trunks confers a mysterious and natural look to the environment. Lastly, ensure the color palette is consistent with the natural world. The frequently seen shades of green, browns, and yellows in nature shouldn’t clash with your owl but should rather complement it. Designing a natural, realistic environment around your owl drawing not only enhances the appeal of your creation but also aids in building a captivating narrative around it, thereby creating a full-fledged, engaging digital storytelling experience that blends technology and traditional art.
Adding Final Touch-ups and Highlights for Realistic Effect
Adding final touch-ups and highlights can dramatically enhance the level of realism in your owl drawing, transforming it from a sketch into a lifelike representation. Skilled artists will tell you that the devil is in the details, and it is often the final touch-ups and the artful placement of highlights that make your creation truly come to life. Firstly, doubling on the details is important during this stage. Enhance the unique textures on the owl's body that you might have overlooked earlier. For instance, focus on the plumage of the owl, which may appear rough and layered in some areas, and soft and smooth in others. By effectively capturing these contrasts, your drawing will exhibit a comprehensive portrayal of the owl's distinct features. Subsequently, utilize erasers or white pastels to add highlights to your drawing. Small dots or lines strategically placed on the eye or beak can represent light reflection and provide a keen sense of realism. These crucial elements can draw attention towards the most detailed and meticulously crafted portions of your creation, thereby amplifying the overall effect. Moreover, highlighting the edges of the feathers creates a sheen, suggesting that the feathers are catching the light, an intricate detail that enhances the bird's lifelike appeal. In addition to creating depth and texture, strategically placed shadows can indicate the position and intensity of light falling on the owl, thereby creating a three-dimensional effect. For instance, if the light source is coming from the right, the left side of the owl will be darker. It's important to remain consistent with this throughout your drawing. Embellishing your artwork with these final strokes may seem subtle, but collectively they add an impactful realistic effect. So, take your time, evaluate your work from various angles, and incorporate these touch-ups and highlights where necessary. These final modifications are akin to adding sparkle to a gem, illuminating the realistic features of the owl and taking the viewer on an immersive, visual storytelling journey. Remember, with every stroke, you breathe more life into your drawing and art, embodying the essence of the owl, and showcasing your nuanced understanding of this magnificent creature.