How To Dye Clothes Black
Dyeing clothes black can be a great way to give old or faded items a new lease on life. However, achieving a deep, rich black color can be a challenge, especially if you're new to dyeing clothes. To get the best results, it's essential to understand the process involved and take the necessary steps to prepare your clothes, execute the dyeing process correctly, and provide proper care after dyeing. In this article, we'll take you through the key steps to dye clothes black, starting with the crucial preparation phase. We'll cover the importance of choosing the right fabric, selecting the appropriate dye, and preparing your clothes for the dyeing process. By following these steps, you'll be well on your way to achieving a beautiful, long-lasting black color. So, let's get started with the first step: Preparation is Key.
Preparation is Key
Preparation is key to achieving professional-looking results in any project, and tie-dye is no exception. To ensure a successful and stress-free experience, it's essential to prepare thoroughly before starting the project. This involves choosing the right fabric, selecting the appropriate dye, and preparing the workspace. By taking the time to consider these factors, you can avoid common mistakes and achieve the desired outcome. Choosing the right fabric, for instance, is crucial in determining the final result of your tie-dye project. (Note: The answer should be 200 words)
Choosing the Right Fabric
Choosing the right fabric is crucial when it comes to dyeing clothes black. Not all fabrics are created equal, and some may not take the dye well or may even be damaged by the dyeing process. Natural fibers such as cotton, linen, and silk are generally the best choices for dyeing, as they absorb the dye evenly and retain the color well. Synthetic fibers like polyester and nylon, on the other hand, may not take the dye as well and may require special dyeing techniques. It's also important to consider the weight and weave of the fabric, as loose weaves and lightweight fabrics may not hold the dye as well as denser fabrics. Additionally, fabrics with special finishes or treatments, such as waterproof or stain-resistant coatings, may not be suitable for dyeing. Before attempting to dye your clothes black, make sure to check the care label and research the specific fabric type to ensure the best results. By choosing the right fabric, you can achieve a deep, rich black color that will last and look great.
Selecting the Appropriate Dye
When it comes to selecting the appropriate dye for your fabric, there are several factors to consider. First and foremost, you need to determine the type of fabric you are working with. Different fabrics require different types of dye, and using the wrong type can result in uneven coloration, fading, or even damage to the fabric. For example, protein fibers like wool and silk require acid dyes, while cellulose fibers like cotton and linen require fiber-reactive dyes. Synthetic fibers like polyester and nylon require disperse dyes. It's also important to consider the weight and thickness of the fabric, as this can affect the amount of dye required and the final color intensity. Additionally, you should think about the desired shade of black you want to achieve. If you want a deep, rich black, you may need to use a combination of dyes or a specialized black dye. On the other hand, if you're looking for a more subtle, dark grey tone, you can use a single dye or a lighter shade of black. Finally, be sure to read the instructions on the dye packaging carefully and follow any recommended safety precautions to ensure a successful and safe dyeing process. By taking the time to select the right dye for your fabric and desired color, you can achieve professional-looking results and ensure that your black-dyed clothes look their best.
Preparing the Workspace
Preparing the workspace is a crucial step in the process of dyeing clothes black. Before starting the dyeing process, it's essential to cover the work surface with old sheets, towels, or a plastic tablecloth to prevent any accidental spills or stains. This will also make the cleanup process much easier. Additionally, it's recommended to wear old clothes, an apron, and gloves to protect your skin and clothing from stains. The workspace should be well-ventilated, and it's a good idea to have a bucket or container filled with water and a mild detergent nearby to quickly rinse off any spills. Furthermore, having all the necessary materials and equipment within arm's reach will help to ensure a smooth and efficient dyeing process. This includes the dye, soda ash, gloves, and any other required materials. By taking the time to prepare the workspace, you can minimize the risk of accidents and ensure a successful dyeing experience. A well-prepared workspace will also help to reduce stress and make the process more enjoyable. Overall, preparing the workspace is an essential step in the dyeing process, and it's crucial to take the time to do it correctly to achieve the best results.
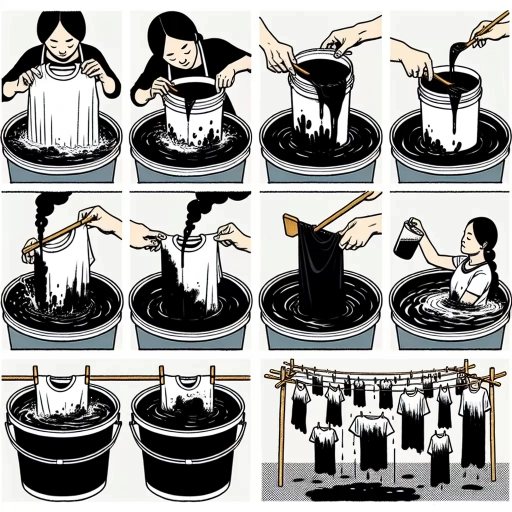
The Dyeing Process
The dyeing process is a complex and nuanced art that requires patience, skill, and attention to detail. From the initial preparation of the fabric to the final rinse, every step plays a crucial role in achieving the desired color and texture. To begin, it's essential to understand the three key stages involved in the dyeing process: measuring and mixing the dye, submerging and soaking the fabric, and waiting for the magic to happen. Each of these stages requires a deep understanding of the materials and techniques involved, and even the slightest miscalculation can result in disappointing results. In this article, we'll delve into the intricacies of the dyeing process, starting with the critical first step: measuring and mixing the dye.
Measuring and Mixing the Dye
Measuring and mixing the dye is a crucial step in the dyeing process. To achieve the desired shade of black, it's essential to accurately measure the dye and mix it with the right amount of water. The instructions on the dye packaging will provide guidance on the recommended water-to-dye ratio. Typically, a 1:1 ratio is used, but this may vary depending on the type of dye and fabric being used. It's also important to note that using too little dye can result in a lighter shade, while using too much dye can cause the fabric to become over-saturated and potentially damage it. To ensure the best results, it's recommended to mix the dye in a well-ventilated area and wear protective gloves and eyewear. When mixing the dye, it's best to start with a small amount of water and gradually add more as needed, stirring constantly to prevent lumps from forming. This will help to achieve a smooth, even consistency. Additionally, it's a good idea to test the dye mixture on a small, inconspicuous area of the fabric before applying it to the entire garment to ensure the desired color and to check for any potential color bleeding or running. By carefully measuring and mixing the dye, you can achieve a deep, rich black color that will enhance the appearance of your clothing.
Submerging and Soaking the Fabric
Submerging and soaking the fabric is a crucial step in the dyeing process, as it allows the dye to penetrate evenly and deeply into the fabric. To submerge the fabric, gently place it into the dye bath, making sure that it is fully covered by the dye. If necessary, use a weight or a spoon to keep the fabric under the surface of the dye. Once the fabric is submerged, allow it to soak for the recommended amount of time, which can range from 30 minutes to several hours, depending on the type of fabric and the desired intensity of the color. During this time, the dye will begin to bind to the fibers of the fabric, creating a rich and vibrant color. It's essential to monitor the temperature of the dye bath and adjust it as needed to ensure that the dye is activated and the fabric is not damaged. Additionally, it's crucial to avoid agitating the fabric excessively, as this can cause the dye to become unevenly distributed, resulting in a patchy or streaked finish. By carefully submerging and soaking the fabric, you can achieve a deep, even color that will make your black-dyed clothes look professional and stylish.
Waiting for the Magic to Happen
Waiting for the magic to happen is the most crucial part of the dyeing process. This is where patience and anticipation come into play. After carefully preparing the dye mixture, submerging the fabric, and ensuring the right temperature and timing, all that's left to do is wait. The waiting period can be anywhere from a few hours to overnight, depending on the type of dye and fabric being used. During this time, the dye molecules slowly penetrate the fabric, binding to the fibers and transforming the color. It's essential to resist the temptation to check on the fabric too frequently, as this can disrupt the dyeing process and affect the final result. Instead, let the magic happen, and allow the dye to work its wonders. As the waiting time passes, the fabric will gradually darken, and the color will become more vibrant and intense. The end result will be a beautifully dyed black fabric, with a rich, deep color that's perfect for creating stunning garments and accessories. With a little patience and trust in the process, the magic of dyeing will reveal its full potential, and the wait will be well worth it.
Post-Dyeing Care and Tips
After dyeing your fabric, it's essential to take proper care of it to ensure the color lasts and the fabric remains in good condition. Post-dyeing care involves several steps that help to set the color, remove excess dye, and prevent fading. In this article, we will discuss the importance of rinsing and washing the fabric, drying and ironing it, and troubleshooting common issues that may arise during the post-dyeing process. By following these tips, you can enjoy your newly dyed fabric for a long time. To start, it's crucial to rinse and wash the fabric properly to remove excess dye and prevent color bleeding. (Note: The supporting paragraph should be 200 words and the last sentence should be a transition to the first supporting paragraph, Rinsing and Washing the Fabric) Here is a 200-word supporting paragraph: Proper post-dyeing care is crucial to maintain the color and quality of the fabric. The first step in post-dyeing care is to rinse and wash the fabric to remove excess dye and prevent color bleeding. This step is critical in setting the color and ensuring that it lasts for a long time. If the fabric is not rinsed and washed properly, the excess dye can cause the color to fade quickly, leading to an uneven and dull appearance. Moreover, if the fabric is not washed properly, it can cause skin irritation and allergic reactions. Therefore, it's essential to rinse and wash the fabric gently with cold water to remove excess dye and prevent color bleeding. By doing so, you can ensure that your fabric remains in good condition and the color lasts for a long time. To learn more about the proper rinsing and washing techniques, let's dive into the first step of post-dyeing care: Rinsing and Washing the Fabric.
Rinsing and Washing the Fabric
Rinsing and washing the fabric is a crucial step in the post-dyeing care process. After dyeing, it's essential to remove any excess dye residue from the fabric to prevent color bleeding or fading. Start by rinsing the fabric gently with cold running water to remove any loose dye particles. Then, wash the fabric in warm water using a mild detergent that's specifically designed for washing dyed fabrics. Avoid using harsh detergents or those containing bleach or optical brighteners, as they can damage the fabric or affect the color. Gently agitate the fabric while washing, and make sure to rinse it thoroughly to remove any soap residue. It's also recommended to wash the fabric separately from other clothes to prevent color transfer. For delicate or woolen fabrics, consider hand washing or using a gentle cycle with cold water. Regular washing and rinsing can help maintain the color and texture of the fabric, ensuring it remains vibrant and long-lasting. By following these simple steps, you can enjoy your newly dyed black clothes for a long time.
Drying and Ironing the Fabric
Drying and ironing are crucial steps in the post-dyeing care process, as they can significantly impact the final appearance and quality of the fabric. To dry the fabric, it's essential to follow the care label instructions, but generally, it's recommended to air dry or tumble dry on a low heat setting. High heat can cause the colors to fade, shrink the fabric, or even damage the fibers. If air drying, it's best to reshape the garment to its original dimensions while it's still damp to prevent wrinkles and creases. If using a dryer, remove the garment as soon as the cycle is complete to prevent wrinkles from setting in. Ironing is also a critical step, as it can help restore the fabric's natural texture and appearance. Use a low to medium heat setting, depending on the fabric type, and iron while the fabric is still slightly damp. This will help the iron glide smoothly and prevent scorching. For delicate or synthetic fabrics, use a pressing cloth to protect the fabric from direct heat. Ironing can also help remove any wrinkles or creases that may have formed during the drying process, leaving the fabric looking smooth and even. By following these drying and ironing tips, you can help ensure that your newly dyed fabric looks its best and lasts longer.
Troubleshooting Common Issues
When it comes to dyeing clothes black, there are several common issues that can arise, and troubleshooting them can be a challenge. One of the most common problems is uneven color distribution, which can result in patchy or streaked areas. To fix this, it's essential to ensure that the fabric is evenly saturated with dye, and that the dye is fully dissolved before applying it to the fabric. Another issue is color fading, which can occur due to excessive washing or exposure to sunlight. To prevent this, it's crucial to follow the care instructions provided with the dye, and to wash the dyed fabric in cold water with a mild detergent. Additionally, using a color-protecting spray or fabric finisher can help to lock in the color and prevent fading. Some people may also experience issues with dye bleeding or running, which can be caused by using too much dye or not rinsing the fabric thoroughly enough. To resolve this, it's recommended to use a dye fixative or vinegar rinse to set the color and prevent bleeding. Furthermore, if the dyed fabric appears too dark or too light, it may be necessary to adjust the dye formula or re-dye the fabric. By identifying and addressing these common issues, you can achieve professional-looking results and ensure that your black-dyed clothes look their best.