How To Make Paper Flowers Easy
Here is the introduction paragraph: Creating paper flowers is a fun and rewarding craft that can add a personal touch to any occasion. Whether you're looking to decorate a wedding, birthday party, or simply brighten up your home, paper flowers are a great way to do so. But, making paper flowers can seem intimidating, especially for beginners. However, with the right guidance, anyone can learn to make beautiful paper flowers. In this article, we will take you through the process of making paper flowers, starting with the basics, then moving on to a step-by-step guide, and finally, providing you with tips and variations to take your paper flower-making skills to the next level. To get started, let's begin by understanding the basics of paper flowers, including the materials and techniques you'll need to get started.
Understanding the Basics of Paper Flowers
Paper flowers have become a popular craft in recent years, and for good reason. Not only are they a beautiful and delicate way to add a touch of elegance to any room, but they are also a fun and creative way to express oneself. However, for those who are new to the world of paper flowers, it can be overwhelming to know where to start. In order to create high-quality paper flowers, it is essential to understand the basics of this craft. This includes choosing the right paper for your flowers, having the basic tools and materials needed, and understanding the different types of paper flowers that can be created. By mastering these fundamental elements, you will be well on your way to creating stunning paper flowers that will impress anyone. So, let's start with the first step: choosing the right paper for your flowers.
Choosing the Right Paper for Your Flowers
When it comes to creating realistic and beautiful paper flowers, choosing the right paper is crucial. The type of paper you select can greatly impact the overall appearance and durability of your flowers. Here are some factors to consider when selecting the right paper for your flowers: color, texture, weight, and finish. For a natural look, opt for paper with a subtle texture that mimics the delicate petals of real flowers. You can choose from a variety of textures, such as smooth, embossed, or even paper with a soft, fabric-like feel. The weight of the paper is also important, as it will affect how easily the petals can be shaped and molded. Generally, a heavier paper is best for creating more realistic flowers, while a lighter paper is better suited for more delicate, whimsical designs. In terms of color, you can choose from a wide range of hues to match your desired flower type. If you want to add an extra touch of realism, consider using paper with a subtle sheen or finish, such as metallic or pearlescent paper. Some popular types of paper for making flowers include crepe paper, tissue paper, and cardstock. Crepe paper is a popular choice for its delicate, ruffled texture and ability to hold its shape well. Tissue paper is another great option, as it is lightweight and easy to work with. Cardstock, on the other hand, is a heavier paper that is ideal for creating more structured, realistic flowers. Ultimately, the right paper for your flowers will depend on the specific design and look you are trying to achieve. By considering factors such as texture, weight, color, and finish, you can choose the perfect paper to bring your paper flowers to life.
Basic Tools and Materials Needed
To get started with making paper flowers, you'll need some basic tools and materials. The essential tools include a pair of scissors, a craft knife or X-Acto knife, a pencil or marker, a ruler or straightedge, and a cutting mat or other protective surface. You'll also need a bone folder or similar tool to help shape and crease the paper. For materials, you'll need paper or cardstock in various colors and textures, depending on the type of flower you want to create. You can use plain paper, patterned paper, or even metallic paper to add some extra shine. Additionally, you may want to have some floral tape, wire, or a hot glue gun on hand to help assemble and attach the flowers to a stem or base. It's also a good idea to have some reference images or tutorials to help guide you through the process. With these basic tools and materials, you'll be well on your way to creating beautiful paper flowers.
Understanding the Different Types of Paper Flowers
Paper flowers come in a wide variety of styles, each with its own unique characteristics and techniques. One of the most popular types of paper flowers is the origami flower, which originated in Japan and involves folding paper to create intricate designs. Another type is the quilled flower, which uses rolled and shaped paper strips to create delicate, lacy patterns. Tissue paper flowers are also a popular choice, often used in Mexican and Indian crafts, and are made by layering and shaping tissue paper to create colorful, textured blooms. Paper roses are a classic choice, often used in wedding decorations and arrangements, and can be made using a variety of techniques, including rolling, folding, and shaping. Other types of paper flowers include crepe paper flowers, which are made using thin, flexible paper and are often used in Chinese and Korean crafts, and paper peonies, which are made using a combination of folding and shaping techniques. Each type of paper flower has its own unique characteristics and requires different techniques and materials, but with practice and patience, anyone can create beautiful and realistic paper flowers.
Step-by-Step Guide to Making Paper Flowers
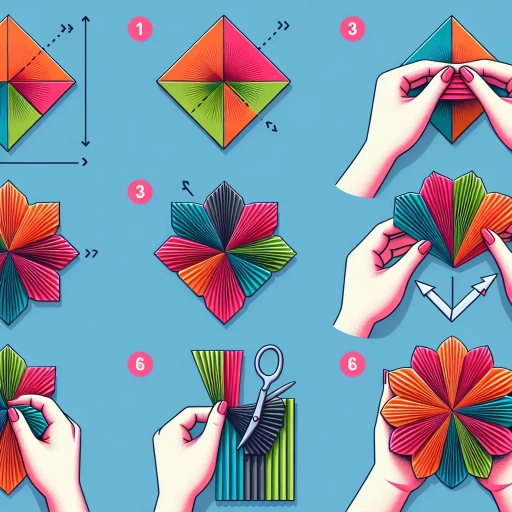
Here is the introduction paragraph: Making paper flowers is a delicate and intricate art form that requires patience, skill, and attention to detail. With the right techniques and materials, you can create beautiful and realistic flowers that can be used to decorate your home, give as gifts, or wear as accessories. In this step-by-step guide, we will walk you through the process of making paper flowers, from creating the center of the flower to shaping and assembling the petals, and finally, adding the finishing touches to your flower. By following these steps, you can create stunning paper flowers that will impress anyone. So, let's start by creating the center of the flower, the foundation of your beautiful paper flower.
Creating the Center of the Flower
To create the center of the flower, you will need to use a combination of techniques and materials. Start by cutting out a small circle of yellow or orange paper, depending on the color you want the center of your flower to be. This circle will serve as the base of the center. Next, cut out a series of small, thin strips of paper in a contrasting color. These strips will be used to create the stamens of the flower. To create the stamens, simply roll each strip into a tight cylinder and secure it with a small dot of glue. Once you have created all of the stamens, arrange them in a circular pattern on top of the yellow or orange circle, making sure to leave a small space in the center. To add some texture and dimension to the center of the flower, you can use a small ball of paper or a paper bead. Simply glue the ball or bead into the center of the stamens, making sure it is secure. Finally, use a small amount of glue to attach the center of the flower to the base of the petals, making sure it is centered and secure. With the center of the flower complete, you can now move on to adding the petals and finishing the flower.
Shaping and Assembling the Petals
To shape and assemble the petals, start by taking one of the petal templates and gently curling it into a natural, curved shape using a tool or your fingers. This will help create a realistic, three-dimensional appearance. Next, take the center of the petal and pinch it together to form a small, tight cluster. This will help the petal hold its shape and prevent it from unfolding. Repeat this process with the remaining petals, making sure to vary the size and shape of each one to create a natural, organic look. Once all the petals are shaped, begin assembling the flower by attaching the largest petals to the center of the stem using a small dot of glue. Work your way around the stem, adding each petal in a slightly overlapping pattern to create a full, lush appearance. As you add each petal, gently shape and adjust it to fit snugly against the one below it, making sure to maintain a natural, curved shape. Continue adding petals until you reach the desired fullness and shape, then finish the flower by adding a few delicate, curved petals to the outer edges to create a soft, romantic appearance.
Adding the Finishing Touches to Your Flower
Adding the finishing touches to your flower is the final step in bringing your paper flower to life. This is where you can get creative and add the details that make your flower truly unique. Start by adding the center of the flower, which can be a small cluster of stamens, a bead, or even a small piece of glitter. This will give your flower a realistic and eye-catching center. Next, add some texture and dimension to your petals by gently curling or ruffling them. You can also add some subtle shading or color variation to give your flower a more natural look. Finally, add some finishing touches such as a stem, leaves, or a decorative base to complete your flower. With these final details, your paper flower will be transformed into a beautiful and realistic bloom that will add a touch of elegance to any arrangement or decoration.
Tips and Variations for Making Paper Flowers
Paper flowers are a beautiful and delicate craft that can add a touch of elegance to any occasion. With a few simple materials and some basic techniques, you can create stunning paper flowers that rival their real-life counterparts. One of the best things about making paper flowers is the ability to customize them to fit your personal style and the occasion. In this article, we'll explore some tips and variations for making paper flowers, including using different colors and textures to add depth, experimenting with different shapes and sizes, and adding embellishments and decorations to your flowers. By incorporating these techniques into your paper flower making, you can create truly unique and eye-catching pieces. For example, using different colors and textures can add a level of sophistication and visual interest to your flowers, making them perfect for special occasions or as a decorative accent for your home. By experimenting with different colors and textures, you can create a wide range of effects, from subtle and understated to bold and eye-catching.
Using Different Colors and Textures to Add Depth
Using different colors and textures is a great way to add depth and visual interest to your paper flowers. You can experiment with various colors, patterns, and textures to create a unique and eye-catching look. For example, you can use metallic paper to add a touch of luxury and sophistication, or use pastel colors to create a soft and romantic look. You can also mix and match different textures, such as smooth paper, glitter paper, or even fabric, to add depth and dimension to your flowers. Additionally, you can use different colors and textures to create a sense of movement and energy in your arrangement, such as using bright colors and bold patterns to create a dynamic and playful look. By incorporating different colors and textures into your paper flowers, you can create a truly one-of-a-kind piece that reflects your personal style and creativity.
Experimenting with Different Shapes and Sizes
Experimenting with different shapes and sizes is a great way to add variety to your paper flowers and make them more visually interesting. To create different shapes, you can try using different folding techniques or adjusting the size of your paper strips. For example, you can use a accordion fold to create a more textured, 3D effect, or a simple fold to create a more delicate, flat shape. You can also experiment with different petal shapes, such as teardrops, ovals, or even squares. In terms of size, you can create flowers that range from small and dainty to large and showy, depending on the size of your paper strips and the number of petals you use. To create a more realistic look, you can also experiment with layering different sizes and shapes of flowers together. For example, you can create a large, showy flower and then surround it with smaller, more delicate flowers to create a bouquet effect. By experimenting with different shapes and sizes, you can create a wide range of unique and beautiful paper flowers that reflect your personal style and creativity.
Adding Embellishments and Decorations to Your Flowers
Adding embellishments and decorations to your paper flowers can elevate their beauty and make them more visually appealing. One way to add embellishments is by using floral tape, which comes in various colors and textures, to wrap around the stem of the flower. This not only adds a decorative touch but also helps to secure the petals in place. Another way to add embellishments is by using glue to attach small decorative items such as rhinestones, beads, or sequins to the center of the flower or along the edges of the petals. You can also use paint or markers to add color and patterns to the flowers, or use a mixture of glitter and glue to create a sparkly effect. Additionally, you can use ribbons or lace to create a beautiful and delicate look, or use a hot glue gun to attach small decorative items such as bows or flowers to the stem of the flower. By experimenting with different embellishments and decorations, you can create unique and personalized paper flowers that reflect your style and creativity.