How To Draw A Buffalo
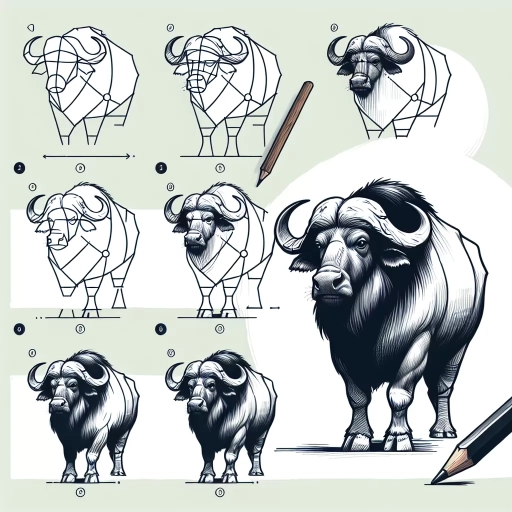
Here is the introduction paragraph: Drawing a buffalo can be a fun and rewarding experience, especially when you have a clear understanding of the animal's anatomy and key features. To create a realistic and detailed drawing of a buffalo, it's essential to start with the basics and work your way up. In this article, we'll take you through the process of drawing a buffalo, from understanding its basic structure to sketching its key features and adding details and texture. We'll begin by exploring the fundamental shape and proportions of a buffalo, including its body, legs, and head. By grasping these basics, you'll be able to create a solid foundation for your drawing and set yourself up for success. So, let's start by understanding the basic structure of a buffalo. Note: I made some minor adjustments to the original text to make it flow better and to ensure it transitions smoothly to the first supporting paragraph.
Understanding the Basic Structure of a Buffalo
Here is the introduction paragraph: The majestic buffalo, with its imposing size and rugged appearance, is a sight to behold. But have you ever stopped to think about the intricate details that make up this magnificent creature? To truly appreciate the beauty and functionality of a buffalo, it's essential to understand its basic structure. By familiarizing yourself with the overall body shape, noting the distinctive features of a buffalo's head, and observing the proportions of the legs and body, you'll gain a deeper appreciation for the unique characteristics that set this animal apart. In this article, we'll delve into the fascinating world of buffalo anatomy, exploring the key components that make up this incredible creature. So, let's begin our journey to Understanding the Basic Structure of a Buffalo.
1. Familiarize yourself with the overall body shape
. Here is the paragraph: Familiarize yourself with the overall body shape of a buffalo. A buffalo's body is typically large and sturdy, with a broad chest and well-developed muscles. The body shape can be broken down into several key components, including the head, neck, shoulders, back, and hindquarters. The head is relatively small compared to the rest of the body, with a short, curved horn protruding from the forehead. The neck is thick and muscular, supporting the weight of the head and horns. The shoulders are broad and powerful, with a distinctive hump of muscle that gives the buffalo its characteristic appearance. The back is long and straight, with a slight dip in the middle, and the hindquarters are well-developed and muscular. By understanding the overall body shape of a buffalo, you can begin to break down the individual components and start drawing the animal with confidence. Start by sketching the overall shape of the body, using simple shapes such as circles, ovals, and rectangles to help you get the proportions right. Pay attention to the proportions of the different body parts, making sure that the head is in proportion to the rest of the body, and that the neck and shoulders are well-defined. With practice and patience, you can develop a more detailed and accurate drawing of a buffalo.
2. Note the distinctive features of a buffalo's head
. The distinctive features of a buffalo's head are a key aspect of its overall appearance. One of the most notable features is the large, curved horns that protrude from the top of the head. These horns are typically dark in color and can be quite long, sometimes reaching up to 2 feet in length. The horns are made of keratin, the same protein that makes up human hair and nails, and are used for defense, intimidation, and even attracting mates. Another distinctive feature of a buffalo's head is its large, floppy ears. These ears are extremely mobile, allowing the buffalo to swivel them independently to pinpoint sounds and detect potential threats. The ears are also covered in a thick layer of fur, which helps to protect them from the elements. The buffalo's eyes are relatively small compared to its overall head size, but they are positioned on the sides of the head, giving the animal a wide field of vision. The nose is broad and flat, with two large nostrils that are highly sensitive to smells. The mouth is relatively small, with a distinctive set of teeth that are designed for grinding and crushing tough plant material. Overall, the buffalo's head is a remarkable example of evolutionary adaptation, with each feature playing a crucial role in the animal's survival and success. By carefully observing and rendering these distinctive features, artists can create a realistic and compelling portrait of a buffalo.
3. Observe the proportions of the legs and body
. Here is the paragraphy: When drawing a buffalo, it's essential to observe the proportions of the legs and body. The legs of a buffalo are relatively short compared to its body, with the front legs being slightly shorter than the hind legs. The body of a buffalo is large and muscular, with a prominent hump on its back. The hump is actually a reservoir of fatty tissue that helps the buffalo survive during times of scarcity. The body should be drawn with a gentle curve, with the back sloping downwards towards the hindquarters. The legs should be drawn in proportion to the body, with the front legs being positioned slightly forward of the body's centerline. The hooves should be small and oval-shaped, with a slight curve to them. By observing the proportions of the legs and body, you can create a more accurate and realistic drawing of a buffalo.
Sketching the Key Features of a Buffalo
Here is the introduction paragraph: The majestic buffalo, with its imposing physique and distinctive features, is a popular subject for artists and sketchers alike. To capture the essence of this magnificent creature, it's essential to focus on its key characteristics. When sketching a buffalo, there are three crucial elements to consider: the curved horns and facial features, the distinctive hump on its back, and the shaggy coat and tail. By mastering these features, you'll be able to create a realistic and captivating representation of this incredible animal. In this article, we'll delve into the world of buffalo sketching, exploring the techniques and tips necessary to bring this magnificent creature to life on paper. By the end of this article, you'll have a deeper understanding of the basic structure of a buffalo, allowing you to create stunning sketches that showcase its unique beauty and majesty.
1. Draw the curved horns and facial features
. Here is the paragraphy: To draw the curved horns and facial features of a buffalo, start by sketching the overall shape of the horns. Imagine two curved triangles that protrude from the top of the buffalo's head, with the base of the triangles touching the head and the tips pointing upwards. The horns should be slightly asymmetrical, with one horn slightly larger than the other. Next, add the facial features, starting with the eyes. Draw two small circles for the eyes, making sure to leave enough space between them to accommodate the nose and mouth. The eyes should be positioned on either side of the head, about one-third of the way down from the top of the horns. Draw a small oval shape for the nose, making sure it is centered between the eyes. The mouth should be a small, curved line that follows the shape of the jawline. Add some texture to the horns by drawing short, curved lines that follow the shape of the horn. You can also add some wrinkles to the face by drawing short, curved lines around the eyes and mouth. Finally, add some shading to the horns and facial features to give them depth and dimension. Use a range of values, from light to dark, to create a sense of volume and texture. By following these steps, you should be able to create a realistic and detailed drawing of a buffalo's curved horns and facial features.
2. Add the distinctive hump on the buffalo's back
. The distinctive hump on the buffalo's back is one of its most recognizable features. This hump is actually a mass of muscle that allows the buffalo to move its head and horns with great flexibility. To draw the hump, start by adding a curved line to the top of the buffalo's back, just behind the neck. The curve of the line should be smooth and flowing, with the highest point of the hump located just above the buffalo's shoulders. From there, add a series of gentle, rounded lines that follow the contours of the hump, giving it a soft and muscular appearance. Be sure to vary the thickness of the lines to create a sense of depth and dimension, with the thickest lines at the base of the hump and the thinnest lines at the top. As you add the hump to your drawing, pay attention to its relationship to the rest of the buffalo's body, making sure that it is in proportion to the animal's overall size and shape. With the hump in place, your buffalo is starting to take shape, and you can begin to add the final details that will bring it to life.
3. Sketch the shaggy coat and tail
. The shaggy coat and tail of a buffalo are two of its most distinctive features. To sketch these, start by adding a layer of fur to the body, using short, curved lines that follow the contours of the animal's shape. The fur should be longest on the shoulders, back, and hips, with shorter fur on the legs and belly. Use a range of values to suggest the texture and depth of the fur, with darker lines indicating the shadows and lighter lines suggesting the highlights. For the tail, use a long, curved line that tapers to a point at the end. The tail should be thick and shaggy, with a distinctive tuft of fur at the end. Use a series of short, curved lines to suggest the texture of the tail, and add a few longer lines to indicate the flow of the fur. To add some movement and energy to the drawing, you can also suggest the way the tail is swishing back and forth, using a few loose, expressive lines. Overall, the shaggy coat and tail of a buffalo are key features that help to bring the animal to life, and with a little practice, you should be able to capture their texture and movement in your drawing.
Adding Details and Texture to Your Buffalo Drawing
Here is the introduction paragraph: When it comes to drawing a buffalo, capturing its rugged and majestic appearance is key. While understanding the basic structure of a buffalo is essential, adding details and texture can elevate your drawing from a simple outline to a lifelike representation. To achieve this, there are several techniques to focus on. Firstly, adding wrinkles and folds to the skin can give your buffalo a more weathered and aged look. Secondly, defining the muscles and joints can help convey the animal's strength and power. Finally, incorporating texture and pattern to the coat can add depth and visual interest to your drawing. By mastering these techniques, you can create a buffalo drawing that is not only accurate but also engaging and detailed. Understanding the basic structure of a buffalo is a great starting point, but it's the addition of these details and textures that will truly bring your drawing to life.
1. Add wrinkles and folds to the skin
. Here is the paragraphy:
Adding wrinkles and folds to the skin can add depth and realism to your buffalo drawing. Start by identifying the areas where the skin would naturally wrinkle, such as around the eyes, mouth, and joints. Use short, curved lines to suggest the wrinkles, making sure to vary the length and depth of the lines to create a natural, organic look. You can also add folds to the skin, particularly around the neck and shoulders, where the buffalo's thick hide would naturally crease. To create folds, use gentle, flowing lines that follow the contours of the body, making sure to capture the soft, rounded shapes of the buffalo's skin. As you add wrinkles and folds, pay attention to the way they interact with the surrounding fur, making sure to blend the edges of the wrinkles and folds seamlessly into the surrounding texture. By adding these details, you can create a rich, tactile quality to your buffalo drawing that invites the viewer to touch.
2. Define the muscles and joints
. Here is the paragraphy: When drawing a buffalo, it's essential to understand the anatomy of its muscles and joints. The buffalo's body is composed of powerful muscles that enable it to move its massive body with ease. The muscles in the buffalo's neck, back, and legs are particularly well-developed, allowing it to support its heavy body and move with agility. The joints in the buffalo's legs, such as the knees and ankles, are also crucial in facilitating its movement. The knees are designed to absorb shock and distribute the buffalo's weight evenly, while the ankles provide flexibility and stability. By accurately depicting the muscles and joints in your drawing, you can create a more realistic and dynamic representation of the buffalo. Pay attention to the way the muscles bulge and contract, and how the joints move in relation to the surrounding muscles. This attention to detail will help bring your drawing to life and give it a sense of movement and energy. Additionally, understanding the anatomy of the buffalo's muscles and joints will also help you to accurately depict its posture and movement, whether it's standing, walking, or running. By combining this knowledge with your artistic skills, you can create a truly impressive and realistic drawing of a buffalo.
3. Incorporate texture and pattern to the coat
. Here is the paragraphy:
When it comes to adding texture and pattern to your buffalo's coat, there are a few key things to keep in mind. First, buffalo have a thick, shaggy coat that is made up of two layers: a thick undercoat and a longer, guard hair layer. The undercoat is soft and dense, while the guard hairs are longer and more coarse. To capture this texture in your drawing, try using a combination of short, curved lines for the undercoat and longer, more flowing lines for the guard hairs. You can also add some texture to the coat by suggesting the presence of individual hairs, using short, broken lines to indicate the direction and length of the hairs. In terms of pattern, buffalo coats can vary in color, but they often have a distinctive pattern of darker and lighter areas. The darker areas are usually found on the back and shoulders, while the lighter areas are on the belly and face. To capture this pattern in your drawing, try using a range of values (light and dark) to suggest the different colors and textures of the coat. You can also add some subtle shading to suggest the contours of the buffalo's body beneath the coat. By incorporating texture and pattern into your drawing, you can add depth and interest to your buffalo's coat, and create a more realistic and engaging portrait.