How To Draw A Lizard
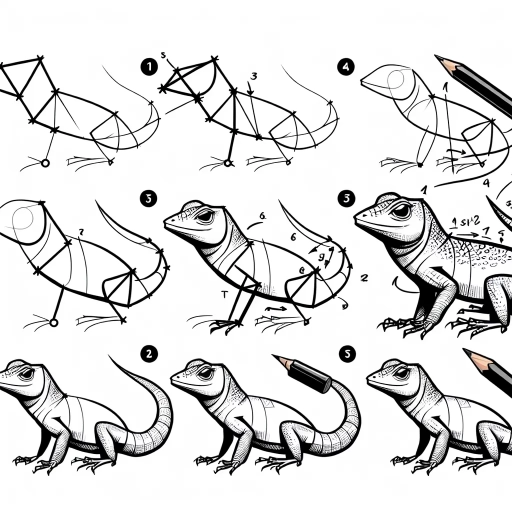
Here is the introduction paragraph: Drawing a lizard can be a fun and creative activity, but it requires some knowledge of its anatomy and proportions. To create a realistic and detailed lizard drawing, you need to understand the different parts of its body and how they relate to each other. In this article, we will guide you through the process of drawing a lizard, starting with understanding its anatomy, then sketching its proportions and features, and finally adding details and texture to bring your drawing to life. By following these steps, you will be able to create a high-quality lizard drawing that showcases your artistic skills. So, let's start by understanding the anatomy of a lizard, which is essential for creating a realistic and accurate drawing.
Understanding Lizard Anatomy
Lizards are fascinating creatures that have been on our planet for over 200 million years, with over 3,000 species spread across the globe. To truly appreciate these incredible animals, it's essential to understand their anatomy. By studying lizard anatomy, we can gain insights into their behavior, habitat, and evolution. In this article, we will delve into the world of lizard anatomy, exploring their body structure, scales and skin texture, and posture and movement. We will start by familiarizing ourselves with the lizard body structure, which will provide a foundation for understanding their unique characteristics. By examining the different parts of a lizard's body, we can better comprehend how they function and adapt to their environment. Let's begin our journey into the world of lizard anatomy by taking a closer look at their body structure.
Familiarizing with Lizard Body Structure
Familiarizing with Lizard Body Structure Lizards have a unique body structure that is adapted to their environment and lifestyle. The body of a lizard is typically divided into three main parts: the head, the trunk, and the tail. The head is characterized by a short, broad snout, and a pair of eyes that are usually positioned on the sides of the head. The trunk is the main body of the lizard, and it contains the internal organs, including the heart, lungs, and digestive system. The tail is a long, slender extension of the body that is used for balance, communication, and defense. Lizards also have four limbs, which are usually positioned under the body and are used for movement, climbing, and grasping. The limbs are typically equipped with sharp claws, which are used for digging, climbing, and defending against predators. The skin of a lizard is usually dry and scaly, and it is covered in small, hard plates called scales. These scales provide protection against the environment and help to reduce water loss. Some lizards also have a dewlap, which is a flap of skin on the throat that is used for communication and display. Understanding the body structure of a lizard is essential for drawing a realistic and accurate representation of these fascinating creatures.
Studying Lizard Scales and Skin Texture
Studying lizard scales and skin texture is a crucial step in understanding their anatomy and creating realistic drawings. Lizards have unique scales that vary in shape, size, and texture, depending on the species. Some lizards have smooth, shiny scales, while others have rough, bumpy, or even spiky scales. The texture of a lizard's skin can also vary, with some having soft, scaly skin, while others have rough, leathery skin. To accurately draw a lizard, it's essential to observe and study the different types of scales and skin textures found on various species. This can be done by looking at pictures or observing lizards in person. By studying the patterns, shapes, and textures of lizard scales and skin, artists can create more realistic and detailed drawings. Additionally, understanding the anatomy of lizard scales and skin can also help artists to better capture the movement and flexibility of these animals in their drawings. For example, the way a lizard's scales overlap and move as it bends or stretches can be accurately depicted by studying the texture and pattern of its skin. By combining this knowledge with an understanding of lizard anatomy, artists can create drawings that are not only visually appealing but also anatomically accurate.
Observing Lizard Posture and Movement
Observing lizard posture and movement is crucial in understanding their anatomy and behavior. Lizards are ectothermic, meaning they regulate their body temperature using external sources, such as the sun or a warm rock. As a result, they often bask in the sun with their bodies stretched out, exposing their skin to the warmth. This posture is characterized by a flat, horizontal body position, with the legs splayed out to the sides and the tail extended behind. When moving, lizards use a variety of gaits, including walking, running, and climbing. They are able to move quickly and efficiently due to their powerful leg muscles and sharp claws. Some species of lizards, such as geckos and chameleons, are also able to climb vertical surfaces and even hang upside down from branches. By observing the posture and movement of lizards, artists can gain a deeper understanding of their anatomy and behavior, allowing them to create more accurate and detailed drawings. Additionally, studying the movement patterns of lizards can help artists capture their dynamic and energetic nature, bringing their drawings to life.
Sketching Lizard Proportions and Features
Sketching a lizard can be a fun and creative activity, but it requires attention to detail and accuracy to capture its unique proportions and features. To create a realistic and engaging lizard sketch, it's essential to understand the basics of lizard anatomy and how to translate that into a drawing. In this article, we'll explore the key elements of sketching lizard proportions and features, including measuring and drawing the body proportions, adding facial features and expressions, and sketching the limbs and claws. By mastering these techniques, you'll be able to create a detailed and lifelike lizard sketch that showcases its unique characteristics. So, let's start by exploring the foundation of a lizard sketch: measuring and drawing the body proportions.
Measuring and Drawing Lizard Body Proportions
Measuring and drawing lizard body proportions is a crucial step in creating an accurate and realistic drawing. To start, observe the overall shape of the lizard's body, taking note of its length, width, and any distinctive features such as a long tail or spiky scales. Measure the length of the lizard's body from the tip of the snout to the base of the tail, and divide it into sections to help you draw the proportions accurately. Typically, a lizard's body can be divided into three main sections: the head, body, and tail. The head is usually about one-quarter to one-third of the total body length, while the body makes up about half to two-thirds of the total length. The tail is usually the longest section, making up about one-quarter to one-third of the total length. When drawing the body proportions, pay attention to the lizard's posture and the way it holds its body. Some lizards, such as geckos, have a more upright posture, while others, such as skinks, have a more horizontal posture. Use simple shapes, such as circles, ovals, and rectangles, to help you draw the body proportions accurately. For example, you can use a circle for the head, an oval for the body, and a rectangle for the tail. By measuring and drawing the lizard's body proportions accurately, you can create a realistic and detailed drawing that captures the unique characteristics of your subject.
Adding Facial Features and Expressions
When adding facial features and expressions to your lizard drawing, start by defining the shape of the eyes, which are typically large and rounded. The eyes should be positioned on either side of the head, with the top of the eye aligned with the top of the skull. The pupils can be small and circular, or larger and more oval-shaped, depending on the species of lizard you are drawing. Next, add the nostrils, which are usually small and rounded, and positioned on either side of the head, just below the eyes. The mouth can be a simple curved line, or a more complex shape with lips and a tongue. To add expression to your lizard's face, you can adjust the shape of the eyes and mouth. For example, a happy lizard might have a curved mouth and wide, open eyes, while a threatened lizard might have a straight mouth and narrowed eyes. You can also add texture and detail to the face, such as scales, wrinkles, or a distinctive pattern of markings. By paying attention to these details, you can create a lizard drawing that is not only anatomically accurate, but also full of personality and character.
Sketching Lizard Limbs and Claws
When sketching lizard limbs and claws, it's essential to understand their unique characteristics and proportions. Lizards have a wide range of limb shapes and sizes, but most have a similar skeletal structure. Start by sketching the overall shape of the limb, paying attention to the proportions of the upper arm, forearm, and hand or foot. The upper arm is usually shorter than the forearm, and the hand or foot is typically smaller than the rest of the limb. Next, add the claws, which are usually curved and tapered, with the largest claws on the hind legs. The number and shape of claws can vary depending on the species, so be sure to research the specific lizard you're drawing. When sketching the claws, pay attention to the way they curve and interact with the surrounding skin and scales. You can also add texture and detail to the claws by suggesting the ridges and grooves that run along their length. Finally, don't forget to add the joints and muscles that connect the limbs to the body, giving your lizard a sense of movement and flexibility. By paying attention to these details, you can create a realistic and engaging sketch of a lizard's limbs and claws.
Adding Details and Texture to Your Lizard Drawing
When it comes to drawing a lizard, it's the little details that can make all the difference between a good drawing and a great one. Adding texture and details to your lizard drawing can help bring it to life and make it more engaging for the viewer. To achieve this, there are several key elements to focus on. First, creating realistic scales and skin patterns is crucial in capturing the lizard's unique texture and appearance. Additionally, adding shading and dimension can help create a sense of depth and volume, making the lizard appear more three-dimensional. Finally, incorporating environmental details and context can help to ground the lizard in its natural habitat and add an extra layer of realism. By focusing on these key elements, you can add depth, texture, and interest to your lizard drawing. In this article, we'll start by exploring the importance of creating realistic scales and skin patterns, and provide tips and techniques for achieving this in your drawing.
Creating Realistic Scales and Skin Patterns
Creating realistic scales and skin patterns is a crucial step in adding depth and authenticity to your lizard drawing. To achieve this, start by studying the unique characteristics of the lizard species you're drawing, paying attention to the shape, size, and arrangement of its scales. Notice how the scales overlap, curve, and reflect light, and take note of any distinctive patterns or markings. Next, use a range of pencils and shading techniques to create a textured, three-dimensional effect. Start with a light base layer, using gentle hatching and cross-hatching strokes to suggest the shape and contours of the scales. Gradually build up layers of shading, using darker pencils to create depth and dimension. To add a sense of realism, pay attention to the way the scales catch the light, using highlights and subtle gradations of tone to create a sense of shine and texture. For more intricate patterns, such as the scaly texture of a gecko's skin, use a fine-tip pen or a small brush to create delicate, detailed strokes. By carefully observing and rendering the unique characteristics of your lizard's scales and skin, you can create a drawing that's both visually striking and anatomically accurate.
Adding Shading and Dimension to Your Lizard
Adding shading and dimension to your lizard drawing can elevate it from a flat, two-dimensional image to a vibrant, lifelike representation. To start, identify the light source in your drawing and determine where the shadows will fall. Typically, the light source comes from above, so the shadows will be cast underneath the lizard's features, such as the eyes, nose, and mouth. Use a range of shading techniques, including hatching, cross-hatching, and stippling, to create depth and dimension. Hatching involves creating parallel lines that follow the contours of the lizard's body, while cross-hatching involves layering lines at different angles to create a more textured appearance. Stippling involves creating patterns of small dots to create shading and texture. Pay particular attention to the areas where the lizard's body meets the ground or other surfaces, as these areas will typically be darker and more shaded. You can also use shading to create a sense of volume and weight, by adding deeper shadows to areas where the lizard's body is more rounded or curved. Additionally, consider adding highlights to your drawing, which can be created using a white or light-colored pencil or marker. Highlights can help to create a sense of shine and reflectivity on the lizard's scales, eyes, and other features. By carefully balancing shading and highlights, you can create a drawing that is both detailed and visually appealing.
Incorporating Environmental Details and Context
Incorporating environmental details and context into your lizard drawing can elevate it from a simple illustration to a captivating scene. To achieve this, start by considering the lizard's natural habitat and the elements that would typically surround it. For example, if you're drawing a desert-dwelling lizard, you might include cacti, rocks, and sandy dunes in the background. If your lizard lives in a forest, you could add trees, foliage, and a forest floor. Think about the textures and colors that would be present in the environment and try to incorporate them into your drawing. You could also include other animals that might coexist with your lizard, such as insects, birds, or other reptiles. Additionally, consider the time of day and the lighting conditions that would affect the scene. For instance, a warm sunset might cast a golden glow over the desert landscape, while a misty morning might create a cool, eerie atmosphere in the forest. By incorporating these environmental details and context, you can create a rich and immersive world for your lizard to inhabit, drawing the viewer's eye and sparking their imagination.