How To Cut Cabbage
 In the seemingly boundless world of culinary endeavor, mastering the nuances of handling produce might seem trivial but is quite essential. Within this realm lies an integral skill - knowing how to cut cabbage properly. This article aims to guide you through the art of cabbage cutting, ensuring you get perfectly sliced veggies each time. We start by understanding the basics of selecting and preparing your cabbage for an optimal experience. Following this, we delve into the techniques to slice it efficiently and safely for various culinary contexts. Lastly, preserving the freshness of your cut cabbage is essential to ensure it retains its crunch and flavor. So, we'll also discuss some proven strategies for storing your cut cabbage. As you journey through these sections, remember that every skill, like a good bowl of coleslaw, is tasting separate elements before savoring the combined effect. So, let’s start at the root of it all - understanding how to choose and prepare a cabbage.
Understanding the Basics: How to Choose and Prepare a Cabbage
Understanding the foundational aspects of selecting and preparing a cabbage is essential to enhancing your culinary skills and elevating your dishes. This comprehensive guide aims to assist you in your kitchen endeavors by divulging the secrets of cabbage preparation. Specifically, our discussion will ensue in three pivotal stages. In the first stage, we will walk you through the process of 'Choosing the Perfect Cabbage for Cutting', demystifying the process of picking out the best cabbages in the market. Next, we will transition to 'Properly Cleaning and Preparing the Cabbage', exploring valuable tips and techniques to enhance your safety and efficiency in washing and preparing the vegetable. Lastly, we will delve into 'Why Removing the Core is a Crucial Consideration', unravelling the reasons why this is an often overlooked yet vital part of the process. Each phase will contribute immeasurably to your overall understanding of the how-to's of cabbage. With no further ado, let's get to grips with the first step - unravelling the art of choosing the perfect cabbage for cutting.
Choosing the Perfect Cabbage for Cutting
Choosing the perfect cabbage for cutting is an essential step to myriad culinary experiences. An understanding of the different cabbage types, their tastes, and textures can significantly elevate your kitchen talent and help you create different taste palates effortlessly. The selection process may appear ordinary or even trivial to the undiscerning eye, but it is an integral part of meal preparation, which determines the final taste and texture of your meals. When selecting a cabbage, it’s important to consider what it will be used for. Green cabbage, arguably the most popular type, is crisp and sturdy, making it perfect for slaws or for use in cooking, as it holds its shape well. Red cabbage, slightly more peppery in flavor, is excellent for pickling or adding a vibrant color punch to salads. Savoy cabbage, on the other hand, with its ruffled, lacy texture and milder flavor, is excellent for stuffing and wilting in soups and stews. Look for cabbages that feel dense for their size with bright, crisp leaves. Avoid those with blemishes, cracks, and browning leaves, as these are often signs of age and inferior quality. The outer leaves should be tightly wound, and they should have a shiny look. Upon cutting, the interior should expose a certain degree of moisture, reflecting the vegetable’s freshness and taste. Remember, achieving the perfect cut not only has to do with your knife skills but also the quality of cabbage you're using. A good quality cabbage guarantees that the flavors remain intact even after cooking. Therefore, do not underestimate the impact of this vegetable in your meals. The humble cabbage, when chosen carefully, can transform your dishes from ordinary to extraordinary, adding richness, vibrancy, and nutrition value. Choosing the perfect cabbage for cutting entails more than just grabbing the first one you see at the grocery store. It’s about understanding the flavor profiles, knowing the destination of the cabbage in your meals, and being able to identify the marks of quality and freshness. This simple yet meaningful kitchen act is the start of preparing meals more thoughtfully, eventually enhancing the culinary experience altogether. On your next visit to the market, take an extra second to examine the cabbage - its color, texture, weight, - and you will be one step closer to mastering the art of creating delightful food with a simple, versatile ingredient like the cabbage.
Properly Cleaning and Preparing the Cabbage
Properly cleaning and preparing cabbage is an essential step that can significantly influence the outcome of your dish. As such, it's not just about the recipe; it's also a valuable part of understanding cabbage's basic handling and preparation secrets. Firstly, ensure you choose firm, dense heads with vividly colored, crisp leaves. Avoid those with drying or browning leaves, which could be signs of age and diminished quality. Next, we're onto the cleaning process. Most might think that since the outer layers are often disposed of, there's no need for their washing. However, it's commendable to clean every product right away, as it's likely been exposed to different environments during transportation, storage, and display. In doing so, consider soaking your cabbage head in a vinegar and water solution for a few minutes. This mixture aids the detachment of dirt and potential pesticide residues, without compromising the cabbage's crispiness. Afterward, rinse under running water to eliminate any vinegar-taste. Preparing cabbage follows cleaning. You'll begin by removing the outer leaves, in case they're damaged or discolored, and discard the tough, fibrous stem by using a sharp knife to carve it out. Cutting cabbage can vary based on your recipe requirements. If the dish calls for shredded cabbage, quarter the head first for better control and then thinly slice. For chunkier pieces, cut the quarters into the desired thickness. Remember to keep your slices consistent to ensure even cooking. Throughout this process, attention to detail, patience, and precision are non-negotiable elements. They are as critical as the selection of the cabbage head itself. By knowing the right techniques, you're on your way to change a seemingly mundane ingredient into something extraordinarily delicious and nutritious; proving yet again that understanding the basics can make a world of difference in your cooking adventures. However you've chosen to cut your cabbage, whether it's shredded, julienned, or quartered, each method transforms this hearty vegetable into a canvas waiting to absorb flavors from the elements of your culinary masterpiece.
Why Removing the Core is a Crucial Consideration
The process of preparing a cabbage isn't just about the knife work; a crucial consideration lies in removing the core. This seemingly simple act significantly impacts both the cooking process and the final taste of your cabbage-based dishes. In fact, the core of the cabbage tends to be dense, robust, and often overly bitter, hence the necessity to remove it - but more on that later. Removing the core also ensures even cooking. The core's dense nature means that it doesn't cook at the same rate as the leaves. This could lead to an undesirable texture, where some parts are adequately cooked while others are too stiff or grainy. In dishes that require finely chopped or shredded cabbage, such as a traditional coleslaw or a stir-fry, removal of the core is especially crucial to achieve the desired texture and ease of cooking. Back to the taste, some might argue that leaving the core intact can add a unique bitter undertone to your dishes. However, that's a risky gamble to take. Instead of subtly balancing the other ingredients, the core's particular bitterness can completely overwhelm the dish. By extracting the core, you are therefore left with the flavorsome, sweet, and slightly peppery notes of the cabbage, which tends to pair well with various ingredients and across diverse cuisines. Lastly, removing the core is a critical safety measure. The core's hardness can cause the knife to slip, leading to kitchen accidents. Through its elimination, you can slice through the rest of the cabbage with ease and precision, without having to negotiate the hard, uneven core. So, it is clear that removing the core is an integral step in preparing a cabbage, contributing to the right texture, taste, and safety during the process. In the end, what seems like a minor step creates the difference between an average cabbage dish and one that stands out, revealing the magic hidden in the intricacies of food preparation.
Mastering the Technique: Different Ways to Cut Cabbage
Cabbage, a versatile vegetable that can turn any ordinary meal into an extraordinary one, requires practiced precision to master different cutting techniques. This article will explore the nuances of various cabbage cutting methods, ensuring you're equipped with the knowledge to slice it in whatever way your recipe requires. Our focus will be on three primary techniques: cutting cabbage into thin shreds for coleslaw, slicing it into chunks for stew or roasting, and cutting it into wedges for a quick, easy method. By understanding these techniques, not only will your prep time decrease, but you'll also enhance the overall flavor and presentation of your dish. Our first topic of examination delves into the art of shredding cabbage, a technique synonymous with making coleslaw. This will transform a difficult task into accessible knowledge, turning your coleslaw into a dish to be praised by everyone. Stay tuned!
Cutting Cabbage into Thin Shreds (Coleslaw-Style)
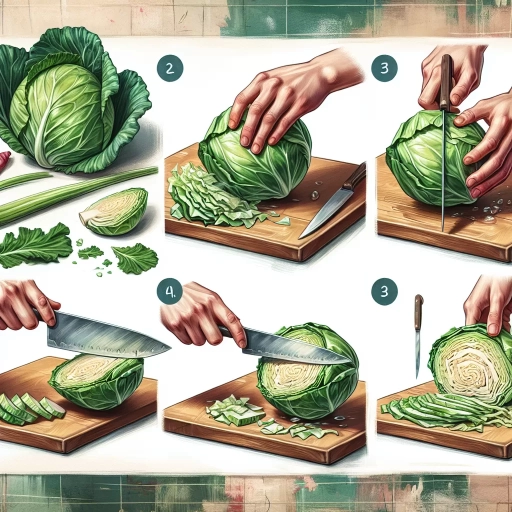
Cabbage, one of the most versatile vegetables, while being a powerhouse of nutrients, often confounds the uninitiated when it comes to its preparation. In particular, transforming this leafy green into thin, coleslaw-style shreds can be a daunting task. However, with the right technique, it's possible to turn this bulbous head into a bed of finely shredded leaves, perfect for a crisp, refreshing coleslaw. To begin with, you would need a sharp knife and a clean cutting board. Before making the initial cut, remove the outer leaves of the cabbage as they are often tough and may carry residual dirt. Once done, slice off the bottom of the head — the stem end — and cut the cabbage into quarters. This would reveal the hard, white core, which although edible, holds a bitter taste and is usually removed. Now begins the critical part. Turn a quarter of the cabbage, so the flat cut side is on the board, while the core end is facing you. Carefully cut diagonally into the cabbage to remove the core. Once this is done, you are left with a wedge of cored cabbage. The key to cutting cabbage into thin strips, or "julienned," is maintaining control over the knife and the cabbage itself. Hold the cored quarter of cabbage with one hand while the other hand employs the knife — remember to always work away from your hand to prevent accidents. With the edge of the knife, make close, parallel cuts along the length of the cabbage quarter, resulting in thin, even shreds. Size can matter. For a coleslaw, you’d generally go for very thin shreds, around 1/8-inch thick. If you want a chunkier slaw, you could widen these shreds. The importance lies in maintaining uniformity in the cut size, ensuring that your coleslaw has a consistent texture and that each bite will be an explosion of freshness and crunch. Mastering this simple and effective technique of cutting cabbage into thin, coleslaw-style shreds, enhances your culinary repertoire. The humble cabbage, thus morphs from a hard, round head to a bowl of delicate, lively shreds, ready to soak up the flavors of your dressing and adding a satisfying crunch to your coleslaw. This simple skill, when practiced, not only infinitely improves the quality of your homemade coleslaw but also opens up a whole host of other cuisines where shredded cabbage takes the center stage.
Cutting Cabbage into Chunks (Stew or Roasting)
In "Mastering the Technique: Different Ways to Cut Cabbage," we cover a vast array of methods to make your cabbage preparation easier, more efficient, and more suitable for a range of dishes. One versatile and simple technique is cutting cabbage into chunks - a method particularly suited for stews or roasting, but equally versatile in salads or stir-fries. Getting the right size and uniformity in your cabbage chunks is crucial to ensure an even consistency when cooking and a pleasing texture while eating. Begin by removing the outer leaves, as they can be tough and might contain dirt. Rinse your cabbage under cold water to wash away any remaining grit. To make cabbage chunks, first, cut your cabbage into quarters. Make a diagonal slash down into each quarter to remove the dense core and discard. This portion is too tough for most recipes and doesn't contribute to a pleasurable eating experience. Now it's time to create your cabbage chunks. The size of your chunks will depend on the exact dish you're cooking. Larger chunks (about 2 inches square) are perfect for slow roasting or dishes that require a longer cooking time, like a stew. These hearty pieces maintain their structure even after lengthy cooking, providing a satisfying bite and absorbing the surrounding flavors in the pot. Smaller cabbage chunks (about 1 inch square) are excellent for quicker cooking methods or for incorporating into a stir-fry, where a more delicate texture is usually preferable. Smaller chunks also bring versatility as they combine more seamlessly in salads and slaws. Remember, uniformity in your chunks is important. Not only does it make for a more professional and visually appealing dish, but chunks of the same size will cook at the same rate, ensuring that every mouthful is perfectly cooked. Having a sharp knife is pivotal in this process, not only for precise control over chunk size but also for safety. Cutting cabbage requires some pressure, so a dull knife can significantly increase the risk of a kitchen mishap. Additionally, a sharper knife produces cleaner cuts, which effectively reduces browning, preserving your cabbage's freshness for longer. Cutting cabbage into chunks might seem like a simple task, but mastering this technique is fundamental not only in elevating your everyday dishes but also in enhancing your kitchen confidence. From adding comfort to a home-cooked stew or bringing vibrant crunchiness to a salad, the method of chunk cutting transcends beyond the realm of cabbages and can be applied to various vegetables, showing its essential role in the culinary world.
Slicing Cabbage into Wedges (Fast and Easy)
Slicing Cabbage into Wedges (Fast and Easy) Mastering how to precisely slice cabbage into wedges can unveil a delightful fusion of crispness and juiciness seldom experienced in other culinary cuts. But, if approached haphazardly, it can turn into a logistically challenging task. Fret not; with a swift method and nifty tricks, you can learn how to execute this process quickly, easily and with utmost precision. To start with, it's essential to carefully select a quality cabbage — look for one that's firm to the touch, refreshingly green, and relatively heavy for its size. Once you have picked the perfect 'green gem', give it a nice rinse under cool water to remove any potential dirt or bugs. Next, starting at the stem end, cut the cabbage into two halves, following down the core. The exposed core will serve as your guide when cutting it into wedges. Taking one-half of your cabbage, place it cut-side down onto your cutting board, providing a steady base. Next, decide on the number of wedges — the more wedges, the thinner they'll be. For a standard wedge cut, divide your cabbage half into three or four sections, slicing at an angle from the core to the outer edge. Always remember to keep your fingers tucked away from the knife's path, ensuring safety. Retaining the core in each wedge is crucial; it holds the leaves together and grants the wedge its firm, satisfyingly crisp texture when cooked. If you find any loose leaves, tuck them back into the wedge or remove them if they're too far gone. Repeat the process with the remaining cabbage half, and voila, you've got yourself a stack of efficiently cut cabbage wedges. This fast and easy technique, when mastered, not only simplifies your meal prep but also drastically enhances the textural elements of your recipes. Cabbage wedges can be grilled, roasted, or even used in soups and stews, providing a hearty and healthy addition to your meals. Remember that practice makes perfect; the first few times may seem tricky, but with each cut, you will be propelling yourself closer to becoming a veritable cabbage-cutting pro. Armed with this know-how, slicing cabbage into wedges won't just be a culinary necessity, but an art form, an expression of your skill, your passion for creating delicious, visually pleasing, and nutritious dishes. So go ahead, lead on with this newfound knowledge and watch as your culinary repertoire expands to unprecedented heights. After all, every great dish begins with mastering basic techniques, and slicing cabbage into wedges is an indispensable one.
Prolonging Freshness: How to Store Cut Cabbage
When it comes to prolonging the freshness of cut cabbage, understanding how to store it correctly is key. Whether you're a home-cook or a professional chef, nobody wants to waste food due to improper storage — especially not a versatile ingredient like cabbage. In this article, we will be exploring three effective methods to keep your cut cabbage fresh for longer periods. First, we'll go over how to store cut cabbage in your refrigerator in an effective manner — a technique everyone can benefit from owing to its simplicity. Next, we'll dive into the technology-driven approach of vacuum-sealing your cabbage for an extended shelf-life. And finally, we will discuss when and how to freeze your cabbage cuts for retaining their freshness, even after months. All of these methods are geared towards minimizing waste, saving money, and ensuring the availability of fresh cabbage whenever you need. Let's begin by uncovering how your everyday refrigerator can be an effective tool in cabbage preservation.
Store Cut Cabbage in the Refrigerator Effectively
Certainly, here is a 500-word supporting paragraph elaborating on effective storage of cut cabbage in the refrigerator: Keeping cut cabbage fresh in the refrigerator requires careful attention, execution, and maintenance. To achieve a prolonged lifespan of your cut cabbage without destroying its crispness, flavor, or nutritional value, you need to follow some very easy, cost-effective, and time-saving steps. First things first, never wash the cabbage before storing. The moisture from water encourages bacterial growth, decreasing the longevity of your cabbage. Instead, it is generally advised to wash your cabbage right before you prepare it. The best way to store cut cabbage in the refrigerator is by using an airtight container or a tightly sealed plastic bag. If you're using a plastic bag, try to remove as much air from the bag as possible before sealing it. Getting rid of excess air keeps the cabbage from reacting with oxygen, which can degrade its color, texture, and taste over time. Airtight containers are more eco-friendly alternatives, and they can be reused for other food items as well. In essence, creating an environment devoid of oxygen can help in slowing down the enzymatic process, that leads to rotting. Location within the refrigerator also plays a significant role. The vegetable crisper drawers are often the best place for storing cut cabbage. These drawers are explicitly designed to hold produce and maintain some moisture, preventing your cabbage from drying out. Cabbage thrives in slightly humid conditions. Avoid placing cut cabbage near fruits like apples, avocados, and bananas that produce ethylene gas, as this can accelerate ripening and lead to early spoilage. For the cabbage's freshness to last even longer, a smart hack to apply is separating the leaves and wrapping them individually with a paper towel before storing them. This practice controls the build-up of excess moisture which deteriorates the cabbage faster. However, your cabbage shouldn't be too dry either as it may lead to wilting. Achieving the right balance of moisture is key here. Labeling and dating your cabbage once stored will help you track how long it's been in the refrigerator. As a rule of thumb, the sooner you consume the cut cabbage, the better. However, if stored properly, cut cabbage can retain its freshness for up to one to two weeks in the refrigerator. Remember, the quality of stored cabbage may not be the same as fresh cabbage, but it will still be reasonably good and will add value to your meals in terms of taste and health benefits. Incorporating these steps into your kitchen routine will help you minimize waste, and maximize freshness, leading to stored cabbage that is both delicious and nutritious for longer than you may have initially thought possible.
Using Vacuum Sealing for Longer Shelf-life
Among the myriad of methods to preserve and store fresh cut cabbage, vacuum sealing stands out as a remarkable technique that greatly enhances shelf-life. The vacuum-sealing process, in its most basic form, involves removing the air around the cabbage in a securable bag, creating a tight seal that obstructs the growth of microorganisms and delays oxidation. This specially-designed containment with reduced air exposure slows down the deterioration process, retaining the freshness of the cabbage for a remarkably longer period compared to other storage methods. This powerful preservation technique capitalizes on the fact that bacteria, which are the chief agents in food degradation, thrive primarily in oxygen-rich environments. Therefore, by sucking out the air from the storage bag, you are simultaneously depriving these bacteria of their major blockbuster, thus slowing their multiplication rate on your cabbage. Moreover, vacuum-sealing also helps to preserve the color, texture, and nutritional value of the cut cabbage by preventing unnecessary exposure to harsh environmental conditions and retaining moisture in the process. Investing in a quality vacuum sealer will not only save your cabbage but also aids in reducing overall food waste. Especially when bought in bulk, cabbage often ends up thrown away due to spoilage, but with vacuum sealing, you can store it in smaller, separate batches, preserving its freshness for subsequent use. This preservation method can significantly increase the shelf-life of cut cabbage, making it a valuable addition to a household's long-term food storage scheme. However, while vacuum sealing is a fantastic option for prolonging the freshness of cut cabbage, it's critical to ensure the process is correctly executed. The cabbage should be thoroughly washed and dried before sealing, and the checked for any damaged spots or signs of rot. Also, it's of utmost importance that the sealed bags are stored in an appropriate environment - either in the fridge or freezer, depending on how long you plan to store them. This coupled with regular checks for any possible seal breaches guarantees that your cut cabbage will remain crisp, fresh, and fully nutritious for far longer than when using conventional storage methods.
When and How to Freeze Cut Cabbage
When considering the process of freezing cut cabbage, understanding the when and how is crucial to maintaining the freshness and nutritional quality of this luscibly crisp vegetable. While cabbage may be sturdy, it generally doesn't last beyond a week in the refrigerator once it's been cut into. That's where freezing comes in. The optimum time to freeze cabbage is as soon as it has been cut, as this maximizes the potential for preserving its crunchiness and more essentially, its nutrient content, which may bring a frown if forgotten. Before setting your cabbage in the freezer, there are several steps that ensure its contents are safeguarded and remain enticing for future culinary use. Initially, all cut segments of the cabbage should be thoroughly washed and drained. This is to get rid of any lurking dirt or bacterial components. After it's been thoroughly cleaned, the cabbage needs to be blanched. Blanching, a process of scalding vegetables in boiling water or steam, followed by the shock of an ice bath is vital when freezing cut cabbage. This is capable of preserving the cabbage's texture, color, flavor, and nutritional value; our prime concern. To accomplish this, first, get a large pot of water boiling. Then, introduce the cut cabbage into the boiling water and blanch for about one and a half minutes. This process sufficiently kills enzymes that can deteriorate cabbage over time. Following this, immediately dip the cabbage in a bowl of ice water for the same amount of time it was blanched. Drain the cabbage and dry it to discard excess water content, a possible dense flavor diluter! Consequently, divide your cut, blanched cabbage into convenient portions and pack into freezer-resistant containers or heavy-duty freezer bags. These are often described as our best buddies in the freezer. The container or bag should be sealed tightly; this is crucial to avert freezer burn which can cast a dismal gray color and a taste that’s horrifyingly off. Froze cut cabbage can be kept in the freezer for up to 9 months, thereby allowing you to enjoy this nutrient-rich vegetable out of season. One of the joyous sides of life is having what you crave for when it’s not available anywhere. So, the strategy is to remember to date and label your freezer bags or containers – it helps keep track about ‘when’ they journeyed into the freezer world. Remember, when you are ready to use it, defrosting is not necessary. The frozen cabbage can go directly into your cooking pot, gifting your cabbage dishes with not just its freshness but cabbage’s well-toted health benefits, a clever culinary twist, isn't it? Thus, by understanding the proper moment and method to freeze cut cabbage, the freshness, flavor, texture and nutritious value can be preserved efficiently, paving the way for the all-year-round availability of this green delight – the cabbage. Indeed, learning this craft of freezing cut cabbage is a definitive extension to ‘Prolonging Freshness: How to Store Cut Cabbage'; a savvines, no cabbage-loving kitchen should ever lack!