How To Use Plumbers Putty
Plumbers putty is a versatile and essential tool in the plumbing industry, used to create a watertight seal between pipes and fixtures. However, many DIY enthusiasts and homeowners struggle to use it effectively, leading to leaks and other issues. To master the use of plumbers putty, it's essential to understand the preparation, application, and maintenance techniques involved. In this article, we'll explore the key steps to get the most out of plumbers putty, starting with the crucial preparation phase. By understanding how to prepare the surface, choose the right type of putty, and follow best practices, you'll be well on your way to creating a secure and long-lasting seal. So, let's dive into the first step: Preparation is Key.
Preparation is Key
When it comes to using plumber's putty, preparation is key to ensuring a successful and long-lasting seal. To achieve this, it's essential to consider several factors before application. Firstly, choosing the right type of plumber's putty is crucial, as different types are suited for specific tasks and materials. Additionally, preparing the area for application is vital to ensure a clean and even surface. Furthermore, understanding the surface material is also important, as it can affect the putty's adhesion and performance. By considering these factors, you can ensure a strong and reliable seal. In this article, we will explore these factors in more detail, starting with the importance of choosing the right type of plumber's putty.
Choose the Right Type of Plumber's Putty
When it comes to choosing the right type of plumber's putty, it's essential to consider the specific needs of your project. There are two main types of plumber's putty: traditional and epoxy-based. Traditional plumber's putty is a mixture of clay and other minerals, and is suitable for most plumbing applications. It's easy to apply, dries quickly, and is relatively inexpensive. However, it may not be suitable for high-temperature or high-pressure applications. Epoxy-based plumber's putty, on the other hand, is a two-part mixture that hardens when combined. It's more durable and resistant to heat and pressure than traditional putty, making it ideal for applications such as faucet installations and toilet repairs. Additionally, some plumber's putty products are specifically designed for use with certain types of materials, such as stainless steel or PVC. When selecting a plumber's putty, be sure to read the label and choose a product that is compatible with the materials you're working with. By choosing the right type of plumber's putty, you can ensure a secure and long-lasting seal.
Prepare the Area for Application
Before applying plumber's putty, it's essential to prepare the area to ensure a smooth and effective application. Start by cleaning the surface where the putty will be applied, removing any dirt, grime, or old adhesive. Use a wire brush or a scrubber to scrub away any stubborn debris, and then wipe the area clean with a damp cloth. Next, dry the surface completely with a dry cloth to prevent any moisture from interfering with the putty's adhesion. If you're working with a new sink or faucet, remove any protective covering or film from the area where the putty will be applied. Finally, inspect the area for any imperfections or unevenness, and use a file or sandpaper to smooth out any rough spots. By taking the time to properly prepare the area, you'll ensure a strong bond between the putty and the surface, and a successful installation.
Understand the Surface Material
When it comes to using plumber's putty, understanding the surface material is crucial for a successful seal. Different surfaces require different approaches, and using the wrong type of putty or applying it incorrectly can lead to leaks and other issues. For example, when working with ceramic or porcelain surfaces, it's essential to use a putty that is specifically designed for these materials. These surfaces are often more delicate and require a putty that won't scratch or damage them. On the other hand, when working with metal or PVC surfaces, a more robust putty may be necessary to ensure a strong seal. Additionally, some surfaces may require a primer or special preparation before applying the putty, so it's essential to read the manufacturer's instructions carefully. By taking the time to understand the surface material and choosing the right putty, you can ensure a successful seal and avoid costly repairs down the line.
Application Techniques
When it comes to application techniques, there are several key factors to consider in order to achieve a successful outcome. One of the most critical aspects is applying the putty in the correct amount, as too little or too much can lead to a poor finish. Additionally, shaping the putty to fit the application is crucial, as this will ensure a smooth and even surface. Finally, pressing the putty firmly into place is essential to prevent air pockets and ensure a strong bond. By mastering these three techniques, individuals can achieve professional-looking results and ensure a long-lasting finish. To start, it's essential to apply the putty in the correct amount, as this will set the foundation for a successful application.
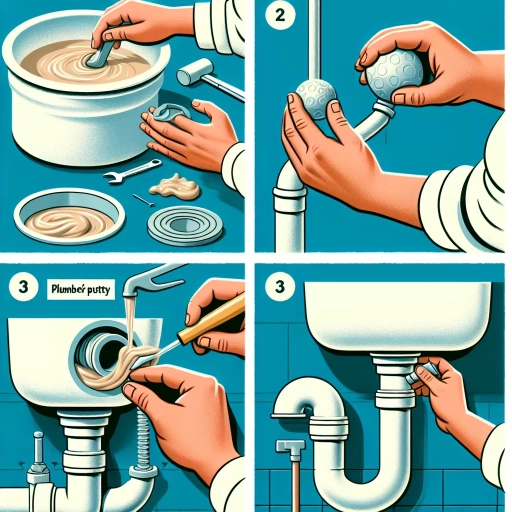
Apply the Putty in the Correct Amount
When applying plumber's putty, it's essential to use the correct amount to ensure a watertight seal. Too little putty may not provide adequate sealing, while too much can be messy and difficult to clean up. The ideal amount of putty to use varies depending on the size of the drain or faucet you're working with. A good rule of thumb is to use a small amount, about the size of a pea or a small marble, for small drains and faucets. For larger drains and faucets, you can use a slightly larger amount, about the size of a golf ball. It's also important to note that you should only apply putty to the threads of the drain or faucet, rather than the entire surface. This will help prevent excess putty from squeezing out and making a mess. By using the correct amount of putty, you can ensure a secure and watertight seal that will last for a long time.
Shape the Putty to Fit the Application
Plumbers putty is a versatile tool that can be molded to fit various applications, making it an essential component in many plumbing tasks. To shape the putty to fit the application, start by kneading it until it becomes pliable and easy to work with. This process helps to remove any air pockets and ensures the putty is evenly textured. Next, use your fingers or a putty knife to shape the putty into the desired form. For example, if you're working with a faucet, you may need to shape the putty into a thin rope or a small ball to fit into the faucet's mounting holes. If you're working with a drain assembly, you may need to shape the putty into a thicker rope or a flat sheet to fit around the drain's flange. The key is to apply gentle pressure and work the putty slowly, allowing it to conform to the shape you need. As you shape the putty, make sure to remove any excess material and smooth out any rough edges. This will help ensure a tight seal and prevent any leaks. By shaping the putty to fit the application, you can create a customized seal that meets the specific needs of your project, ensuring a successful and leak-free installation.
Press the Putty Firmly into Place
Press the putty firmly into place, making sure it is evenly distributed and covers the entire area where the faucet or drain will sit. Apply gentle to moderate pressure, depending on the type of putty and the surface it is being applied to. Be careful not to press too hard, as this can cause the putty to ooze out beyond the edges of the faucet or drain, creating a mess. Instead, focus on applying consistent pressure to ensure the putty is securely in place. As you press the putty into place, use a gentle twisting motion to help it spread evenly and fill any gaps or irregularities in the surface. This will help create a strong, watertight seal that will prevent leaks and ensure a secure fit. Once the putty is in place, use a damp cloth or paper towel to wipe away any excess that has squeezed out beyond the edges of the faucet or drain. This will help create a clean, finished look and prevent any mess from spreading. By following these steps and pressing the putty firmly into place, you can create a secure, watertight seal that will last for years to come.
Troubleshooting and Maintenance
Effective troubleshooting and maintenance are crucial for ensuring the longevity and performance of various systems, including plumbing and mechanical systems. Regular maintenance can help prevent costly repairs, reduce downtime, and improve overall efficiency. One key aspect of maintenance is addressing issues with putty seals, which can deteriorate over time and cause leaks. To maintain the integrity of these seals, it is essential to identify and fix leaks promptly, replace old or dried-out putty, and regularly inspect putty seals. By taking these proactive steps, individuals can prevent minor issues from becoming major problems. In this article, we will explore these maintenance strategies in more detail, starting with the importance of identifying and fixing leaks promptly.
Identify and Fix Leaks Promptly
Identifying and fixing leaks promptly is crucial to prevent water damage, reduce water bills, and maintain a safe and healthy environment. Leaks can occur in various plumbing fixtures, including faucets, toilets, and pipes. To identify leaks, look for signs such as water spots, warping, or mineral deposits on walls and ceilings. Check for dripping sounds, especially after shutting off the water supply. Inspect pipes and connections for rust, corrosion, or mineral buildup. For toilets, check the flapper and fill valve for proper function. If you suspect a leak, turn off the main water shut-off valve and inspect the affected area. Use a wrench or pliers to tighten loose connections, and replace worn-out washers or gaskets. For more complex leaks, consider hiring a professional plumber to avoid further damage. Regular maintenance, such as checking and replacing worn-out parts, can help prevent leaks from occurring in the first place. By identifying and fixing leaks promptly, you can save time, money, and stress in the long run.
Replace Old or Dried-Out Putty
When dealing with old or dried-out putty, it's essential to replace it to ensure a watertight seal. Over time, putty can dry out and lose its effectiveness, leading to leaks and water damage. To replace old or dried-out putty, start by removing the old putty from the affected area using a putty knife or a scraper. Be careful not to scratch the surface, as this can create more problems. Once the old putty is removed, clean the area thoroughly with a damp cloth to remove any remaining residue. Next, apply a new layer of plumber's putty to the area, following the manufacturer's instructions for the correct amount to use. Make sure to press the putty firmly into place to ensure a tight seal. Finally, reassemble the fixture or fitting, and test the seal by running water through it. If the seal is still leaking, you may need to adjust the putty or replace it again. Regularly inspecting and replacing old or dried-out putty can help prevent costly repairs and ensure a safe and functional plumbing system.
Regularly Inspect Putty Seals
Regularly inspecting putty seals is a crucial step in maintaining the integrity of your plumbing system. Over time, putty seals can deteriorate, causing leaks and water damage. To prevent this, it's essential to regularly inspect the putty seals around your faucets, drains, and other plumbing fixtures. Start by visually inspecting the putty seals for any signs of wear, such as cracks, gaps, or discoloration. Check for any water droplets or mineral deposits around the seal, which can indicate a leak. If you notice any issues, it's time to replace the putty seal. When inspecting putty seals, also check the surrounding area for any signs of moisture or water damage. Look for warping, discoloration, or mineral deposits on the surrounding surfaces, which can indicate a more significant issue. Regular inspections can help you catch problems early, preventing costly repairs and water damage. It's recommended to inspect putty seals every 6-12 months, depending on usage and environmental factors. By incorporating regular inspections into your maintenance routine, you can ensure the longevity of your plumbing system and prevent costly repairs. Additionally, regular inspections can also help you identify other potential issues, such as worn-out washers or corroded pipes, allowing you to address them before they become major problems. By staying on top of putty seal inspections, you can enjoy a leak-free and efficient plumbing system for years to come.