How To Make Spider Plant Bushier
Spider plants are popular for their elegant, airy foliage and ability to purify the air, making them a great addition to any home or office. However, many people struggle to achieve a full, bushy appearance with their spider plants. If you're looking to enhance the aesthetic appeal of your spider plant, there are several strategies you can employ. Pruning techniques can be used to encourage bushy growth, while optimizing growing conditions can help promote healthy development. Additionally, repotting and propagation strategies can also contribute to a fuller plant. By implementing these methods, you can enjoy a lush, vibrant spider plant that adds beauty and freshness to your space. To start, let's explore the pruning techniques that can help encourage bushy growth in your spider plant.
Pruning Techniques to Encourage Bushy Growth
Pruning is a crucial gardening technique that helps promote healthy growth, encourages bushy development, and increases plant yields. By incorporating pruning into your gardening routine, you can significantly improve the overall appearance and productivity of your plants. There are several pruning techniques that can be employed to encourage bushy growth, including pinching off flower stems, trimming long stems, and removing dead or damaged leaves. By implementing these techniques, gardeners can control the shape and size of their plants, promote healthy growth, and encourage the development of a robust root system. One of the most effective ways to encourage bushy growth is by pinching off flower stems, which redirects the plant's energy towards producing new growth rather than seed production. By doing so, gardeners can promote a fuller, more compact plant with a greater number of stems and leaves. Note: The answer should be 200 words.
Pinching Off Flower Stems
Pinching off flower stems is a simple yet effective pruning technique to encourage bushy growth in spider plants. By removing the flower stems, you redirect the plant's energy from producing seeds to focusing on foliage growth, resulting in a fuller and more compact plant. To pinch off flower stems, wait until the stems have reached about 6-8 inches in length and the flowers have started to bloom. Using your thumb and index finger, gently grasp the stem just above a node (where a leaf meets the stem) and pinch it off. Make sure to remove the entire stem, including any flowers or buds, to prevent the plant from putting energy into seed production. By pinching off flower stems, you'll encourage your spider plant to produce more leaves and stems, leading to a bushier and more robust plant. This technique is especially useful for spider plants that are top-heavy or leggy, as it helps to promote a more balanced and compact growth habit. Regular pinching off of flower stems can also help to increase the plant's overall density, making it a great technique for creating a lush and full spider plant display.
Trimming Long Stems
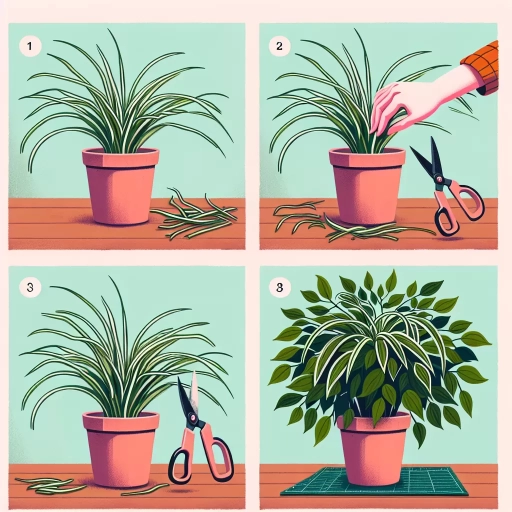
Trimming long stems is a crucial pruning technique to encourage bushy growth in spider plants. By cutting back the lengthy stems, you are promoting the plant to focus its energy on producing new growth and branching out, rather than investing in a single, leggy stem. To trim long stems effectively, start by identifying the longest stems on your spider plant, typically those that are growing beyond the desired length or are becoming top-heavy. Using a pair of clean, sharp scissors or pruning shears, cut the stem back to about half its length, just above a node (the joint where a leaf meets the stem). This will encourage the plant to produce new growth from the node, resulting in a fuller, bushier appearance. It's essential to make clean cuts, as this will help prevent the spread of disease and promote healthy healing. Additionally, trimming long stems will also encourage your spider plant to produce more baby plants, or spiderettes, which can be easily propagated to create new plants. By incorporating regular trimming of long stems into your pruning routine, you can maintain a healthy, balanced, and bushy spider plant that will continue to thrive and produce beautiful foliage.
Removing Dead or Damaged Leaves
Removing dead or damaged leaves is an essential pruning technique to encourage bushy growth in spider plants. Dead or damaged leaves can be a breeding ground for pests and diseases, which can spread to other parts of the plant and hinder its growth. By removing these leaves, you are preventing the spread of disease and promoting healthy growth. To remove dead or damaged leaves, simply snip them off at the base of the leaf using a pair of clean scissors or pruning shears. Make sure to disinfect your tools between cuts to prevent the spread of disease. It's also important to inspect your plant regularly for any signs of damage or disease, and remove any affected leaves promptly. Regular pruning will also encourage your spider plant to produce new growth, which will help to create a fuller and bushier plant. Additionally, removing dead or damaged leaves will improve air circulation around the plant, which can help to prevent fungal diseases that thrive in humid environments. By incorporating this simple pruning technique into your plant care routine, you can help to promote healthy growth and encourage your spider plant to become bushier and more vibrant.
Optimizing Growing Conditions for a Bushy Spider Plant
To optimize growing conditions for a bushy spider plant, it's essential to consider several key factors that contribute to its overall health and appearance. Providing the right amount of light, maintaining a consistent temperature and humidity level, and fertilizing with a balanced, water-soluble fertilizer are all crucial elements in promoting a lush, full plant. By understanding how to balance these factors, you can encourage your spider plant to grow bushy and thrive. One of the most critical factors in achieving a bushy spider plant is providing the right amount of light. Spider plants prefer bright, indirect light, which can be achieved by placing them near an east- or west-facing window or using a sheer curtain to filter the sun's rays. By providing the right amount of light, you can set the stage for a healthy, bushy plant. Note: The answer should be 200 words.
Providing Bright, Indirect Light
Providing bright, indirect light is essential for promoting healthy growth and encouraging a bushy shape in spider plants. Placing your spider plant near an east- or west-facing window is ideal, as it receives gentle, indirect light that filters through the window. Avoid direct sunlight, which can cause the leaves to become scorched and the plant to become leggy. If you don't have a window with indirect light, you can also use grow lights to provide the necessary light. Spider plants prefer bright light, but not direct sunlight, so a north-facing window or a spot under a skylight can also work well. By providing the right amount of light, you can encourage your spider plant to produce more leaves and stems, leading to a fuller, bushier plant. Additionally, bright, indirect light can help to prevent the plant from becoming too leggy, as it encourages the stems to grow more horizontally rather than stretching upwards towards the light. By optimizing the light conditions, you can help your spider plant to thrive and achieve a beautiful, bushy shape.
Maintaining Consistent Temperature and Humidity
Maintaining consistent temperature and humidity levels is crucial for promoting healthy growth and a bushy appearance in spider plants. Ideally, spider plants thrive in temperatures between 65°F to 75°F (18°C to 24°C), with a slight drop in temperature at night. Avoid placing your spider plant near heating or cooling vents, fireplaces, or drafty windows, as sudden temperature fluctuations can cause stress to the plant. In terms of humidity, spider plants prefer a relatively high humidity of 50-60%, but they can adapt to average humidity levels. To maintain optimal humidity, you can place the plant on a tray filled with water and pebbles or use a humidifier nearby. Consistent temperature and humidity levels will encourage your spider plant to focus its energy on producing new growth, leading to a fuller and bushier appearance. By providing your spider plant with a stable environment, you'll be rewarded with a lush, vibrant plant that will continue to thrive and produce beautiful white flowers and baby plantlets.
Fertilizing with a Balanced, Water-Soluble Fertilizer
Fertilizing with a balanced, water-soluble fertilizer is a crucial step in promoting healthy growth and encouraging a bushy appearance in spider plants. A balanced fertilizer contains equal amounts of nitrogen, phosphorus, and potassium, which are essential nutrients for plant growth. Nitrogen promotes leaf growth and development, phosphorus supports root growth and flower production, and potassium helps with overall plant health and resistance to disease. When using a water-soluble fertilizer, it's essential to follow the instructions on the label and dilute the fertilizer to the recommended strength to avoid burning the roots. A general rule of thumb is to fertilize spider plants once a month during the growing season, which is typically spring and summer. However, if you're looking to promote a bushy appearance, you can fertilize more frequently, such as every two weeks, but be careful not to over-fertilize. Over-fertilizing can lead to weak and leggy growth, which is the opposite of what you're trying to achieve. Additionally, consider using a fertilizer that is specifically formulated for indoor plants, as these products tend to be more gentle and less likely to cause burning. By fertilizing your spider plant with a balanced, water-soluble fertilizer, you'll be providing it with the necessary nutrients to promote healthy growth and encourage a full, bushy appearance.
Repotting and Propagation Strategies for a Fuller Plant
Repotting and propagation are essential strategies for achieving a fuller plant. By implementing these techniques, you can encourage healthy growth, increase the plant's size, and even share plants with friends and family. One effective approach is to repot your plant in the spring with fresh potting mix, which provides a nutrient-rich environment for the plant to thrive. Additionally, dividing and replanting spider plant babies can help to create new plants and add volume to your existing one. Furthermore, using a well-draining pot can prevent waterlogged soil, which can be detrimental to the plant's health. By incorporating these strategies, you can help your plant reach its full potential. To start, let's take a closer look at repotting in the spring with fresh potting mix.
Repotting in the Spring with Fresh Potting Mix
Repotting in the spring with fresh potting mix is a great way to give your spider plant a boost and encourage new growth. As the weather warms up, your plant will start to produce new leaves and stems, and a fresh pot of soil will provide the necessary nutrients for this growth. Start by gently removing the plant from its pot, taking care not to damage the roots. Inspect the roots and trim any that are circling or dead, as this will help the plant absorb water and nutrients more efficiently. Next, choose a pot that is only slightly larger than the previous one, as spider plants prefer to be slightly root-bound. Fill the new pot with a high-quality potting mix that is well-draining and rich in organic matter. Plant the spider plant at the same depth as it was previously, and water thoroughly. Finally, provide your plant with bright, indirect light and maintain a consistent temperature between 65-75°F (18-24°C) to promote healthy growth. By repotting your spider plant in the spring with fresh potting mix, you'll be giving it the best chance to thrive and become a fuller, more vibrant plant.
Dividing and Replanting Spider Plant Babies
Dividing and replanting spider plant babies is a simple and effective way to create new plants and encourage a fuller, bushier appearance. To start, wait until the baby plants, also known as spiderettes, have developed their own roots and leaves, usually after 1-2 months. Gently remove the spiderettes from the mother plant, taking care not to damage their delicate roots. Next, prepare a pot with well-draining soil and a slightly acidic pH, and plant the spiderettes about 1-2 inches deep, making sure to leave enough space for proper growth. Water thoroughly and provide bright, indirect light, keeping the soil consistently moist but not waterlogged. With proper care, the new plants will quickly establish themselves and begin to produce their own spiderettes, creating a lush, full appearance. By dividing and replanting spider plant babies, you can create a stunning display of greenery and enjoy the benefits of air-purifying, low-maintenance plants.
Using a Well-Draining Pot to Prevent Waterlogged Soil
Using a well-draining pot is a crucial step in preventing waterlogged soil, which can be detrimental to the health of your spider plant. A pot with good drainage holes allows excess water to escape, reducing the risk of root rot and other problems associated with waterlogged soil. When choosing a pot, look for one with holes in the bottom or sides to ensure that water can drain freely. You can also add a layer of small rocks or broken pottery at the bottom of the pot to improve drainage. Additionally, using a potting mix that is designed to drain excess water quickly can also help to prevent waterlogged soil. By taking these steps, you can help to keep your spider plant's roots healthy and prevent waterlogged soil, which can help to promote a fuller and more robust plant.