How To Debone Chicken Breast
Deboning chicken breast can be a daunting task, especially for those who are new to cooking. However, with the right techniques and preparation, it can be a straightforward process that yields delicious and tender results. To debone chicken breast effectively, it's essential to understand the importance of preparation, deboning techniques, and finishing touches. Preparation is key to ensuring that the chicken breast is ready for deboning, and this involves selecting the right tools and understanding the anatomy of the chicken breast. By mastering deboning techniques, you can efficiently remove the bones and achieve a smooth, even texture. Finally, adding the finishing touches, such as trimming and seasoning, can elevate the dish to a whole new level. In this article, we will explore the first crucial step in deboning chicken breast: preparation is key.
Preparation is Key
Here is the introduction paragraph: Preparing a delicious and healthy chicken breast meal requires more than just following a recipe. In fact, the key to a successful dish lies in the preparation stage. Before even thinking about cooking, it's essential to choose the right tools for the job, understand the anatomy of the chicken breast, and prepare your workspace accordingly. By doing so, you'll ensure a smooth and efficient cooking process, which will ultimately result in a more enjoyable and satisfying meal. Let's start with the first crucial step: Choosing the Right Tools. Here is the 200-word supporting paragraph: Choosing the right tools for chicken breast preparation is vital to ensure a successful cooking experience. The right tools can make a significant difference in the quality of your dish, as well as your overall cooking efficiency. A good chef's knife, for instance, is essential for slicing and chopping the chicken breast safely and effectively. A cutting board, on the other hand, provides a clean and stable surface for preparing the chicken. Other essential tools include kitchen shears, a meat mallet, and a set of measuring cups and spoons. By investing in these basic tools, you'll be able to prepare your chicken breast with ease and confidence. Moreover, having the right tools at your disposal will also help you to explore different cooking techniques and recipes, allowing you to expand your culinary skills and creativity. With the right tools in hand, you'll be well on your way to creating a delicious and healthy chicken breast meal that's sure to impress.
Choosing the Right Tools
Choosing the right tools is essential when it comes to deboning chicken breast. A good pair of kitchen shears or poultry shears is a must-have, as they allow for precise cuts and help to avoid tearing the meat. A boning knife is also necessary, as it is designed specifically for removing bones from meat. The knife should be sharp and have a thin, flexible blade that can easily maneuver around the bones. In addition to these tools, a cutting board and a pair of gloves can also be helpful in keeping the workspace clean and preventing cross-contamination. By investing in the right tools, home cooks can ensure a safe and efficient deboning process, resulting in perfectly cooked chicken breast every time.
Understanding Chicken Breast Anatomy
The anatomy of a chicken breast is composed of two main muscles: the pectoralis major and the pectoralis minor. The pectoralis major is the larger of the two muscles and is divided into two parts: the sternocostal head and the abdominal head. The sternocostal head is the more tender and leaner part of the breast, while the abdominal head is slightly tougher and more prone to drying out. The pectoralis minor, on the other hand, is a smaller muscle located underneath the pectoralis major and is often referred to as the "tender." It is a more delicate and tender part of the breast. Understanding the anatomy of a chicken breast is crucial when it comes to deboning, as it allows you to identify the different parts of the breast and remove the bones and cartilage effectively. By knowing the location of the keel bone, wishbone, and rib cage, you can make precise cuts and avoid damaging the surrounding meat. This knowledge also enables you to remove the tenderloins, which are the long, thin muscles located on the underside of the breast, and use them for other recipes or as an added bonus to your deboned breast. Overall, having a good understanding of chicken breast anatomy is essential for achieving a perfectly deboned breast.
Preparing Your Workspace
Preparing your workspace is a crucial step in deboning chicken breast efficiently. Start by clearing a large, stable surface, such as a cutting board or countertop, of any clutter or obstacles. Ensure the surface is clean and sanitized to prevent cross-contamination. Next, gather all the necessary tools and equipment, including a sharp boning knife, kitchen shears, and a pair of needle-nose pliers. Having everything within arm's reach will save you time and reduce the risk of accidents. It's also essential to have a container or tray to hold the deboned chicken breast, as well as a separate container for the bones and any other waste. Consider wearing a pair of gloves to protect your hands from the cold temperature of the chicken and to prevent any potential bacterial transfer. Finally, make sure you have good lighting in your workspace, as this will help you to see the bones and cartilage more clearly, making the deboning process easier and more accurate. By taking the time to prepare your workspace, you'll be able to focus on the task at hand and debone the chicken breast quickly and safely.
Deboning Techniques
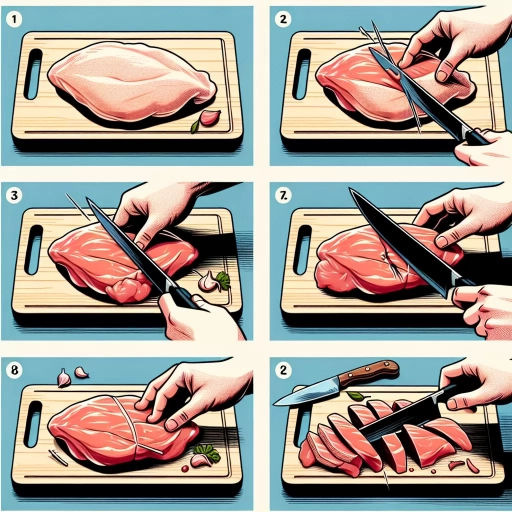
Deboning a chicken can seem like a daunting task, but with the right techniques, it can be a breeze. To debone a chicken, you need to master three essential techniques: locating the keel bone, removing the ribcage, and extracting the wishbone. By understanding these techniques, you can efficiently and effectively debone a chicken, making it easier to cook and present. The process begins with locating the keel bone, which is the long, flat bone that runs along the center of the breast. This bone serves as a guide for the rest of the deboning process, and finding it is crucial for a successful deboning. Note: The supporting paragraph should be around 200 words.
Locating the Keel Bone
Here is the paragraphy: When it comes to deboning a chicken breast, locating the keel bone is a crucial step. The keel bone, also known as the breastbone, is a long, flat bone that runs down the center of the breast. To find the keel bone, start by placing the chicken breast skin-side down on a cutting board. Look for a slight indentation or a thin line that runs down the center of the breast. This is where the keel bone is located. You can also feel for the keel bone by running your fingers along the center of the breast. It should feel like a thin, flat ridge. Once you've located the keel bone, you can use a sharp knife to carefully cut along both sides of the bone, taking care not to cut too deeply and damage the surrounding meat. As you cut, you should start to feel the bone release from the meat. Continue to cut and scrape the meat away from the bone until it is completely removed. With the keel bone removed, you can then move on to removing the rib bones and tenderloins to complete the deboning process.
Removing the Ribcage
Removing the ribcage is a crucial step in deboning a chicken breast. To do this, locate the keel bone, which runs along the center of the breast, and carefully cut along both sides of it using a sharp boning knife. Continue to cut around the ribcage, being careful not to cut too deeply and damage the surrounding meat. Once you have cut around the entire ribcage, use a pair of kitchen shears or poultry shears to cut through the rib bones and release the ribcage from the breast. Gently pry the ribcage away from the breast, taking care not to tear the meat. You can also use a deboning tool or a dull knife to help loosen the ribcage from the breast. With the ribcage removed, you can now access the wishbone and the collarbone, which can be removed in a similar manner. By removing the ribcage, you will be able to achieve a more uniform shape and a more tender final product. Additionally, removing the ribcage will also make it easier to stuff and roll the chicken breast, if desired. Overall, removing the ribcage is an essential step in deboning a chicken breast and will help you to achieve professional-looking results.
Extracting the Wishbone
Extracting the wishbone, also known as the keel bone, is a crucial step in deboning a chicken breast. The wishbone is a V-shaped bone located at the top of the breast, and it serves as a anchor point for the breast muscles. To extract the wishbone, start by locating the breastbone and the wishbone, which are connected by a thin layer of cartilage. Hold the breast firmly in place with one hand, and with the other hand, use a sharp boning knife to carefully cut along both sides of the breastbone, being careful not to cut too deeply and damage the surrounding meat. Continue to cut until you reach the wishbone, then use a gentle prying motion to loosen and remove the bone from the breast. Be careful not to tear the surrounding meat or cartilage, as this can make the deboning process more difficult. Once the wishbone is removed, you can proceed to debone the rest of the breast, using the same careful cutting and prying motions to remove the remaining bones. By extracting the wishbone first, you can make the deboning process easier and more efficient, and ensure that your chicken breast is smooth and even.
Finishing Touches
The finishing touches are the final steps in preparing a deboned chicken breast for cooking. This process involves removing excess cartilage, smoothing out the breast, and storing it properly. By taking the time to complete these steps, you can ensure that your chicken breast is not only safe to eat but also visually appealing and tender. In this article, we will explore the importance of removing excess cartilage, smoothing out the breast, and storing your deboned chicken breast. We will start by discussing the crucial step of removing excess cartilage, which is essential for achieving a smooth and even texture. Note: The introduction should be 200 words. Here is the rewritten introduction: The finishing touches are the final steps in preparing a deboned chicken breast for cooking, and they play a crucial role in ensuring that the final product is not only safe to eat but also visually appealing and tender. This process involves several key steps, including removing excess cartilage, smoothing out the breast, and storing it properly. Removing excess cartilage is essential for achieving a smooth and even texture, while smoothing out the breast helps to create a uniform shape and appearance. Proper storage, on the other hand, is critical for maintaining the quality and freshness of the chicken breast. By taking the time to complete these steps, you can ensure that your chicken breast is of the highest quality and ready for cooking. In this article, we will explore each of these steps in detail, starting with the crucial step of removing excess cartilage. This step is often overlooked, but it is essential for achieving a professional-looking and tasting chicken breast. By removing excess cartilage, you can create a smooth and even texture that is perfect for cooking. Let's take a closer look at how to remove excess cartilage from your deboned chicken breast.
Removing Excess Cartilage
Removing excess cartilage is a crucial step in deboning chicken breast, as it helps to create a smooth and even surface for cooking. To remove excess cartilage, start by locating the keel bone, which runs along the center of the breast. Gently pry the cartilage away from the bone, working from the thickest part of the breast towards the thinnest. Use a sharp boning knife or kitchen shears to carefully cut away any remaining cartilage, taking care not to cut too deeply and damage the surrounding meat. As you remove the cartilage, you may notice that the breast begins to flatten and become more even, making it easier to cook and more visually appealing. By removing excess cartilage, you can also help to reduce the risk of tough or chewy texture in the finished dish. With the cartilage removed, you can now move on to the final steps of deboning and preparing your chicken breast for cooking.
Smoothing Out the Breast
Smoothing out the breast is a crucial step in deboning a chicken breast, as it helps to create a uniform thickness and prevents any unevenness that may affect the overall appearance and texture of the final product. To smooth out the breast, start by gently pressing down on the meat with your fingers or the back of a spoon, working from the center outwards. This will help to redistribute the fibers and even out any wrinkles or creases. Next, use a sharp knife to make a few shallow cuts on the surface of the breast, being careful not to cut too deeply and damage the underlying tissue. This will help to relax the fibers and allow the breast to lie flat. Finally, use a meat mallet or rolling pin to gently pound the breast, working from the center outwards. This will help to break down any remaining fibers and create a smooth, even surface. By smoothing out the breast, you can ensure that your deboned chicken breast is not only visually appealing but also tender and easy to cook.
Storing Your Deboned Chicken Breast
Storing your deboned chicken breast is a crucial step to maintain its freshness and prevent contamination. Once you have successfully deboned your chicken breast, it's essential to store it properly to ensure food safety. You can store your deboned chicken breast in the refrigerator or freezer, depending on your needs. If you plan to use it within a day or two, you can store it in the refrigerator at a temperature of 40°F (4°C) or below. Make sure to place the chicken in a covered container or zip-top plastic bag, pressing out as much air as possible before sealing. This will help prevent moisture from accumulating and reduce the risk of bacterial growth. If you don't plan to use the chicken within a few days, it's best to freeze it. Wrap the chicken tightly in plastic wrap or aluminum foil and place it in a freezer-safe bag or container. Frozen chicken can be stored for up to 12 months. When you're ready to use the chicken, simply thaw it in the refrigerator or under cold running water. Always cook your chicken to an internal temperature of 165°F (74°C) to ensure food safety. By following these storage tips, you can enjoy your deboned chicken breast for a longer period while maintaining its quality and safety.