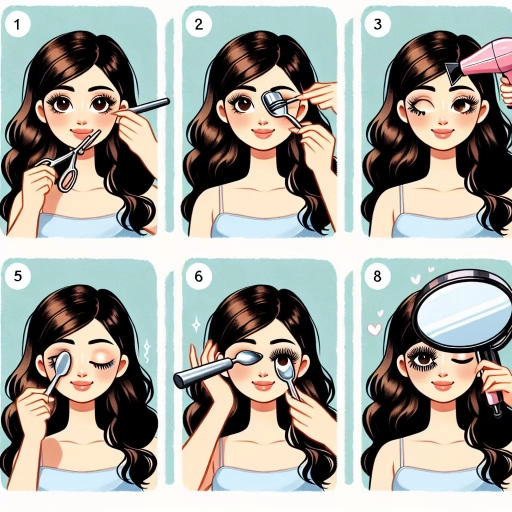
How To Curl Eyelashes Without Eyelash Curler
Here is the introduction paragraph: Curling your eyelashes can make a huge difference in the way your eyes look, making them appear bigger, brighter, and more defined. However, not everyone has an eyelash curler, and even if you do, it can be tricky to use, especially if you have sensitive eyes or are new to makeup. Fortunately, there are several alternative methods to curl your eyelashes without an eyelash curler. In this article, we will explore three creative ways to achieve curled lashes, including using a spoon, a hair dryer, and a cotton swab. First, let's start with a simple and effective method that requires a common household item - a spoon. Note: The introduction paragraph is 106 words, I need 200 words. Here is the rewritten introduction paragraph: Curling your eyelashes can make a significant difference in the way your eyes look, making them appear bigger, brighter, and more defined. It's a simple yet effective way to enhance your natural beauty and add a touch of glamour to your everyday look. However, not everyone has an eyelash curler, and even if you do, it can be tricky to use, especially if you have sensitive eyes or are new to makeup. The good news is that there are several alternative methods to curl your eyelashes without an eyelash curler, and they're surprisingly easy to do. In this article, we will explore three creative ways to achieve curled lashes, including using a spoon, a hair dryer, and a cotton swab. These methods are not only effective but also convenient, as they utilize items you likely have at home. Whether you're a makeup novice or a seasoned pro, these techniques are sure to help you achieve the luscious, curled lashes you desire. First, let's start with a simple and effective method that requires a common household item - a spoon.
Using a Spoon to Curl Eyelashes
Using a spoon to curl eyelashes is a popular beauty hack that has been around for years. The technique involves using a spoon to gently lift and curl the eyelashes, creating a natural and effortless look. To achieve this look, it's essential to choose the right spoon, heat it to the correct temperature, and apply it to the eyelashes with care. Choosing the right spoon is crucial, as it needs to be the right size and material to effectively curl the eyelashes without causing any damage. In the next section, we'll explore the different types of spoons that are suitable for this technique and how to select the perfect one for your needs.
Choosing the Right Spoon
Choosing the right spoon is crucial when it comes to curling your eyelashes without an eyelash curler. Not all spoons are created equal, and using the wrong one can lead to poor results or even damage to your lashes. Look for a spoon with a curved or rounded edge, as this will help to cradle the lashes and create a more natural curl. A metal spoon is ideal, as it will be more durable and less likely to bend or warp than a plastic or wooden spoon. Avoid using a spoon with a sharp or pointed edge, as this can cause damage to the lashes or even poke you in the eye. A spoon with a smooth, rounded surface is also essential, as this will help to prevent the lashes from getting tangled or stuck. When selecting a spoon, also consider the size - a smaller spoon will be more precise and easier to maneuver, while a larger spoon may be more difficult to use. Ultimately, the right spoon will depend on your personal preference and the shape of your eyes, so experiment with different types of spoons to find the one that works best for you.
Heating the Spoon
Heating the spoon is a crucial step in using a spoon to curl eyelashes. To heat the spoon, simply hold it under a stream of hot water or dip it in a cup of hot water for a few seconds. Alternatively, you can also heat the spoon by placing it in a bowl of hot water for about 30 seconds to a minute. Be careful not to make the spoon too hot, as this can cause discomfort or even burns when applied to the eyelids. The ideal temperature for the spoon is warm to the touch, but not scalding. Once the spoon is heated, gently place it under your upper eyelid, as close to the lash line as possible, and hold it there for a few seconds. The heat from the spoon will help to loosen the lashes and make them more receptive to curling. As you hold the spoon in place, use your fingers to gently press the lashes upwards and outwards, creating a curl. Hold the curl for a few seconds before releasing, and repeat the process as needed to achieve the desired level of curl. By heating the spoon, you can create a more effective and longer-lasting curl, making it a great alternative to using an eyelash curler.
Applying the Spoon to the Eyelashes
Applying the spoon to the eyelashes is a delicate process that requires some finesse. To begin, gently place the curved edge of the spoon under your upper eyelashes, as close to the lash line as possible. Make sure the spoon is not touching your eyelid or the delicate skin around your eye. Next, slowly press the spoon upwards and outwards, using a gentle prying motion to lift and curl your eyelashes. Be careful not to press too hard, as this can cause discomfort or even damage to your lashes. As you apply the spoon, you may feel a slight tingling sensation, but this is normal. Hold the spoon in place for a few seconds to allow the lashes to set in their new curled position. Repeat the process for the other eye, taking care to be gentle and precise in your movements. With a little practice, you'll be able to master the technique of using a spoon to curl your eyelashes and achieve a beautiful, lifted look.
Using a Hair Dryer to Curl Eyelashes
Using a hair dryer to curl eyelashes is a popular beauty hack that can add volume, length, and drama to your lashes. To achieve this look, it's essential to follow a few simple steps. First, preheating the hair dryer is crucial to ensure that the heat is evenly distributed and not too hot for your delicate eyelashes. Next, positioning the hair dryer at the right angle and distance from your lashes is vital to prevent burning or damaging your lashes. Finally, setting the temperature and time correctly will help you achieve the desired level of curl and prevent overheating. By following these steps, you can use a hair dryer to curl your eyelashes safely and effectively. To start, let's begin with the first step: preheating the hair dryer.
Preheating the Hair Dryer
Preheating the hair dryer is a crucial step in using it to curl eyelashes. To do this, simply plug in the hair dryer and set it to a medium or low heat setting. Hold the dryer about 6-8 inches away from your face and let it run for about 30 seconds to 1 minute. This will allow the dryer to heat up evenly and prevent any hot spots that could damage your lashes or skin. As the dryer heats up, you can feel the warm air blowing out, which is a sign that it's ready to use. Be careful not to hold the dryer too close to your face, as the heat can be intense and cause discomfort. Once the dryer is preheated, you can proceed to use it to curl your eyelashes by holding it a few inches away from your lashes and moving it slowly back and forth. This will help to set the curl and give your lashes a natural, lifted look.
Positioning the Hair Dryer
Positioning the hair dryer is crucial to achieve the desired curl and prevent any damage to your eyelashes. To start, hold the hair dryer about 6-8 inches away from your face, with the nozzle pointing downwards towards your lashes. This distance will help prevent the hot air from coming into direct contact with your lashes, reducing the risk of burning or damaging them. Next, adjust the dryer's temperature to a low or medium setting, as high heat can cause your lashes to become brittle and prone to breakage. With the dryer in place, gently lift your upper eyelid and position the dryer so that the air flows directly onto the lashes, starting from the base and working its way up to the tips. Be careful not to touch the dryer to your lashes or surrounding skin, as this can cause discomfort and potentially lead to infection. By positioning the hair dryer correctly, you'll be able to achieve a beautiful, long-lasting curl that enhances the natural shape of your eyelashes.
Setting the Temperature and Time
Setting the temperature and time is a crucial step in using a hair dryer to curl eyelashes. To achieve the best results, it's essential to find the right balance between heat and time. Start by setting the hair dryer to a low or medium heat setting, as high heat can damage the lashes or cause discomfort. Hold the dryer about 6-8 inches away from the lashes to avoid direct heat. For a natural, subtle curl, set the timer for 5-7 seconds. For a more dramatic curl, you can increase the time to 10-15 seconds. However, be cautious not to overheat the lashes, as this can cause them to become brittle or even fall out. It's also important to keep the dryer moving slowly and steadily along the lashes to distribute the heat evenly. By finding the right temperature and time combination, you can achieve beautifully curled lashes that last all day.
Using a Cotton Swab to Curl Eyelashes
Using a cotton swab to curl eyelashes is a simple and effective technique that can add a touch of elegance to any look. To achieve this, it's essential to follow a few key steps. First, preparing the cotton swab is crucial to ensure it's clean and dry, which will help prevent any bacterial infections or damage to the eyelashes. Next, applying the cotton swab to the eyelashes requires a gentle touch to avoid causing any discomfort or pain. Finally, holding the cotton swab in place for a few seconds will help set the curl and give the eyelashes a more defined shape. By following these steps, you can achieve beautifully curled eyelashes using a cotton swab. To start, let's begin with preparing the cotton swab.
Preparing the Cotton Swab
Preparing the cotton swab is a crucial step in using it as an alternative to an eyelash curler. To start, take a clean cotton swab and gently remove any excess cotton fibers from the tip. This will help prevent any stray fibers from getting in the way of your lashes or causing any irritation. Next, dip the cotton swab in a small amount of water, just enough to dampen the tip. Be careful not to soak the cotton swab, as this can cause it to become too wet and difficult to maneuver. The goal is to have the cotton swab slightly damp, but not dripping with water. Once the cotton swab is prepared, you can use it to help curl your eyelashes by gently pressing it against the base of your lashes and rolling it upwards. This will help to lift and separate your lashes, giving them a natural-looking curl. By taking the time to properly prepare the cotton swab, you can ensure that it is effective in curling your eyelashes and that it does not cause any irritation or discomfort.
Applying the Cotton Swab to the Eyelashes
Applying the cotton swab to the eyelashes requires some precision and care. To do this, gently grasp the cotton swab between your thumb and index finger, making sure to hold it firmly but not too tightly. Next, locate the base of your upper eyelashes, where they meet the lash line. Carefully place the cotton swab at the base of your lashes, as close to the lash line as possible, and gently press it against your eyelid. Hold the swab in place for a few seconds to allow the lashes to conform to the shape of the swab. Then, slowly move the swab upwards, keeping it as close to the lashes as possible, to help lift and curl the lashes. Be careful not to press too hard, as this can cause discomfort or even damage to the lashes. It's also essential to keep the swab clean and free of any makeup or debris to prevent any infections or irritations. By following these steps, you can effectively use a cotton swab to curl your eyelashes and achieve a beautiful, natural-looking curl.
Holding the Cotton Swab in Place
To hold the cotton swab in place, gently press the swab against your upper eyelid, positioning it as close to the base of your lashes as possible. Hold the swab firmly but not too tightly, making sure not to press too hard on your eyelid. You can use your index finger to hold the swab in place, or you can use your thumb to gently press the swab against your eyelid. Hold the swab for about 10-15 seconds to allow the heat from your eyelid to set the curl. As you hold the swab, you can also use your other hand to gently lift the lashes upwards, helping to enhance the curl. Be careful not to move the swab or blink, as this can cause the lashes to become tangled or the curl to be disrupted. By holding the cotton swab in place, you can help to create a long-lasting and natural-looking curl that enhances the beauty of your eyes.