How To Draw A Eagle
 Drawing an eagle is no easy task; it requires an understanding of the bird's anatomical structure, detailed attention to its features, and the right techniques to bring life into the image. However, with thoughtful guidance and step-by-step instructions, you too can master the art of drawing this majestic bird. This comprehensive article dives deep into 'Introduction to Drawing an Eagle,' which will familiarize you with the specific traits and characteristics of eagles. Next, the 'Detailed Guide to Drawing an Eagle' section will break down the process into manageable steps, from basic pencil strokes to complex detailing. Finally, 'Enhancements and Finalizing Your Eagle Drawing' will assist you in adding the final touches, from perfecting the feather details to capturing the eagle’s regal essence. Regardless of your artistry level, this article is tailored to guide you at every corner to let your creativity soar high just like an eagle. Let's dive into the world of these majestic creatures- starting with an introduction to drawing an eagle
Introduction to Drawing an Eagle
Drawing an eagle, one of nature's most majestic creatures, is a task that can seem daunting, yet equally exciting. This article is crafted to guide art enthusiasts through an enjoyable journey commencing from the rudimentary step, right up to the completion of an inspiring eagle sketch. Our focus will be layered in three key areas. First and foremost, we will delve into the importance of comprehending the intricate anatomy of eagles. Understanding these flight masters' physiological structure aids in generating an accurate and realistic sketch. Secondly, we'll guide you on procuring the necessary tools and materials vital for eagle drawing. The right instruments not only boost your drawing skill, but also greatly improve the overall quality of your artwork. Lastly, we will unwrap the secrets to establishing the fundamental shape and structure of an eagle, the real crux to start shaping your imagination into reality. Equipped with detailed understanding and right tools, to set the stage, we will first take a deep dive into the essence of the distinguishing anatomical details of an eagle.
The Importance of Understanding Eagle Anatomy
Understanding the anatomy of an eagle is a core component of accurately recreating its form on paper. It's not just about the similarity to the physical appearance, but comprehending the underlying features that define this majestic creature. Eagle anatomy is the blueprint that determines its flight dynamics, predatory attributes, and striking disposition. For example, an eagle’s wings, spanning up to 8 feet for larger species, have a unique combination of long, broad feathers allowing them to soar high while using minimal energy, making them incredibly efficient flyers. Recognizing this in the scope of drawing provides a basis for capturing the expansiveness and intricacy of the eagle's wings. The talons of an eagle, equally impressive, are central to its hunting ability. Composed of four sharp, curved projections affixed to powerful muscles, they are the decisive tools for capturing prey. In the realm of sketching, understanding this grants artists the opportunity to showcase an eagle's apex predator status. Of similar importance is the bird's beak. Eagles have hooked beaks, perfect for tearing into their prey. This characteristic shape, if drawn correctly, lends a definitive, fierce expression to the bird's face that sets the tone of the entire picture. In addition, understanding the positioning and features of an eagle’s eyes - larger than those of most other creatures - aids in depicting its acute vision, known for spotting prey from thousands of feet in the air. In the context of drawing, these piercing eyes lend a sense of power and intensity to the image. Appreciating the underlying structure of feathers and how they overlay to create the various patterns and textures is the final addition to the lifelike portrayal of an eagle. Attention to such subtleties transforms the depth of a drawing, giving it a realistic and attractive appeal. As such, having a deep understanding of eagle anatomy is crucial. It not only informs the proportions and details that one incorporates into the drawing, but it also allows one to portray the spirit and essence of this admirable bird. It is the synthesis of these components that gives rise to a truly compelling and realistic depiction of an eagle. Good luck with your drawing!
Required Tools and Materials for Eagle Drawing
Drawing an eagle requires careful planning, precision, and the right set of tools and materials. The introduction to this process has likely sparked an interest and aspiration in you to bring this magnificent bird to life on paper. Here, in this section, we discuss the essentials required to create an eagle drawing that truly echoes the majesty of this raptor. First, the pencil is paramount. A set of graphite pencils is highly recommended, offering a range of B and H grades to help you depict the fine details and the various tonal contrast of an eagle. B-grade pencils are softer and produce darker lines, useful for adding depth and shadow. H-grade pencils, on the other hand, are harder and lay out lighter lines, invaluable when outlining and sketching the initial framework of the drawing. Paper plays a crucial role as well. A heavyweight paper, such as bristol board or sketching paper, that can withstand repeated erasing and shading is ideal. Slightly textured paper can also add another dynamic to your drawing, enhancing depth and realism. The importance of a well-balanced, high-quality eraser cannot be overstated. It serves as your tool to correct mistakes, but it also facilitates in creating highlights and reflections. An eraser that cleanly lifts the pencil from the paper without leaving smudges is crucial to ensuring your eagle drawing comes out crisp, precise, and well-defined. Adding color to your drawing delivers vigor and vitality to your eagle. Colored pencils with a variable color palette can simulate the eagle's varied hues. From the golden-tawny and dark chocolate brown shades of the feather to the shimmering white of the head- the accurate representation of these colors enhances the authenticity of your drawing. Further, a sharpener keeps your pencil tips defined, thus maintaining the precision in your drawing. Opting for a high-quality sharpener that prevents breakage and wastage of the pencil lead is wise. Finally, a smudge stick or blending stump – a cylindrical drawing tool typically made of rolled paper – is a much-needed accessory. It reveals an array of blending possibilities, softening the lines, and creating seamless transitions between different shades. In essence, the combination of various tools and materials can greatly affect the outcome of your eagle drawing. Equipping yourself with the ones suitable for your style and adaptability will enable you to sketch, shade, and detail your eagle effects bringing this majestic bird to life.
Establishing the Basic Shape and Structure of an Eagle
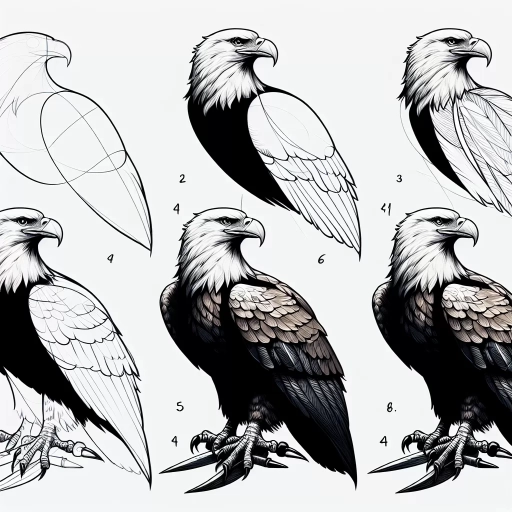
When embarking on the task of drawing an eagle, establishing the basic shape and structure is a fundamental step. Drawing is not simply a matter of putting pen to paper; it's about understanding the form and dimension of your subject, which in this case, is a majestic eagle. An eagle is not just a collection of lines and shapes but a testament to Mother Nature's impeccable design, with each part of its anatomy serving a purpose. To accurately portray this revered creature, one must visualize the bird in its entirety, carving out a mental sculpture before translating it to two dimensions. The body of an eagle can be simplified into a series of geometric forms. Start by imagining the eagle's body as an oval, with the head as a smaller circle attached to the top of it. These are the foundational blocks of your drawing, providing you with an eagle’s basic silhouette. The long, robust wings unfold from the body, stretching outwards. Visualize them as large triangles, but with rounded edges and subtle curves to mimic the wing's natural design. The eagle's powerful beak, a symbol of its strength and precision, carries a triangular shape; its sharp tip is a pivotal distinguishing feature. It brings an element of fierceness to the eagle's facial structure, which can be further enhanced by the stark, piercing eyes - small circles filled in with meticulous shading. The eagle's muscular legs extend down from the base of the oval body. They are relatively straight, with a slight curvature, ending in sharp, deadly talons. Keep in mind that the talons are one of the most critical elements in an eagle's anatomy because they are the tools it uses for hunting and defense. Therefore, investing time in perfecting this component of your drawing will lend a sense of authenticity and dynamism to your sketch. Lastly, the tail feathers, often overlooked yet essential for balance and flight, can be represented as a smaller triangle protruding from the base of the body frame. Perfecting the feathers' depiction, with their layered details, will add a touch of realism to your composition. As a guiding principle, remember that in establishing the basic shape and structure of an eagle, reference to real-life images or models, and practicing varied sketches, will help you gradually develop your understanding of this magnificent bird's anatomy. Over time, this process will allow you to produce beautifully drawn eagles, capturing not just their physical appearance but also their underlying essence.
Detailed Guide to Drawing an Eagle
Drawing an eagle may seem like a daunting task, but breaking it down into several steps can make the process much more accessible. This detailed guide will take you through each aspect of drawing an eagle, enabling you to create an awe-inspiring representation of this majestic bird. First, we will delve into the step-by-step process of sketching the body of the eagle- the foundational base of your masterpiece. Then, we will move to a thorough guide on depicting the eagle's head and beak with precision, crucial for capturing the bird's characteristic expression. Finally, we will round off your artwork by diving into the intricacies of drawing the wings and feathers, adding the necessary dose of realism to your creation. Each of these stages has its unique challenges and techniques, requiring a keen eye for details and a solid understanding of the basics of sketching. Now, put your creative hat on, and let's embark on our first phase - 'Step by Step Instructions to Sketching an Eagle's Body'.
Step by Step Instructions to Sketching an Eagle's Body
In your journey of learning how to draw an eagle, after you've mastered the preliminary sketching, it's time to focus on the most distinctive part of the eagle – its body. But remember, step by step, we are not rushing into anything. First, the eagle's body starts with the torso. Visualize the shape as a teardrop, wider near the head and tapering to a point towards the tail. The curvature of this form is important as it gives the eagle its powerful posture. This torso, the center of the eagle’s body, lays the groundwork for the rest of the sketch. Next, you sketch the wings, a key attribute of the eagle and a testament to its might and majesty. When sketching, think of the wings as elongated triangles, broad at the base and narrowing towards the tip. Remember, eagles have powerful, large, and broad wings compared to their body size to help them soar high in the sky with minimal effort. Keep in mind the individual segments of the wings: the coverts (small feathers at the base), primaries (long feathers at the tip), and secondaries (in the middle). These segments give the wings their unique shape and grandeur. The most challenging but rewarding part of the sketch could be creating the feather details. It might seem daunting but mastering the overlapping pattern and the texture of the eagle’s feathers can bring your sketch to life. Start from the top, creating a row of feathers and then layering them as you go down. The feathers aren't uniform; they have different lengths, widths, and shapes which you slowly and meticulously draw, paying careful attention to every intricate detail. Then, it's time for the tail. The tail, like wings, is broad and fan-like but less complex. Sketch the tail as an extension of the torso, remembering that it helps the eagle navigate swiftly through the air. Finish the tail by adding lines to indicate the individual feathers. Lastly, focus on the talons and legs of the eagle — a key predator characteristic. Eagles have powerful, large, and sharp claws used for hunting. Therefore, be sure to capture the strength by making the claws prominent and sharply curved. The legs, cylindrical and thick, support these claws. To add depth to your sketch, you can use a shading technique. Overlap your lines in the direction of the feather growth, starting with the coverts, and then the primaries and secondaries. Shading will provide volume and a 3D effect to your sketch, making it exceptionally realistic. Remember, sketching an eagle's body will require diligence, attention to detail, and practice. Take your time, don't rush the process. Each feather, the positioning of the wings, the curve of the talons, every element you sketch adds to the bird's grandeur. With each step, you are not only sketching an eagle's body; you are telling a story of this majestic creature's strength, prowess, and its transcendence in the wilderness. Happy sketching!
Depicting an Eagle's Head and Beak with Precision
Crafting the image of an eagle's head and beak with precision is a crucial aspect of realistically depicting this majestic bird. This component significantly contributes to the overall impression of your drawing, given that the eagle's head and beak are among its most distinct and immediately recognizable features. Therefore, mastering the art of drawing these parts with finesse not only tests your artistic skills but also enhances the authenticity of your representation. The basic structure of an eagle's head is streamlined and aerodynamic. It's imperative to maintain a keen focus on these structural specifics to ensure your eagle does not lose its noble and fearsome disposition. A common mistake beginners often make is drawing the eagle's head too round or chubby. In reality, an eagle's skull is sleek and elongated, integrated seamlessly into the bird's body. Its powerful, sharp beak and penetrating gaze are arguably the most dominant characteristics and need to be sketched with particular precision. The beak of an eagle is a reflection of its predator status in the animal kingdom. Strong, hooked, and robust, it is a symbol of its predatory prowess and pin-sharp efficiency. To accurately draw this, start with a straight line stretching from the forehead, curving downwards into a sharp point, mimicking the eagle's robust beak. It is vital to remember that the curvature of the beak varies among different species of eagles. For instance, a bald eagle's beak is larger and more curved than that of a golden eagle. Another factor that adds life to your drawing is the eagle’s eyes. Eagle's eyes are known for their intensity and alertness. They are one of nature's best optical systems, allowing them to spot prey from immense distances. As you draw, don't forget to incorporate the small crease above the eyes and keep the eyes large and almond-shaped to capture that image. This will elevate the allure and impact of your artistry. Remember, shading is an excellent way to accentuate the distinguishing features of the eagle’s head and beak. While the beak should have a glossy, textured surface depicting its hardened exterior, the head should be lightly shaded to convey the soft, delicate feathers. Applying these techniques correctly might require practice but remember that patience and perseverance are your best partners. In conclusion, depicting an eagle's head and beak accurately and engagingly entails keen attention to detail. Understanding the essence of these elements and drawing them efficiently would forge a notable connection between your art and your audience, bringing your drawing to life. (Article Continued...)
Drawing Wings and Feathers for a Realistic Representation
Drawing Wings and Feathers for a Realistic Representation
Close study is the crux of producing an authentic and lifelike likeness when attempting to draw wings and feathers for a realistic representation, specifically in the case of the magnificent eagle. Mastering the details of their extravagant plumage necessitates careful observation and incorporation of intricate texture and depth. A critical aspect to bear in mind is that an eagle's wings are not uniform; each exhibits its own divergent form and feather placement. While broad strokes can capture the general shape and layout, the true magic lies within the distinctive, finely drawn details. Start by outlining the eagle's outstretched wings, focusing on the major feather groups and their orientation - primary, secondary, and covert feathers. Each group has a varied size and role in the bird's flight which should reflect in your drawing. The primary feathers, located at the wingtip, are the longest and distinctly separate, aiding the eagle in maneuverability. Secondary feathers, however, are shorter and more densely packed towards the wing's inner part, providing the lifting power. Meanwhile, coverts serve to streamline the wing surface. Each feather should be drawn with moderate thickness and curvature for a realistic look, capturing the bird's natural grandeur. Pay close attention to the smaller details, such as the subtle variance in feather sizes, the thinning towards the end, and the slight waviness - every detail counts towards achieving a convincing representation. Add shadows and highlights to replicate the voluminous nature of the eagle's wings. The changes in value and careful layering will give your eagle's wings a multi-dimensional, lifelike feel. Shadows give depth while highlights bring life to your creation, making it appear as if poised for flight. Also, a soft gradient should be used for depicting the gorgeous golden-brown coloration. Remember, every additional detail reinforces the illusion of a real eagle. The task of creating a believable portrayal of an eagle's wing is an intricate one, but by breaking down the process, applying the techniques, and above all, keeping a keen observation can transform the cautionary task into an achievable goal. Your earnest efforts can breathe life into each feather, conjuring a soaring eagle on your canvas. Beautiful, vivid, and ready to take flight.Enhancements and Finalizing Your Eagle Drawing
Creating a compelling, detailed work of art like an eagle drawing demands more than just a good hand - it requires close attention to detail, an understanding of visual contrasts and the application of specific techniques. This article aims to bring you the tips and tricks needed to enhance your eagle drawing and finalize it to a level of impressively realistic representation. You will be guided through three significant steps - starting with 'Enhancing the Eagle Drawing with Shading Techniques'. This step will helped you equip with the principles of shadow and depth, which are key to lending your drawing a three-dimensional aspect. The next section, 'Adding Details to Enhance Realism in Your Eagle Drawing', will inform you about the significance of adding minute details, focusing specifically on the bird's key features, to make your artwork stand out with accuracy and authenticity. Lastly, through our 'Tips and Tricks for Final Touches to Your Eagle Sketch', it presents a collection of finishing moves to be made in your sketch to bring your eagle to life. So, let's dive right into our first section 'Enhancing the Eagle Drawing with Shading Techniques' and start the transformation of your eagle sketch into a stunning piece of art.
Enhancing the Eagle Drawing with Shading Techniques
Enhancing the Eagle Drawing with Shading Techniques The art of drawing is not merely about mere sketches; the essence lies in the details, and nothing delivers that better than shading techniques. Shading isn’t just evenly distributed lines, but a technical tool which breathes life into your drawing, particularly when portraying the magnificence of an eagle. When developing the superlative of your eagle sketch, focus on areas such as the wings, head, and talons, as these are the defining features of this majestic bird. Contouring the bird starts with simple and soft lines, but shading helps underline the intricately layered feathers, giving depth and dimension to their layout. Feathers in reality possess a layered and textured appearance, hence use a combination of soft and hard lead pencils to emulate this effect. Comprehending the subtle variations in color intensity in a real-life eagle will guide you to master the art of shading your sketch. Use the technique of hatching for the eagle's body. This is a technique where a series of parallel lines are drawn to simulate a light source highlighting the feathers. A softer hatch provides a lighter impression which best portrays the distinctive “white head” feature of an eagle. When it comes to the wings, stippling would be the perfect approach. This technique uses a series of dots which can emphasize the coarse texture of an eagle's extensive wings. The concentration of dots dictates the perceived darkness or lightness, enabling you to unveil the highly detailed spread of the wings. The eagle's talons, a symbol of its power, must not be left out. For this region, employ the cross-hatching method which intensifies the depth and overall realism of the sharp claws. The crossover lines in varying densities depict the hard-edged nature of the talons assertively. By enhancing your eagle drawing with these shading techniques, it can leap off the page and emulate a life-like illusion. Incorporating these upgrades in your sketch relays a robust depiction of this magnificent bird, making it not just an average drawing, but an art piece that compellingly speaks a narrative. As you refine your shading skills, your eagle drawing will not only be a display of your dexterity but a testament of the unique expression of life pencils can capture.
Adding Details to Enhance Realism in Your Eagle Drawing
Adding details to your eagle drawing can significantly enhance its realism and bring your artwork to life. The first element to consider is texture; an eagle's feathers are not uniformly smooth, and capturing their rugged quality can add a layer of depth to your drawing. You can create this effect with carefully placed lines and shading. Try to observe the direction and length of the feathers in different parts of the eagle's body -the wings, tail, chest, and head- and replicate this in your drawing. Take your time with the eagle's eyes, as they are among the most striking features of this majestic bird. They should look sharp and alert, reflecting the eagle's keen sight. The beak should also be a focal point, showing its power and predatory nature. Try to replicate its hooked form and add some shine at the top to show its smoothness. Moreover, don't underestimate the value of the background in enhancing the realism of your eagle drawing. An aerial view of a forest, or perhaps cliffs and skies, not only situates your eagle in its natural habitat, but it adds an element of story. Your audience can imagine the eagle soaring high in the sky or perched, watching out for its prey. Using various tones and gradations to portray the interplay of light and shadow can greatly contribute to the three-dimensionality of your drawing. Pay attention to the direction of light and how it casts shadows, especially on the eagle's contour and wings. Lastly, remember that adding details should not compromise the coherence of your drawing. All elements should harmoniously fit together and each enhancement should justify its role in making the eagle look as realistic as possible. These considerations can certainly add more life to your eagle illustration. By devoting time to these small but significant details, you are not only mastering the art of drawing an eagle but also honing your overall observational and drawing skills. With persistence and patience, these finer details would eventually become intuitive, naturally integrating into your drawing process and consistently enhancing the realism in your artworks.
Tips and Tricks for Final Touches to Your Eagle Sketch
Adding final touches to your eagle sketch can transform a simple drawing into a masterpiece. When it comes to this phase, it's all about mastering the minute and delicate details. Begin by refining your sketch's contouring. Achieve this by delicately adding lines along the feather pattern and working meticulously around the beak, eyes, and talons where intricacy is critical. Wisely use your pencil to produce varying tones and depths. The spread of the wings, for example, should have a perfect gradient from dark to light, capturing the depths and highlights. The next tip is incorporating a high level of realism to your sketch. Here's where observing a real eagle's photo or footage becomes beneficial. It provides you with a visual template for you to mimic the texture and pattern of an eagle's feathers on your sketch. Pay acute attention to the eagle's fierce eye and strive to replicate this powerful expression on your sketch. Remember, the eagle's eyes are its most distinctive feature, hence the importance of giving it special attention. Don’t forget to use your eraser for more than just correcting errors. An eraser can be a tool to create highlights, unveiling clever areas of illumination, making your sketch more lively and striking. Have a sharp eraser on hand to fine-tune areas of your drawing, such as the edges of the beak or claw's points. Another trick is to focus on the background. Instead of leaving a plain backdrop, sketch in an inspiring natural environment your eagle could be soaring over, such as mountains or valleys. This will not only add depth but also showcase your drawing prowess. Finally, be patient—with the drawing and yourself. Consider every stroke as something that can add value to your sketch. There are no fast rules in art. The detailing will take time, but that's what differentiates a superficial sketch from a masterpiece. Take regular breaks and view your sketch from a distance. This will provide a refreshing perspective, helping you perceive any inconsistencies or areas that need more work. These tips and tricks are not exclusively for your eagle sketch, but these are fundamental techniques that you can apply to any drawing. The power of these simple yet effective modifications can undoubtedly increase the overall appeal and quality of your artwork, allowing your eagle to truly take flight. Remember, every artist has a unique style, so feel free to adapt these strategies to suit your personal creative expression.