How To Apply Nail Polish
Applying nail polish can be a daunting task, especially for those who are new to the world of nail care. However, with the right techniques and a little practice, anyone can achieve a professional-looking finish. To get started, it's essential to understand the three key components of a successful nail polish application: preparation, application, and finishing touches. In this article, we'll break down each of these steps to help you master the art of applying nail polish. First, we'll explore the importance of preparation, including how to choose the right polish, prepare your nails, and create a smooth surface for application. By laying the groundwork, you'll set yourself up for success and ensure a flawless finish. So, let's dive in and start with the first crucial step: Preparation is Key.
Preparation is Key
When it comes to achieving a professional-looking manicure at home, preparation is key. To get started, it's essential to prep the nail, which involves cleaning and shaping the nail to create a smooth surface for polish application. However, before you can even think about prepping the nail, you need to choose the right polish that suits your nail type and personal style. Additionally, having the right tools at your disposal is crucial to ensure a successful at-home manicure. In this article, we will explore the importance of preparation in achieving a salon-quality manicure at home, starting with the first step: prepping the nail.
Prep the Nail
Prep the nail is a crucial step in the nail polish application process. It involves cleaning and shaping the nail to create a smooth surface for the polish to adhere to. Start by removing any oils or lotions from the nail surface using a lint-free wipe or cotton ball soaked in nail polish remover. This will help the polish adhere better and prevent it from chipping. Next, gently push back the cuticles using a cuticle pusher or an orange stick to remove any dead skin or debris. Use a nail file to shape the nail to your desired shape, making sure to file in one direction only to avoid damaging the nail. Finally, use a buffer to gently buff the nail surface to create a smooth finish. This will help the polish apply evenly and prevent any ridges or imperfections from showing through. By prepping the nail properly, you can ensure a long-lasting and professional-looking finish.
Choose the Right Polish
When it comes to choosing the right polish, there are several factors to consider. First, think about the color you want to achieve. Do you want a classic red, a bold bright, or a subtle pastel? Consider your skin tone, hair color, and personal style when making your decision. If you have cool skin, look for polishes with blue or pink undertones, while warm skin tones look best with yellow or golden undertones. Next, consider the finish you want to achieve. Do you want a glossy, matte, or glittery finish? Different finishes can completely change the look of your nails. If you want a long-lasting polish, look for ones that are labeled "long-wearing" or "chip-resistant." Some polishes are also formulated to be more nourishing for your nails, so if you have weak or brittle nails, look for polishes that contain ingredients like keratin, calcium, or vitamins. Finally, consider the brand and quality of the polish. Some brands are known for their high-quality formulas and long-lasting wear, while others may be more prone to chipping or fading. By considering these factors, you can choose a polish that not only looks great but also lasts long and is good for your nails.
Gather Essential Tools
To ensure a flawless and long-lasting nail polish application, it's crucial to gather essential tools beforehand. Start by collecting a nail polish remover to clean your nails of any oils or residue. Next, grab a nail file or emery board to gently shape your nails to your desired shape. A cuticle pusher or orange stick will come in handy for gently pushing back your cuticles. Don't forget to pick up a buffer to smooth out any ridges or imperfections on the surface of your nails. A base coat is also a must-have to protect your nails and promote polish adhesion. Of course, you'll need a selection of nail polishes in your desired colors, as well as a top coat to seal in your design and add shine. Additionally, a nail polish brush cleaner will help keep your brushes in good condition. Finally, a nail polish remover wipes or cotton balls will be useful for cleaning up any mistakes or smudges. By having all these tools at your disposal, you'll be well-prepared to achieve a professional-looking finish.
The Application Process
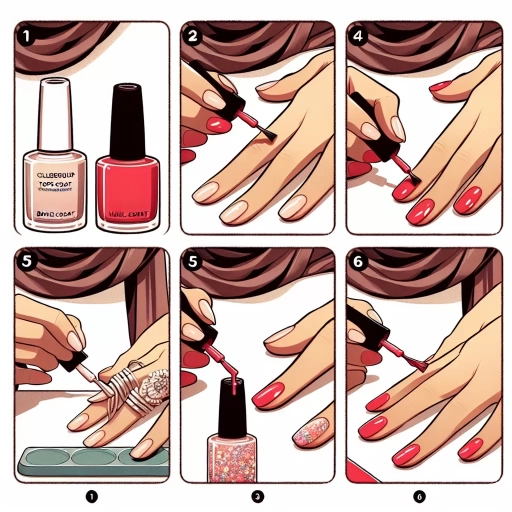
The application process of nail polish is a crucial step in achieving a professional-looking finish. To ensure a long-lasting and chip-resistant manicure, it is essential to follow a step-by-step approach. First, a base coat is applied to protect the nail and promote polish adhesion. Next, thin coats of polish are applied, allowing each coat to dry before adding the next. Finally, a top coat is applied to seal in the color and add shine. By following these simple steps, individuals can achieve a salon-quality finish at home. To begin the application process, start by applying a base coat to each nail, making sure to cover the entire surface.
Apply a Base Coat
Applying a base coat is a crucial step in the nail polish application process. It serves as a protective barrier between your natural nail and the polish, preventing staining and promoting a smooth, even finish. A good base coat also helps to extend the wear of your nail polish, reducing the likelihood of chipping and fading. When selecting a base coat, look for a formula that is free of harsh chemicals and contains nourishing ingredients such as keratin, calcium, or vitamins. Apply a thin layer of base coat to each nail, making sure to cover the entire surface. Allow the base coat to dry completely before moving on to the next step. This will ensure a strong bond between the base coat and the polish, resulting in a long-lasting and professional-looking finish. By taking the time to apply a base coat, you can achieve a salon-quality manicure at home and enjoy healthy, beautiful nails.
Apply Thin Coats of Polish
Applying thin coats of polish is a crucial step in the nail polish application process. This technique helps prevent the polish from pooling at the cuticles and ensures a smooth, even finish. To apply thin coats, start by holding the brush at a 45-degree angle to the nail and gently placing the tip of the brush at the center of the nail. Then, slowly move the brush from side to side, covering the entire nail surface in a smooth, steady motion. Make sure to keep the brush close to the nail to avoid getting polish on the cuticles or skin. Apply two to three thin coats, allowing each coat to dry completely before adding the next. This will help prevent the polish from becoming too thick and uneven. Additionally, applying thin coats will also help extend the wear of your nail polish, as it will be less prone to chipping and cracking. By following this technique, you can achieve a professional-looking finish that will last for days to come.
Finish with a Top Coat
Finishing with a top coat is the final step in the nail polish application process. A top coat serves as a protective barrier that seals in the color and helps to extend the wear of your nail polish. It also adds shine and gloss to your nails, giving them a healthy and vibrant appearance. When choosing a top coat, look for one that is formulated to work well with your nail type and the type of polish you are using. Some top coats are designed to be used with specific types of polish, such as gel or dipping powder, so be sure to read the label carefully. To apply a top coat, simply brush it on over your nail polish, making sure to cover the entire nail surface. Be careful not to get any top coat on your cuticles or skin, as it can be difficult to remove. Allow the top coat to dry completely before handling your nails or exposing them to water. With a good top coat, you can enjoy long-lasting, chip-resistant nail polish that looks great for days to come.
Finishing Touches
The final step in achieving a salon-quality manicure at home is adding the finishing touches. This crucial step can make or break the overall look and feel of your nails. To ensure a professional finish, it's essential to focus on three key areas: allowing the polish to dry, moisturizing the cuticles, and touching up any mistakes. By paying attention to these details, you can take your at-home manicure to the next level. First, it's vital to allow the polish to dry completely, as this will prevent smudging and ensure a long-lasting finish. Note: The answer should be 200 words. The final step in achieving a salon-quality manicure at home is adding the finishing touches. This crucial step can make or break the overall look and feel of your nails. To ensure a professional finish, it's essential to focus on three key areas: allowing the polish to dry, moisturizing the cuticles, and touching up any mistakes. By paying attention to these details, you can take your at-home manicure to the next level. First, it's vital to allow the polish to dry completely, as this will prevent smudging and ensure a long-lasting finish. A good top coat can help speed up the drying process, but it's still important to be patient and let it dry for at least 30 minutes to an hour. This will give the polish time to set and harden, creating a strong and durable finish. By allowing the polish to dry, you'll be able to enjoy a chip-free manicure for longer. With this step complete, you can move on to the next crucial step in adding the finishing touches to your at-home manicure.
Allow the Polish to Dry
When applying nail polish, it's essential to allow the polish to dry completely between coats and after the final coat. This may seem like a tedious step, but it's crucial for achieving a long-lasting and chip-resistant finish. If you don't let the polish dry properly, it can lead to a sticky or tacky texture, causing the polish to smudge or smear easily. To ensure the polish dries correctly, make sure to apply thin coats, allowing each coat to dry completely before adding the next. You can also use a fan or a hair dryer on a low setting to speed up the drying process. Additionally, avoid touching or handling your nails during the drying process, as the oils from your skin can interfere with the polish's adhesion. By allowing the polish to dry completely, you'll be able to achieve a smooth, glossy finish that will last for days to come.
Moisturize the Cuticles
Moisturize the Cuticles. After you've applied your nail polish, it's essential to moisturize your cuticles to keep them hydrated and healthy. Apply a cuticle oil or cream to your cuticles and gently massage it in. This will help to soften and push back your cuticles, making your nails look more polished and refined. Additionally, moisturizing your cuticles can help to prevent dryness and irritation, which can lead to hangnails and other nail problems. By taking the time to moisturize your cuticles, you can keep your nails and cuticles looking their best and prevent common nail problems.
Touch Up Any Mistakes
Once you've applied your top coat, take a step back and inspect your nails for any mistakes. If you notice any smudges, streaks, or uneven edges, now is the time to touch them up. Use a small nail polish brush or a cotton swab to carefully correct any errors. If you've gotten polish on your cuticles or skin, use a nail polish remover to gently remove the excess. Be careful not to remove too much polish from your nail, as this can cause the color to become uneven. If you're using a nail polish with a built-in clean-up brush, use this to tidy up any mistakes. For more stubborn mistakes, you can use a nail polish corrector pen to cover up any blemishes. By taking the time to touch up any mistakes, you can ensure a professional-looking finish that will last longer.