How To Draw A Mouth
Understanding Basic Shapes and Proportions
The Importance of Basic Shapes
In any type of drawing, understanding basic shapes is a key first step. Shapes, whether geometric, organic, or more abstract, serve as the foundation for creating any structure or form, including mouths. They guide us in figuring out the overall layout of the subject we are drawing, helping to establish proportions, spatial relationships, and perspective. For instance, when drawing a mouth, the shape could potentially resemble an irregular oval, which can then be further refined and detailed. Recognizing this shape can simplify the process and make it more manageable, especially for beginners.
Determining Proportions
In the context of drawing a mouth, proportions refer to the size and placement of the mouth in relation to other facial features. Generally, the width of the mouth should align with the middle of each eye, although this can vary depending on the individual or the angle of the face. The size of the mouth, including the thickness of the lips, can vary greatly from person to person and should be observed carefully. Understanding proportions is fundamental to achieve a realistic representation.
Integrating Shapes and Proportions
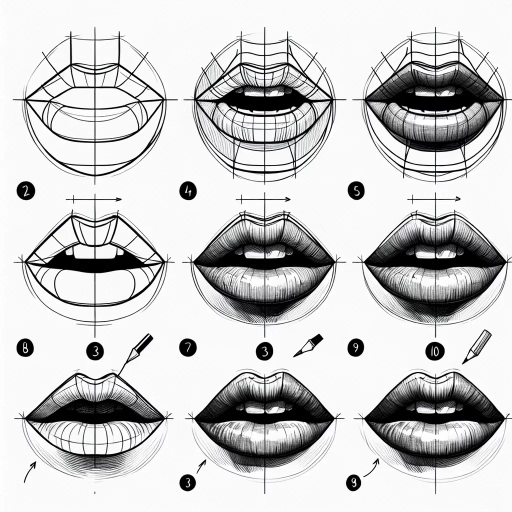
Merging basic shapes and proportions involves using shapes to map out the mouth, then adjusting these shapes to match the observed or desired proportions. To draw a mouth, one could start by drawing an oval to represent the overall shape, then dividing this oval to plot the upper and lower lips. Once the basic shapes are laid out, they can be tweaked for accuracy, eventually adding detailed features such as the lip lines, ridges, and teeth.
Mastering Shading and Highlighting
The Role of Shading
Shading is a crucial technique in drawing that helps translate 3D objects into 2D format. By varying the intensity of shading, we can indicate the depth and volume of the mouth, as well as the texture of the lips. Shading the corners of the mouth darker, for example, can give the impression of depth, while gentler, wider shading can create the rounded appearance of the lips.
Using Highlights Effectively
Highlights are areas on the object that reflect light, appearing brighter than the surrounding areas. They are particularly important in portraying shiny or wet surfaces, such as lips. Effective use of highlights can greatly elevate the realism and depth of the drawing. As a rule of thumb, the shinier the surface, the smaller and brighter the highlight would be. Carefully observing the subject and accurately representing these highlights can make a significant difference.
Combining Shading and Highlighting
Merging shading and highlighting effectively is all about contrast. This principle is especially relevant when drawing a mouth, as the lips often have a combination of shaded areas and highlights due to their curvature and reflective surface. One method is to begin with a mid-tone shade over the entire mouth, establish where the darkest shadows and brightest highlights are, then progressively work to darken the shadows and lighten the highlights until the desired contrast and depth are achieved.
Incorporating Texture and Details
Depicting Lip Texture
Lips have a unique texture that can greatly influence how a mouth looks in a drawing. They typically exhibit a characteristic pattern of vertical lines, particularly visible on the lower lip. Depicting this texture can be achieved by using slightly darker, closely-spaced lines following the shape of the lips. The key is subtlety - the lines should be visible, but not too dominant.
Adding Teeth and the Inner Mouth
Drawing teeth and the inner mouth properly is useful for portraying mouths in different expressions or positions. The first important aspect to consider is the shape of the teeth - they should not be drawn as perfect, identical rectangles. Instead, natural-looking teeth are slightly varied in shape and size, with subtle gaps and overlaps. For the inner mouth, proper shading is crucial to show depth and the darker environment inside the mouth.
Perfecting Details with Finishing Touches
No drawing is truly complete without a few finishing touches to refine and perfect the details. These could include intensifying the shadows and highlights, smoothing out the shading, or finessing the details of the lip texture and teeth. A handy technique is using an eraser to add subtler highlights, such as the shine on the lips or the light bouncing off the teeth. Small final adjustments can dramatically enhance the overall quality and realism of the drawing.