How To Insert A Diva Cup
Here is the introduction paragraph: Inserting a Diva Cup can seem intimidating at first, but with the right approach, it can become a comfortable and empowering experience. To ensure a successful insertion, it's essential to understand the process and take the necessary steps to prepare. Preparation is key to a smooth and stress-free experience. In this article, we will guide you through the process of inserting a Diva Cup, covering the essential steps to take before insertion, the techniques to use during insertion, and what to expect after the cup is in place. By following these steps, you'll be able to confidently and comfortably use your Diva Cup. So, let's start with the first crucial step: Preparation is Key.
Preparation is Key
Preparation is key to achieving success in various aspects of life, including physical and mental well-being. When it comes to physical health, preparation can make all the difference in achieving a healthy and balanced lifestyle. To prepare for a healthy lifestyle, it is essential to choose the right size, understand your body, and practice relaxation techniques. Choosing the right size is crucial in ensuring that you are not overexerting yourself, which can lead to injuries and burnout. Understanding your body is vital in recognizing your limitations and capabilities, allowing you to tailor your approach to your unique needs. Practicing relaxation techniques can help you manage stress and anxiety, leading to a more balanced and healthy lifestyle. By incorporating these three essential elements into your preparation, you can set yourself up for success and achieve your health and wellness goals. Therefore, let's start by exploring the importance of choosing the right size.
Choose the Right Size
When it comes to choosing the right size of Diva Cup, it's essential to consider a few factors to ensure a comfortable and effective fit. The Diva Cup comes in three sizes: Model 0, Model 1, and Model 2. Model 0 is the smallest size, recommended for women under 18 years old or those who have not given birth. Model 1 is the most popular size, suitable for women who have not given birth or have given birth but do not have a heavy flow. Model 2 is the largest size, designed for women who have given birth or have a heavy flow. To determine the right size, consider your age, flow, and whether you have given birth. If you're still unsure, you can consult the Diva Cup website or consult with a healthcare provider. It's also important to note that the size of the Diva Cup may vary depending on the individual's anatomy, so it's essential to try out the cup and adjust as needed. By choosing the right size, you can ensure a comfortable and effective fit, making it easier to use the Diva Cup and enjoy its benefits.
Understand Your Body
Understanding your body is crucial when it comes to using a Diva Cup. It's essential to know your anatomy, including the location and shape of your cervix, vagina, and pelvic floor muscles. Familiarizing yourself with your body will help you determine the best position for inserting the cup, ensuring a comfortable and secure fit. Take some time to explore your body, either by using a mirror or by feeling with your fingers. Locate your cervix, which is usually located at the top of your vagina, and note its position. This will help you guide the cup into place. Additionally, understanding your menstrual cycle and flow will help you choose the right size cup and anticipate when you need to empty it. By being in tune with your body, you'll be able to use your Diva Cup with confidence and ease.
Practice Relaxation Techniques
In addition to preparing your body and mind, practicing relaxation techniques can also help make the process of inserting a Diva Cup smoother and less intimidating. Deep breathing exercises, progressive muscle relaxation, and visualization can help calm your nerves and reduce any anxiety or tension you may be feeling. By taking a few minutes to focus on your breath and relax your muscles, you can help your body relax and open up, making it easier to insert the cup. Additionally, practicing relaxation techniques can also help you become more aware of your body and its sensations, allowing you to better understand what you're feeling and what you need to do to make the process more comfortable. By combining relaxation techniques with proper preparation and a positive mindset, you can set yourself up for success and make the experience of using a Diva Cup a positive and empowering one.
Insertion Techniques
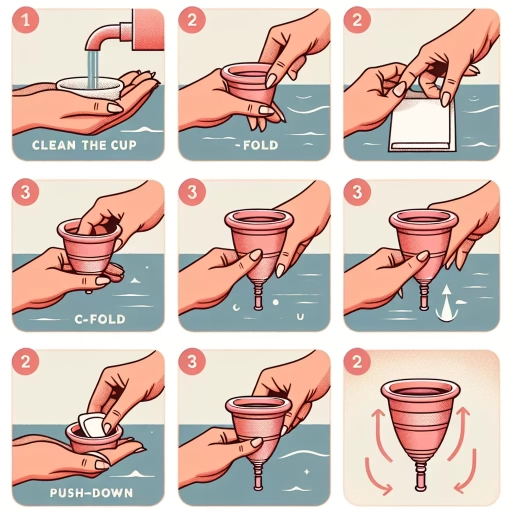
Insertion techniques are a crucial aspect of using a menstrual cup, such as the Diva Cup, effectively and comfortably. Mastering the right insertion techniques can make all the difference in ensuring a leak-free and hassle-free experience. To achieve this, it is essential to focus on three key areas: folding the cup, finding the right angle, and using the right amount of pressure. By folding the Diva Cup correctly, users can ensure a smooth and easy insertion process. This involves creating a compact shape that allows the cup to be inserted into the vagina with minimal discomfort. By doing so, users can set themselves up for success and make the rest of the insertion process much easier. Therefore, let's start by exploring the best ways to fold the Diva Cup.
Fold the Diva Cup
When it comes to inserting a Diva Cup, one of the most effective techniques is to fold the cup. Folding the Diva Cup allows for a more compact and easier insertion, making it a great option for those who are new to using menstrual cups or have a lower cervix. To fold the Diva Cup, start by holding the cup with the stem facing downwards and the rim facing upwards. Then, place your thumb in the center of the cup and your index finger on the rim, and gently squeeze the cup inwards towards the stem. This will create a "C" shape, which is the most common fold used for Diva Cup insertion. Alternatively, you can also try the "push-down" fold, where you place your thumb on the rim and your index finger on the stem, and push the cup downwards to create a more compact shape. Regardless of the fold you choose, make sure to release the cup once it's inside your vagina, allowing it to expand and create a seal. By folding the Diva Cup, you can ensure a comfortable and secure fit, making it easier to enjoy the benefits of menstrual cup use.
Find the Right Angle
When it comes to inserting a DivaCup, finding the right angle is crucial for a comfortable and successful experience. The key is to aim for the back of the vagina, rather than straight up. To do this, sit on the edge of the bed or a chair with your legs apart, and gently fold the cup in half, making a "C" shape. Hold the cup with the stem facing downwards and the curved edge facing upwards. As you insert the cup, tilt it slightly towards the back of your vagina, aiming for the direction of your tailbone. This will help the cup to slide in smoothly and comfortably, rather than pushing against the front wall of the vagina. It's also important to relax your pelvic muscles and take deep breaths, as tension can make insertion more difficult. By finding the right angle and taking your time, you can ensure a comfortable and successful insertion of your DivaCup.
Use the Right Amount of Pressure
When it comes to inserting a Diva Cup, using the right amount of pressure is crucial. If you apply too much pressure, you may experience discomfort or even pain, while too little pressure may result in the cup not opening properly or sitting correctly. To achieve the right balance, start by relaxing your pelvic muscles and taking a few deep breaths. As you insert the cup, gently push it in with your index finger, using a gentle, rocking motion. Apply gentle pressure, increasing it slightly as the cup begins to open and take its shape. Be mindful of your body's signals, and if you feel any discomfort or resistance, stop and adjust your approach. Remember, the goal is to insert the cup comfortably and securely, not to force it into place. By using the right amount of pressure, you'll be able to enjoy a comfortable and leak-free experience with your Diva Cup.
After Insertion
After insertion, it's essential to ensure that your device is functioning correctly and safely. To do this, you'll need to check the seal, adjust as needed, and empty and clean regularly. By following these steps, you can prevent any potential issues and maintain the effectiveness of your device. First, you'll want to check the seal to ensure it's secure and not damaged. This is crucial in preventing any leaks or other problems. Next, you'll need to adjust as needed to ensure a proper fit and optimal performance. Finally, emptying and cleaning regularly will help prevent any buildup or blockages. By following these simple steps, you can ensure your device continues to function correctly and safely. To start, let's take a closer look at the importance of checking the seal. Note: The supporting paragraph is the first paragraph. The supporting paragraph is: After insertion, it's essential to ensure that your device is functioning correctly and safely. To do this, you'll need to check the seal, adjust as needed, and empty and clean regularly. By following these steps, you can prevent any potential issues and maintain the effectiveness of your device. First, you'll want to check the seal to ensure it's secure and not damaged. This is crucial in preventing any leaks or other problems. Next, you'll need to adjust as needed to ensure a proper fit and optimal performance. Finally, emptying and cleaning regularly will help prevent any buildup or blockages. By following these simple steps, you can ensure your device continues to function correctly and safely. To start, let's take a closer look at the importance of checking the seal.
Check the Seal
After insertion, it's essential to check the seal of your DivaCup to ensure it's properly in place and functioning correctly. To do this, gently run your finger around the edge of the cup, feeling for any gaps or air pockets. If you feel any, you may need to adjust the cup's position or try a different folding technique. A good seal is crucial for preventing leaks and ensuring the cup stays in place throughout the day. Additionally, checking the seal can help you identify any potential issues, such as the cup being inserted too high or too low, which can cause discomfort or affect its performance. By taking a moment to check the seal, you can enjoy a worry-free period and get the most out of your DivaCup.
Adjust as Needed
Adjust as needed. Once the DivaCup is inserted, you may need to make some adjustments to ensure it's in the correct position and comfortable. If you feel the stem or the cup itself, it's likely not inserted far enough. Gently push the cup further into your vagina until you no longer feel it. You can also try rotating the cup to find a more comfortable position. If you experience any discomfort or pressure, you may need to adjust the cup's position or remove it and reinsert it. It's also important to make sure the cup is not twisted or folded, as this can cause discomfort and affect its performance. To check the cup's position, you can insert a finger into your vagina and feel for the rim of the cup. If it's not in the correct position, you can use your finger to gently guide it into place. Remember, it may take some time to get used to wearing a DivaCup, so be patient and don't be afraid to make adjustments as needed. With a little practice, you'll be able to insert and wear your DivaCup with confidence.
Empty and Clean Regularly
To ensure a hygienic and comfortable experience with your Diva Cup, it's essential to empty and clean it regularly. This involves removing the cup from your vagina, pouring out the menstrual fluid, and washing it with mild soap and warm water. You should empty your Diva Cup at least every 12 hours, or more often if you have a heavy flow. After emptying, rinse the cup thoroughly with warm water to remove any remaining menstrual fluid. Then, use a mild soap that's fragrance-free and hypoallergenic to clean the cup. Avoid using harsh chemicals, abrasive materials, or scented soaps, as these can cause irritation and damage the silicone material. Once cleaned, rinse the cup again with warm water to remove any soap residue. You can also sanitize your Diva Cup by submerging it in boiling water for 5-7 minutes or using a Diva Cup sanitizing cup. Regular cleaning and sanitizing will help prevent bacterial growth, reduce odors, and keep your Diva Cup in good condition. By following these simple steps, you can enjoy a safe, healthy, and convenient menstrual experience with your Diva Cup.