How To Trim Brussel Sprouts
Here is the introduction paragraph: Trimming Brussels sprouts is an essential step in preparing them for cooking, as it helps to remove damaged or discolored leaves, promote even cooking, and enhance their overall appearance. To achieve perfectly trimmed Brussels sprouts, it's crucial to understand the importance of preparation, various trimming techniques, and post-trimming care. Preparation is key to ensuring that your Brussels sprouts are clean, dry, and ready for trimming. By understanding the different trimming techniques for various types of sprouts, you can tailor your approach to achieve the best results. Additionally, proper post-trimming care and storage can help to maintain the freshness and quality of your trimmed Brussels sprouts. In this article, we will explore these essential steps in detail, starting with the importance of preparation.
Preparation is Key
When it comes to preparing Brussels sprouts, many people are intimidated by the process, but with the right approach, it can be a breeze. Preparation is key to unlocking the full flavor and nutritional potential of these tiny cabbage-like vegetables. To start, it's essential to choose the right tools for the job, as this will make all the difference in the efficiency and effectiveness of the preparation process. Understanding the anatomy of Brussels sprouts is also crucial, as it will help you to identify the best ways to trim, cut, and cook them. Finally, preparing the workspace is vital to ensure a smooth and safe preparation process. By considering these three key factors, you'll be well on your way to becoming a Brussels sprouts preparation pro. So, let's start by exploring the importance of choosing the right tools for the job.
Choosing the Right Tools
Choosing the right tools is essential for trimming Brussels sprouts efficiently and effectively. A sharp paring knife or a pair of kitchen shears are the best tools for the job. A paring knife is ideal for removing the stem and any damaged or discolored leaves, while kitchen shears are perfect for trimming the sprouts to a uniform size. It's also important to choose a cutting board that is stable and easy to clean, as Brussels sprouts can be messy to work with. Additionally, a vegetable peeler can be useful for removing any tough or woody stems. By having the right tools on hand, you'll be able to trim your Brussels sprouts quickly and easily, making the process much less daunting. Furthermore, using the right tools will also help to prevent accidents and injuries, as dull or poorly maintained tools can be hazardous to work with. Overall, taking the time to choose the right tools will make a big difference in the quality of your trimmed Brussels sprouts and the overall trimming experience.
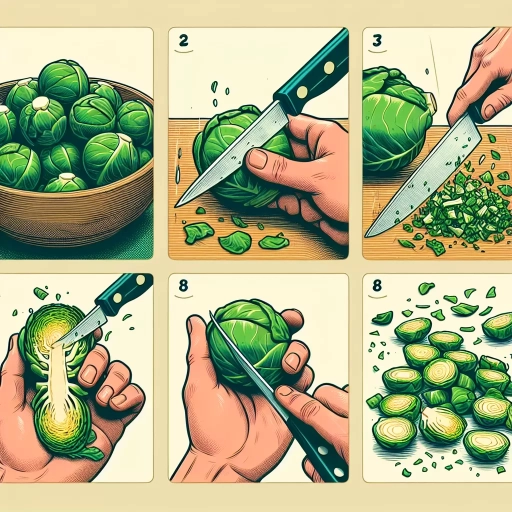
Understanding Brussels Sprouts Anatomy
Understanding Brussels sprouts anatomy is crucial for effective trimming. A Brussels sprouts plant consists of a large stem with a series of tightly packed, bud-like sprouts that resemble miniature cabbages. Each sprout is made up of several layers of leaves that are tightly wrapped around a central core. The outer leaves are typically a deeper green color and are often more bitter than the inner leaves. The stem that connects the sprouts to the plant is usually tough and fibrous, and should be removed during trimming. The base of the sprout, where it meets the stem, is often slightly indented and may have a small amount of stem attached. This area should be carefully trimmed to remove any tough or woody tissue. By understanding the anatomy of Brussels sprouts, you can effectively trim them to remove any tough or bitter parts, leaving you with a delicious and tender vegetable.
Preparing the Workspace
Preparing the workspace is a crucial step in trimming Brussels sprouts efficiently. Start by clearing a large, flat surface, such as a kitchen counter or table. Cover the surface with a clean, dry towel or a silicone mat to prevent the sprouts from rolling around and to make cleanup easier. Next, gather all the necessary tools and ingredients within arm's reach. This includes a sharp paring knife, a cutting board, a bowl or container for the trimmed sprouts, and a trash can for the discarded leaves and stems. Having everything organized and within reach will save time and reduce frustration. Additionally, consider wearing an apron or protective clothing to prevent stains and splatters. Finally, make sure the workspace is well-lit, allowing you to see the sprouts clearly and make precise cuts. By taking the time to prepare the workspace, you'll be able to focus on trimming the Brussels sprouts quickly and effectively, resulting in a delicious and healthy side dish.
Trimming Techniques for Different Sprouts
Trimming is an essential part of sprout care, as it helps to promote healthy growth, prevent overcrowding, and encourage the development of strong, robust plants. Different types of sprouts require different trimming techniques, and understanding these techniques is crucial for achieving optimal results. For small and tight sprouts, a gentle touch is required to avoid damaging the delicate leaves. In contrast, large and loose sprouts may require more aggressive trimming to prevent them from becoming leggy and weak. Additionally, sprouts with damaged or discolored leaves may need to be trimmed to prevent the spread of disease and encourage healthy growth. By mastering the art of trimming, growers can help their sprouts reach their full potential and enjoy a bountiful harvest. For small and tight sprouts, a gentle touch is required to avoid damaging the delicate leaves, which is why we will first explore the techniques for trimming small and tight sprouts.
Trimming Small and Tight Sprouts
Trimming small and tight sprouts requires a delicate touch to avoid damaging the delicate buds. To trim small sprouts, start by cutting off the stem at the base, just above the leaf node. This will help the sprout to grow back and encourage new growth. Next, gently remove any damaged or discolored leaves, taking care not to pull on the stem. For tight sprouts, use a sharp knife or kitchen shears to carefully trim around the edges, removing any tough or woody leaves. Be careful not to cut too much, as this can cause the sprout to become loose and fall apart. Instead, aim to trim just enough to loosen the leaves and allow for even cooking. It's also important to trim small and tight sprouts just before cooking, as this will help to preserve their texture and flavor. By trimming small and tight sprouts with care, you can help to bring out their natural sweetness and tender texture, making them a delicious addition to any meal.
Trimming Large and Loose Sprouts
Trimming large and loose sprouts requires a slightly different approach than trimming smaller, more compact sprouts. For large sprouts, it's essential to remove any damaged or discolored leaves, as these can be bitter and affect the overall flavor. Start by cutting off the stem at the base of the sprout, then gently remove any loose or damaged leaves. Next, trim the sprout in half or quarters, depending on its size, to help it cook more evenly. For loose sprouts, such as those that have begun to open or have a more relaxed structure, it's crucial to trim them more carefully to prevent them from falling apart. To do this, trim the stem at the base, then gently remove any loose or damaged leaves. You can also trim the sprout into smaller sections or florets to help it hold its shape during cooking. When trimming large and loose sprouts, it's also important to consider the cooking method. For example, if you're roasting or grilling the sprouts, you may want to trim them into larger sections to allow for even browning. On the other hand, if you're sautéing or steaming the sprouts, you may want to trim them into smaller sections to help them cook more quickly. By trimming large and loose sprouts correctly, you can help bring out their natural sweetness and texture, and ensure they're a delicious addition to any meal.
Trimming Sprouts with Damaged or Discolored Leaves
Trimming sprouts with damaged or discolored leaves is a crucial step in maintaining their quality and promoting healthy growth. When sprouts develop damaged or discolored leaves, it can be a sign of stress, disease, or pests, which can quickly spread to other parts of the plant. By removing these affected leaves, you can prevent the spread of disease and encourage the sprouts to focus their energy on producing new, healthy growth. To trim sprouts with damaged or discolored leaves, start by inspecting the plant carefully and identifying the affected areas. Use a pair of clean, sharp scissors or pruning shears to carefully cut off the damaged or discolored leaves at the base of the stem, making sure not to damage the surrounding tissue. Remove any weak or spindly growth, and cut back the sprouts to about half their height to encourage bushy growth and prevent the plant from becoming leggy. Regular trimming of damaged or discolored leaves will help to maintain the overall health and appearance of your sprouts, and promote a bountiful harvest.
Post-Trimming Care and Storage
Proper post-trimming care and storage are crucial to maintaining the quality and freshness of your sprouts. After trimming, it's essential to take the right steps to ensure your sprouts remain healthy and vibrant. This involves removing excess moisture, storing trimmed sprouts in the refrigerator, and freezing them for later use. By following these steps, you can enjoy your sprouts for a longer period while preserving their nutritional value. One of the most critical steps in post-trimming care is removing excess moisture, which can lead to mold and bacterial growth if not addressed promptly. (Note: The supporting paragraphs are not included in this request)
Removing Excess Moisture
When it comes to post-trimming care and storage, one of the most crucial steps is removing excess moisture from the trimmed Brussels sprouts. This is because excess moisture can lead to mold, bacterial growth, and a shorter shelf life. To remove excess moisture, start by gently shaking the trimmed sprouts to remove any loose water droplets. Next, use a clean towel or paper towels to pat the sprouts dry, paying extra attention to the cut ends. You can also use a salad spinner to remove excess moisture, but be gentle to avoid bruising the delicate buds. Another effective method is to spread the trimmed sprouts out in a single layer on a clean towel or paper towels, allowing them to air dry for about 30 minutes to an hour. This will help to evaporate any remaining moisture, leaving the sprouts dry and ready for storage. By removing excess moisture, you can help to prevent spoilage and keep your trimmed Brussels sprouts fresh for a longer period.
Storing Trimmed Sprouts in the Refrigerator
Storing trimmed sprouts in the refrigerator is a crucial step in maintaining their freshness and quality. After trimming, it's essential to store the sprouts in a way that prevents moisture from accumulating and promotes airflow. To do this, place the trimmed sprouts in a breathable container or plastic bag with holes, allowing for air circulation and preventing the buildup of condensation. You can also wrap the sprouts in a damp paper towel or cloth to maintain humidity, but make sure to change it every day to prevent bacterial growth. Store the container or bag in the crisper drawer of your refrigerator, set at a consistent temperature below 40°F (4°C). This will help to slow down the sprouts' respiration process, keeping them fresh for a longer period. Typically, trimmed Brussels sprouts can last for 3 to 5 days in the refrigerator, but it's best to use them within 24 hours for optimal flavor and texture. Regularly check on the sprouts for signs of spoilage, such as sliminess, mold, or a sour smell, and remove any affected sprouts to prevent the rest from deteriorating. By following these storage tips, you can enjoy your trimmed Brussels sprouts for a longer period while maintaining their nutritional value and delicious flavor.
Freezing Trimmed Sprouts for Later Use
Freezing trimmed sprouts is an excellent way to preserve their flavor, texture, and nutritional value for later use. To freeze trimmed sprouts, start by blanching them in boiling water for 3-5 minutes to inactivate the enzymes that cause spoilage. Then, immediately submerge the sprouts in an ice bath to stop the cooking process. Once cooled, pat the sprouts dry with a clean towel or paper towels to remove excess moisture. Next, place the trimmed sprouts in a single layer on a baking sheet lined with parchment paper and put them in the freezer until they are frozen solid, usually about 1-2 hours. Finally, transfer the frozen sprouts to airtight containers or freezer bags, making sure to press out as much air as possible before sealing. Frozen trimmed sprouts can be stored for up to 8-10 months and can be used in a variety of dishes, such as soups, stews, casseroles, and roasted vegetable medleys. When you're ready to use them, simply thaw the desired amount and use them as you would fresh sprouts. Freezing trimmed sprouts is a great way to enjoy their delicious flavor and nutritional benefits year-round, even when they're out of season.