How To Draw A Skull
Understanding the basics of drawing a skull
Knowledge of anatomy
Before learning how to draw a skull, it's imperative to understand that knowledge of anatomy is key. Be it human or animal skull, each has a unique shape and structure that you need to grasp. Basic knowledge within anatomy, specifically osteology (the study of bones), will give you a great foundation on which to start. Keep in mind that every skull consists of two parts: the cranium, which holds the brain, and the mandible or jawbone. Proportions of these parts can vary greatly across different species, but a structural understanding allows for freehand drawing.
Shapes and lines
Shapes are the most basic element of drawing. Drawing a skull commences by sketching an oval, which resembles the general shape of the skull. Practising basic shape sketches will allow a smoother transition to a detailed drawing. Lines further enhance the sketch. They represent the contours of the skull, and different types of lines (like curved or straight) suggest unique structures. A sound grip of shapes and lines is fundamental before you start with shading and detailing.
Observation skills
Observation skills play a significant role when you're learning how to draw a skull or any other object for that matter. Drawing requires copying and manipulating the reality as you perceive it. Hence, observing every minute detail of a skull and sketching it on your canvas is a skill you need to develop.
Step-by-step guide to draw a skull
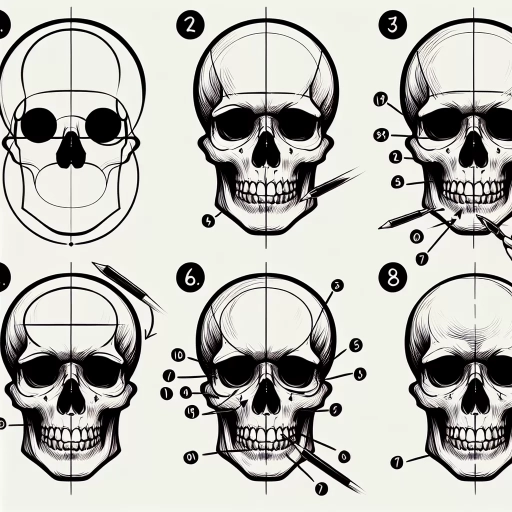
Starting with the outline
Creating the proper outline is the first step for any drawing. Begin by sketching an oval shape for the cranium part of the skull and a narrow rectangle below it for the jaw. It's always a good idea to create lightly drawn guidelines which can be erased later. These guidelines will provide a rough sense of symmetry and proportional layout for your skull drawing.
Detailing the facial features
The next step involves sketching the facial features such as eye sockets, nose, and teeth. Remember, in a skull, eyes are not rounded but more of an almond shape, and the nasal cavity is generally represented by an inverted heart shape. Each tooth should be distinct but uniform, conveying proper alignment and spacing. Having a skull reference image beside you is a good idea to get these features correctly.
Final touches and shading
Once the layout and facial feature details are in place, you can begin the process of smoothing out your outline into a more natural, bone-like texture. After getting the shape right, you can proceed to shading. Shading can make or break your drawing. Attention to light source, reflection, and shadows will add depth and realism to your skull art.
Practising and refining your skills
Practice
Just like any other form of art, skull drawing also requires constant practice. It's only through drawing and redrawing, making mistakes, and learning that you can improve. If one method doesn't work for you, don't be disheartened and try another approach. The more you practice, the more comfortable you will get with the shapes and lines.
Feedback
Feedback is an essential step to improve your drawing skills. Don't hesitate to share your art with others and ask for constructive criticism. You should learn how to take feedback positively and use it to pinpoint your weak areas. Remember, every artist was once a beginner.
Advancing your skills
If you've mastered the basic skull, challenge yourself with more complex structures like a skull with a full set of teeth or even animal skulls. These advanced sketches will force you to understand shapes, lines, and shading in more depth. Also, learning digital tools will undoubtedly enhance your drawing, especially if you plan to turn this hobby into a profession.