How To Draw A Turtle
Understanding the Basics of Drawing a Turtle
The Importance of Learning Basic Shapes
Starting off on the right foot in learning how to draw a turtle begins with understanding basic shapes. Turtles, much like any other objects or living creatures, can be simplified into a series of shapes. Recognizing this is the pivotal first step in drawing a turtle or any subject for that matter. In essence, learning about rectangles, circles, and triangles will enable you to better visualize the turtle's form and structure. The ability to recognize and employ essential shape forms goes a long way in simplifying the complexity of your subject.
- Basic shapes are the foundation of any drawing
- The turtle's shell could be visualized as a hemisphere or a highly rounded triangle
- The turtle's head and legs can be simplified to cylinder and oval shapes respectively
Observational Techniques
Artists often use techniques to help them observe their subjects more closely. One method is to squint. By doing so, unnecessary details are blocked out and the focus is brought upon the bigger shapes and shadows. Adopting these finer observation skills, such as squinting, helps to focus your attention at the task at hand which in turn makes your drawing process easier. Drawing slow and taking time to observe each detail is also another strategy to build your observational skills.
- Squinting helps an artist see broader shapes and shadows
- It's essential to take time to observe before drawing
- Drawing slowly helps capturing more details in your artwork
Consider Lighting and Shading
Understanding and applying light and shade in your artwork will create a three-dimensional effect that brings your turtle drawing to life. Light and shade create depth and richness to an otherwise flat drawing. It's helpful to determine the light source in your drawing, which determinate on which side the light will fall and cast shadows. It's important to progressively build up your shading using a range of different values, shading gradually from light to dark to create a smooth gradient.
- Lighting and shading give depth to your drawing
- Determine the light source to understand where shadows will fall
- Use a range of different shading values to create a realistic 3D effect
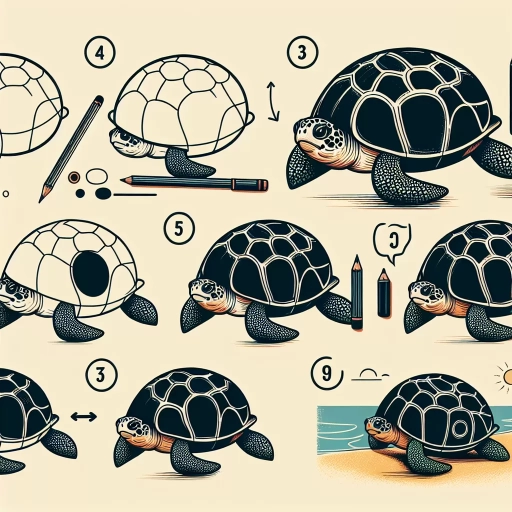
Step-by-Step Guide on Drawing a Turtle
Starting With a Rough Sketch
A rough sketch serves as a guide for your final turtle drawing. Start by lightly penciling in the basic shapes you identified earlier. Drawing these shapes first allows you to get a general sense of the size, proportion, and position of the turtle on your sheet of paper. It also allows room for corrections and changes before adding details and outlines. Your initial sketch does not have to be perfect, so don't be too hard on yourself at this stage. The essential thing is that you are making a start on your drawing.
- Start with a light sketch of basic shapes
- This rough sketch helps you gauge proportion and size
- It's okay for the initial sketch to have mistakes
Adding Details to Your Turtle Drawing
Once you're satisfied with your rough sketch, you can start adding details. It's at this stage that your turtle starts to come to life. The amount of detail adds depth and aesthetic appeal to your drawing. But remember, less is often more in drawing and including too many details can overload and confuse the viewer. It's also important to consider the scale of your drawing when adding details. The larger the scale, the more detail you can add.
- Details bring your turtle to life
- Be careful not to overload your drawing with too much detail
- The scale of your drawing will influence how much detail you can add
Finalizing Your Turtle Drawing With Shading and Texture
Lastly, you'll add shading and texture to your turtle drawing. This process invokes an added layer of interest, richness, and depth to your drawing, elevating it from two dimensions to three. This final step is paramount in creating a realistic, engaging, and aesthetically pleasing drawing of a turtle. Remember, practice is key, and the more you draw, the better you will become.
- Shading and texture bring depth and dimensionality to your drawing
- This final step is essential in creating a realistic drawing of a turtle
- Practice regularly to improve your drawing skills
Common Mistakes in Turtle Drawing and How to Avoid Them
Ignoring Proportions
Ignoring proportions is a common mistake among beginners. Having an accurate sense of proportion is crucial to create a realistic turtle drawing. An excellent tool to help maintain accurate proportions is to use reference lines or a grid. Practice is key in getting your proportions right - don't get disheartened if you don't get it right the first time. It's always a trial and error process.
- Accurate proportions are key to a realistic drawing
- Use reference lines or a grid to maintain proportions
- Don't get disheartened if you don't get proportions right the first time
Pressing Too Hard With Your Pencil
Pencil pressure affects the tone and feeling of the drawing. Pressing too hard can lead to difficulties in erasing errors or making adjustments. It also limits your ability to build up layers of tone. Controlling your pencil pressure will allow you to create various tones that will add depth and dimension to your turtle drawing.
- Pencil pressure affects tone and feel of your drawing
- Pressing too hard can make erasing errors difficult
- Controlling pencil pressure allows you to create more depth and dimension
Not Using a Variety of Lines
Using a variety of lines in your turtle drawing gives it more life and vibrancy. Lines can suggest motion, texture and form. By playing around with line thickness, length and direction, you can create a more engaging and dynamic turtle drawing. It's important not to restrict yourself to using a monotonous line style.
- Variety of lines can suggest motion, texture and form
- Play around with line thickness, length and direction
- Don't restrict yourself to a monotonous line style