How To Draw A Hockey Player
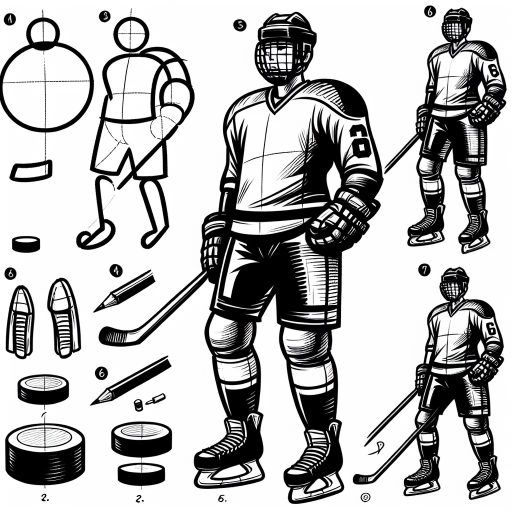
Here is the introduction paragraph: Drawing a hockey player can be a fun and rewarding experience, especially for hockey enthusiasts and art lovers alike. To create a realistic and engaging drawing, it's essential to understand the basics of drawing a hockey player, including the equipment, body positioning, and facial expressions. In this article, we will guide you through the process of drawing a hockey player, starting with the basics, then moving on to sketching the body and facial features, and finally adding details and final touches to bring your drawing to life. By following these steps, you'll be able to create a high-quality drawing that showcases your artistic skills and passion for hockey. So, let's get started by understanding the basics of drawing a hockey player.
Understanding the Basics of Drawing a Hockey Player
Here is the introduction paragraph: Drawing a hockey player can be a challenging task, especially for those who are new to drawing sports figures. To create a realistic and engaging drawing, it's essential to understand the basics of a hockey player's appearance, including their equipment and gear, poses and stances, and proportions and measurements. Familiarizing yourself with the various pieces of equipment and gear that a hockey player wears, such as helmets, pads, and sticks, can help you accurately depict their appearance. Additionally, learning the basic poses and stances that a hockey player assumes during a game, such as skating, shooting, and passing, can add movement and energy to your drawing. By understanding the importance of proportions and measurements, you can ensure that your drawing is balanced and visually appealing. By mastering these fundamental elements, you can create a drawing that captures the spirit and intensity of the game, and that's what we will be exploring in this article, Understanding the Basics of Drawing a Hockey Player.
Familiarizing yourself with hockey player's equipment and gear
. Before you start drawing a hockey player, it's essential to familiarize yourself with the equipment and gear they wear. A hockey player's gear is a crucial part of their overall appearance, and accurately depicting it can make your drawing more realistic and authentic. Start by learning about the different types of equipment, such as helmets, face masks, shoulder pads, elbow pads, gloves, shin guards, and skates. Notice the shapes, sizes, and colors of each piece of gear, as well as how they fit together to form a cohesive whole. Pay attention to the details, such as the straps, buckles, and logos that adorn the equipment. You can find plenty of reference images online or observe hockey players in person to get a better sense of the gear. Additionally, consider the different positions on the ice, such as goalie, defenseman, or forward, as each position has its unique set of equipment and gear. By understanding the intricacies of hockey equipment, you'll be able to draw a more accurate and detailed hockey player, and your artwork will benefit from the added authenticity.
Learning the basic poses and stances of a hockey player
. To accurately draw a hockey player, it's essential to learn the basic poses and stances that are characteristic of the sport. A hockey player's stance is a fundamental aspect of their overall posture and movement on the ice. The most common stance is the "ready position," where the player's feet are shoulder-width apart, with their knees slightly bent and their weight evenly distributed between both feet. This stance allows the player to quickly move in any direction, whether it's to chase after a puck or block a shot. Another common stance is the "skating position," where the player's feet are parallel to each other and their knees are bent at a 90-degree angle. This stance is used when the player is in motion, gliding across the ice with their stick held out in front of them. Additionally, hockey players often use a "crouching position" when they're trying to block a shot or make a save, where they lower their body down and spread their legs wide to cover as much of the net as possible. By mastering these basic poses and stances, you'll be able to accurately capture the dynamic movement and energy of a hockey player in your drawings.
Understanding the importance of proportions and measurements
. Understanding the importance of proportions and measurements is crucial when it comes to drawing a hockey player. Proportions refer to the relationship between the different parts of the body, while measurements refer to the actual size and scale of each part. To draw a realistic hockey player, you need to ensure that the proportions and measurements are accurate. For example, the head should be about one-eighth of the total body height, while the arms and legs should be in proportion to the torso. The measurements of the equipment, such as the hockey stick and skates, should also be accurate in relation to the player's body. By paying attention to proportions and measurements, you can create a drawing that looks balanced, realistic, and visually appealing. Additionally, understanding proportions and measurements can also help you to capture the dynamic movement and action of a hockey player, which is essential for creating a compelling and engaging drawing. By mastering the basics of proportions and measurements, you can take your drawing skills to the next level and create a hockey player that looks like it's ready to jump off the page.
Sketching the Hockey Player's Body and Facial Features
Here is the introduction paragraph: When it comes to drawing a hockey player, it's essential to capture the unique combination of athleticism and protective gear that defines the sport. To create a realistic and engaging illustration, you'll need to focus on three key areas: the helmet and facial protection, the body and equipment, and the facial features that bring the player to life. In this article, we'll explore each of these elements in detail, providing you with the skills and techniques you need to sketch a hockey player with confidence. By mastering the basics of drawing a hockey player's helmet and facial protection, sketching the body and equipment, and adding facial features, you'll be well on your way to creating dynamic and authentic illustrations that capture the excitement of the game. With these skills under your belt, you'll be ready to take your drawing to the next level and tackle more complex subjects, ultimately leading to a deeper Understanding of the Basics of Drawing a Hockey Player.
Drawing the hockey player's helmet and facial protection
. Drawing the hockey player's helmet and facial protection is a crucial step in creating a realistic and detailed illustration. The helmet is a distinctive part of a hockey player's gear, and its shape and design can vary depending on the specific position and team. To draw the helmet, start by sketching a rounded, oval shape that covers the top and back of the head. Add a curved visor that extends from the front of the helmet, making sure to capture its distinctive shape and contours. The visor should be slightly curved and tapered, with a slight lip at the bottom to protect the player's face. Next, add the cage-like facial protection, which consists of a series of horizontal and vertical bars that cover the face and mouth. The bars should be evenly spaced and slightly curved to follow the contours of the face. Make sure to capture the intricate details of the cage, including the screws and rivets that hold it in place. Finally, add some shading and texture to the helmet and facial protection to give it a more realistic and three-dimensional appearance. Pay attention to the way the light reflects off the helmet and visor, and use subtle shading and highlights to capture the nuances of the material. By carefully drawing the helmet and facial protection, you can add a level of authenticity and detail to your illustration that will make it stand out.
Sketching the body, including the jersey, pants, and skates
. To sketch the body of a hockey player, start by drawing the jersey, which should be loose-fitting and slightly baggy. The jersey should have a distinctive shape, with a rounded neckline and a curved hem that falls just above the knees. The sleeves should be long and slightly tapered, with a slight flare at the wrist. Next, draw the pants, which should be tight-fitting and have a distinctive stripe or pattern. The pants should be slightly flared at the bottom, with a slight curve at the ankle. The skates should be drawn with a distinctive shape, with a curved blade and a sturdy boot that rises up to the ankle. The laces should be drawn in a crisscross pattern, with a distinctive bow at the top. When sketching the body, pay attention to the proportions and make sure that the jersey and pants are in proportion to the skates. The skates should be slightly larger than the feet, and the jersey and pants should be slightly loose-fitting. Use gentle, flowing lines to capture the movement and energy of the hockey player's body, and pay attention to the textures and details of the jersey, pants, and skates. With practice and patience, you can create a detailed and realistic sketch of a hockey player's body, complete with jersey, pants, and skates.
Adding facial features, including eyes, nose, and mouth
. Here is the paragraphy: To add facial features to your hockey player, start by sketching the eyes. Draw two small circles for the eyes, making sure to leave a small gap between them. Add pupils to the center of each circle, and then draw a curved line above each eye to create the eyebrows. Next, draw a small oval shape for the nose, making sure it is centered between the eyes. For the mouth, draw a small curved line that follows the natural curve of the face. You can also add some subtle details such as eyelashes and a slight smile to give your hockey player some personality. When drawing the facial features, pay attention to the proportions and make sure they are in line with the rest of the face. The eyes should be about one-third of the way down from the top of the head, and the nose and mouth should be centered and in proportion to the rest of the face. By adding these facial features, you can bring your hockey player to life and give them a unique and recognizable appearance.
Adding Details and Final Touches to Your Hockey Player Drawing
Here is the introduction paragraph: Now that you have a solid foundation in drawing a hockey player, it's time to take your artwork to the next level by adding details and final touches. In this article, we'll explore three key areas to focus on: adding textures and patterns to the hockey player's equipment and uniform, incorporating movement and action into your drawing, and refining your drawing with shading, highlights, and other finishing techniques. By mastering these techniques, you'll be able to create a more realistic and engaging hockey player drawing that showcases your artistic skills. Whether you're a seasoned artist or just starting out, these tips will help you take your drawing from good to great. So, let's dive in and learn how to add the finishing touches to your hockey player drawing, building on the foundational skills you learned in Understanding the Basics of Drawing a Hockey Player.
Adding textures and patterns to the hockey player's equipment and uniform
. Here is the paragraphy: Adding textures and patterns to the hockey player's equipment and uniform can add an extra layer of realism and visual interest to your drawing. For example, you can add a texture to the player's jersey to give it a fabric-like appearance, or add a pattern to the helmet to give it a more dynamic look. You can also add textures to the player's gloves, pants, and skates to give them a more worn and weathered appearance. Additionally, you can add patterns to the player's socks and equipment to give them a more personalized and unique look. When adding textures and patterns, be sure to pay attention to the scale and proportion of the details, as well as the overall balance and harmony of the composition. You can use a variety of techniques to add textures and patterns, including hatching, cross-hatching, and stippling. You can also use reference images to get a better sense of the different textures and patterns that are commonly used in hockey equipment and uniforms. By adding textures and patterns to your drawing, you can create a more detailed and realistic representation of a hockey player, and add an extra layer of depth and visual interest to your artwork.
Incorporating movement and action into your drawing
. Here is the paragraphy: Incorporating movement and action into your drawing can add a dynamic and engaging element to your hockey player illustration. To achieve this, focus on capturing the fluidity and energy of the player's movements. Consider the direction and flow of the player's body, as well as the movement of their equipment, such as the stick and skates. You can also experiment with different poses and angles to convey a sense of motion and action. For example, you could draw the player in mid-stride, with one leg extended and the other bent, or show them in the process of shooting the puck, with their stick extended and their body twisted. Additionally, pay attention to the player's facial expression and body language, as these can also help to convey a sense of movement and energy. By incorporating these elements, you can create a drawing that feels dynamic and engaging, and that captures the excitement and energy of the game.
Refining your drawing with shading, highlights, and other finishing techniques
. Here is the paragraphy: Refining your drawing with shading, highlights, and other finishing techniques can elevate your hockey player drawing from a simple sketch to a visually stunning piece of art. Shading is a crucial aspect of drawing, as it adds depth and dimension to your subject. To create realistic shading, use a range of values, from light to dark, to suggest the contours and textures of the player's body and equipment. Pay particular attention to the areas where the light source is coming from, as this will help create a sense of volume and form. Highlights, on the other hand, can be used to create a sense of shine and reflectivity on the player's gear, such as the helmet, pads, and stick. Use a small brush or a fine-tip pen to add highlights, and be careful not to overdo it, as too many highlights can make the drawing look unnatural. Other finishing techniques, such as hatching and cross-hatching, can be used to add texture and detail to the drawing. Hatching involves creating a series of closely spaced lines that follow the contours of the subject, while cross-hatching involves layering lines at different angles to create a more textured, dimensional look. By incorporating these techniques into your drawing, you can create a rich, detailed, and engaging piece of art that showcases your hockey player in all their glory.