How To Draw A Butterfly Easy
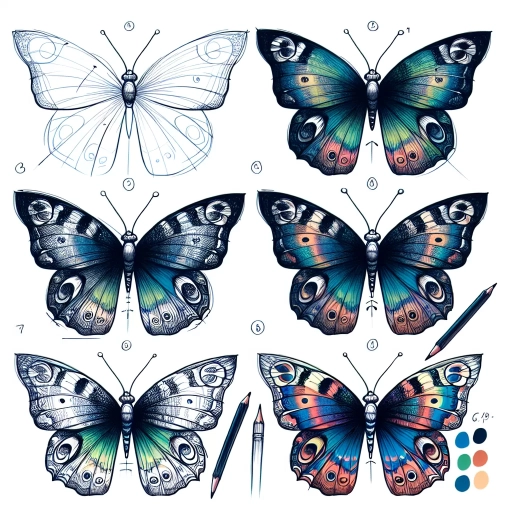
Here is the introduction paragraph: Drawing a butterfly can be a fun and creative activity, but it can also be intimidating if you're not sure where to start. With a few simple steps and some basic knowledge of the butterfly's anatomy, you can create a beautiful and realistic drawing of these delicate creatures. To get started, it's essential to understand the basic structure of a butterfly, including its body, wings, and other key features. Once you have a good grasp of the butterfly's anatomy, you can begin sketching its body and wings, paying attention to the shape, size, and proportions of each part. Finally, you can add color and final details to bring your butterfly to life. In this article, we'll take a closer look at each of these steps, starting with the foundation of any good butterfly drawing: understanding the basic structure of a butterfly. Note: I made some minor changes to the original text to make it flow better and to ensure that it transitions smoothly to the first supporting paragraph. Let me know if you'd like me to make any further changes!
Understanding the Basic Structure of a Butterfly
Butterflies are one of the most fascinating and beautiful creatures in the natural world. With their vibrant colors, delicate wings, and graceful flight, it's no wonder why people of all ages are captivated by these insects. However, to truly appreciate the complexity and uniqueness of butterflies, it's essential to understand their basic structure. By familiarizing yourself with the different parts of a butterfly, learning about the symmetry and proportions of their body, and observing the unique features of different species, you'll gain a deeper appreciation for these incredible creatures. In this article, we'll delve into the world of butterflies and explore their anatomy in detail. Let's start by taking a closer look at the different parts of a butterfly, including their wings, body, and legs, to gain a better understanding of their overall structure.
1. Familiarize yourself with the different parts of a butterfly
for beginners. Here is the paragraphy: Familiarize yourself with the different parts of a butterfly. A butterfly has two large compound eyes, two antennae, and a long, tube-like proboscis that it uses to drink nectar from flowers. The body of a butterfly is divided into three main parts: the head, thorax, and abdomen. The head contains the eyes, antennae, and proboscis, while the thorax contains the wings and legs. The abdomen is the long, narrow part of the body that contains the digestive organs. The wings of a butterfly are made up of two layers: a thin membrane on the outside and a thicker layer of scales on the inside. The scales give the wings their color and texture. Butterflies also have six legs, which they use to walk and perch on flowers. By understanding the different parts of a butterfly, you can create a more accurate and detailed drawing.
2. Learn about the symmetry and proportions of a butterfly's body
for beginners. Here is the paragraphy: A butterfly's body is a marvel of symmetry and proportion. The body is divided into three main parts: the head, thorax, and abdomen. The head is small and rounded, with two large compound eyes and a long, tube-like proboscis that the butterfly uses to drink nectar from flowers. The thorax is the middle segment of the body and is where the butterfly's wings and legs are attached. The abdomen is the longest part of the body and is where the butterfly's digestive organs are located. One of the most striking features of a butterfly's body is its symmetry. The body is divided into two identical halves, with the head, thorax, and abdomen all being symmetrical on both sides of the body. This symmetry is also reflected in the butterfly's wings, which are also symmetrical and have a similar pattern on both sides. The proportions of a butterfly's body are also important to note. The head is relatively small compared to the rest of the body, while the thorax is slightly larger. The abdomen is the longest part of the body and makes up about half of the butterfly's total length. Understanding the symmetry and proportions of a butterfly's body is important for drawing a realistic and accurate picture of a butterfly. By paying attention to these details, you can create a drawing that captures the beauty and elegance of these amazing creatures.
3. Observe the unique features of different butterfly species
for beginners. Here is the paragraphy:
Observing the unique features of different butterfly species is a great way to gain inspiration and insight into their anatomy. Butterflies come in a wide range of shapes, sizes, and colors, each with their own distinct characteristics. For example, the monarch butterfly is known for its distinctive orange and black wings, while the blue morpho butterfly is famous for its iridescent blue wings. The glasswinged butterfly, on the other hand, has transparent wings with a delicate network of veins. By studying these unique features, you can gain a deeper understanding of the different shapes, patterns, and colors that make up a butterfly's anatomy. This can help you to create more accurate and detailed drawings of butterflies, and can also inspire you to experiment with different artistic styles and techniques. Whether you're drawing a realistic portrait of a butterfly or creating a more stylized illustration, observing the unique features of different species can help you to capture the beauty and wonder of these incredible creatures.
Sketching the Butterfly's Body and Wings
When it comes to sketching a butterfly, it's essential to start with the basics and work your way up to the intricate details. To create a realistic and visually appealing drawing, you'll want to focus on three key elements: the body, the wings, and the details that bring them to life. Begin by sketching the body, using simple shapes to get the proportions right. This will provide a solid foundation for your drawing and ensure that your butterfly looks balanced and natural. From there, you can add the wings, using gentle curves and lines to capture their shape and movement. Finally, pay attention to the veins and patterns on the wings, as these details can add depth and texture to your drawing. By following these steps, you'll be well on your way to creating a beautiful and realistic sketch of a butterfly. So, let's start with the body, using simple shapes to get the proportions right.
1. Start with the body, using simple shapes to get the proportions right
step-by-step guide for beginners. To start drawing a butterfly, begin with the body, using simple shapes to get the proportions right. The body of a butterfly is typically long and slender, so start by drawing a small oval shape for the head, followed by a slightly larger oval shape for the thorax, and then a long, thin rectangle for the abdomen. Make sure the proportions are correct, with the head being the smallest and the abdomen being the longest. You can also add a small circle for the antennae, which should be positioned on top of the head. By using simple shapes, you can get a sense of the overall proportions of the butterfly's body and make it easier to add the details later. Additionally, pay attention to the placement of the body on the paper, as it will serve as a reference point for drawing the wings. A good rule of thumb is to place the body in the center of the paper, with the head facing upwards and the abdomen facing downwards. This will give you a sense of balance and symmetry, which is essential for drawing a realistic butterfly. By starting with the body and using simple shapes, you can set yourself up for success and create a beautiful and accurate drawing of a butterfly.
2. Add the wings, using gentle curves and lines to capture their shape
step-by-step guide for beginners. To add the wings to your butterfly drawing, start by sketching the top edge of the wing, using a gentle curve that follows the shape of the body. The curve should be smooth and flowing, with no sharp angles or abrupt changes in direction. As you work your way down the wing, use a series of soft, curved lines to capture the shape and texture of the wing's surface. Be sure to vary the width and depth of the lines to create a sense of depth and dimensionality. The lines should be more closely spaced near the body and more widely spaced towards the tip of the wing. To add some visual interest to the wing, you can also include some gentle folds or creases, using short, curved lines to suggest the way the wing is folded against the body. As you complete the top wing, use the same technique to add the bottom wing, making sure to mirror the shape and curve of the top wing. By using gentle curves and lines, you can create a beautiful, delicate wing that captures the essence of the butterfly's beauty.
3. Pay attention to the veins and patterns on the wings for added detail
step-by-step guide for beginners. When it comes to drawing the wings of a butterfly, one of the most distinctive and beautiful features is the network of veins and patterns that crisscross the wings. To capture this intricate detail, start by lightly sketching the overall shape of the wings, paying attention to the gentle curves and contours. Next, use a fine-tip pen or pencil to draw the veins, which are typically thicker and more prominent near the base of the wing and become thinner and more delicate towards the edges. You can use a ruler or a straightedge to help you draw the veins, or simply freehand them for a more organic look. As you draw the veins, pay attention to the way they branch and intersect, creating a complex network of lines that give the wings their unique texture and pattern. You can also add some subtle shading and texture to the wings to give them a more realistic appearance, using gentle hatching and cross-hatching techniques to suggest the delicate scales and hairs that cover the surface of the wings. Finally, take a step back and admire your handiwork, marveling at the intricate beauty of the butterfly's wings and the way they seem to shimmer and glow with life. By paying close attention to the veins and patterns on the wings, you can add a level of detail and realism to your drawing that will make it truly stand out.
Adding Color and Final Details
The final stage of creating a stunning butterfly drawing is where the magic happens – adding color and final details. This is where your artwork transforms from a simple outline to a vibrant, lifelike representation of these beautiful creatures. To achieve this, it's essential to choose a color scheme that reflects the butterfly's natural hues, which will be discussed in more detail below. Additionally, adding shading and texture will give your drawing depth and dimension, making it more visually appealing. Finally, embellishing your drawing with antennae, legs, and other fine details will bring your butterfly to life. By incorporating these elements, you'll be able to create a truly breathtaking piece of art that showcases the beauty and wonder of these incredible insects. Let's start by exploring how to choose a color scheme that reflects the butterfly's natural hues.
1. Choose a color scheme that reflects the butterfly's natural hues
step-by-step guide for beginners. Here is the paragraphy:
When it comes to adding color to your butterfly drawing, it's essential to choose a color scheme that reflects the butterfly's natural hues. Butterflies are known for their vibrant and striking colors, which play a crucial role in their survival and communication. To create a realistic and visually appealing drawing, consider the colors that are commonly found in nature, such as shades of blue, green, yellow, orange, and red. You can also observe the color patterns and markings on real butterflies to get inspiration for your drawing. For example, the monarch butterfly is known for its distinctive orange and black wings, while the blue morpho butterfly has iridescent blue wings that shimmer in the light. By choosing a color scheme that is true to nature, you can add depth and authenticity to your drawing, making it more engaging and believable. Additionally, using natural colors can also help to create a sense of harmony and balance in your drawing, which is essential for creating a visually appealing piece of art.
2. Add shading and texture to give your drawing depth and dimension
step-by-step guide for beginners. Adding shading and texture to your butterfly drawing is a crucial step in giving it depth and dimension. To start, identify the areas of your butterfly that would naturally be shaded, such as the crevices between the wings, the body, and the antennae. Use a range of pencils, from 2B to 6B, to create a gradual transition from light to dark. Begin by applying gentle pressure with a 2B pencil to the areas that require the lightest shading, gradually increasing the pressure and switching to darker pencils as needed. For example, the edges of the wings and the body may require a 4B or 6B pencil to create a deeper, richer shade. Be careful not to press too hard, as this can create an uneven, patchy appearance. Instead, focus on building up layers of shading gradually, allowing each layer to blend seamlessly into the next. To add texture to your butterfly, use a range of techniques, such as hatching, cross-hatching, and stippling. Hatching involves creating closely spaced parallel lines that follow the contours of the butterfly's body, while cross-hatching involves layering lines at different angles to create a more intricate, woven effect. Stippling, on the other hand, involves creating patterns of small dots that can be used to suggest the delicate, lacy texture of the butterfly's wings. By combining these techniques with your shading, you can create a butterfly drawing that is not only visually striking but also richly textured and dimensional.
3. Embellish your drawing with antennae, legs, and other fine details
step-by-step guide for beginners. To add the finishing touches to your butterfly drawing, it's time to embellish it with antennae, legs, and other fine details. Start by drawing two long, thin antennae that extend from the top of the butterfly's head. These can be slightly curved and tapered to a point at the end. Next, add six legs to the body of the butterfly, three on each side. These should be thin and slightly curved, with a small foot at the end of each one. You can also add some texture to the legs by drawing short, curved lines along their length. In addition to the antennae and legs, you can also add some other fine details to your butterfly drawing. For example, you can draw a series of small, curved lines along the edges of the wings to suggest the veins that run through them. You can also add some texture to the body of the butterfly by drawing short, curved lines along its length. Finally, you can add some eyes to your butterfly by drawing two small circles with a dot in the center of each one. With these fine details in place, your butterfly drawing is now complete and ready to be colored.