How To Take Shellac Off At Home
 In the ever-evolving world of nail care, shellac has become a popular choice due to its durability and lustrous finish. However, removing shellac can be a daunting task when you're sitting at home and wondering how you'll get it off your nails. But what if you could do it effortlessly, right from the comfort of your own home? This comprehensive guide is designed to provide you with insights about taking shellac off at home, giving you the freedom to manage your manicure efficiently. We have structured this article into three main parts. First, we will take a deep dive into 'Understanding Shellac and Its Resilience' to give you an overview of what makes shellac so durable yet challenging to remove. Next, we will introduce you to the 'Materials and Tools Required for At-Home Shellac Removal', which will be your arsenal in this task. Finally, we will walk you through a 'Step-by-Step Guide to Safely Remove Shellac at Home', leaving no room for guesswork. Now, let us start by unfolding the mysteries around Shellac and its resilience.
Understanding Shellac and Its Resilience
Shellac is a versatile, robust, and traditional finish that has seen use in various applications throughout the ages, and continues to find relevance today due to its resilience and longevity. In this deep dive, we will unravel its complex composition, explore the secrets behind its impressive resilience, and provide cautious considerations before you roll up your sleeves to remove it at home. Let's start the journey with a look into what actually constitutes shellac. Derived from the secretions of the Lac insect, shellac's unique properties are a blend of fascinating biology and chemistry. Its all-natural composition contributes not just to its functionality, but also its sustainability – an aspect increasingly valued in today's environmentally aware world. Stay with us as we journey through shellac's strengths and longevity, before culminating in a guide that helps you safely approach shellac removal — if you must. Our comprehension of this substance starts, however, with understanding its composition deeply, right down to its molecular bonds. So, lace up your science boots as we delve into the fascinating world of shellac.
What is Shellac? Understanding Its Composition
Shellac, a resinous substance primarily identified for its usage in furniture finishes and nail salons, continues to gain popularity due to its robust qualities. Originating from the secretions of the Lac beetle, found predominantly in the forests of India and Thailand, shellac forms when these insects secrete Lac resin on tree branches. Over time, these secretions dry and turn into flakes that are later harvested, purified, and dissolved into alcohol to create the shellac solution. Understanding shellac's composition is critical in evaluating its resilience. At its most basic, shellac comprises of three key components: shellac wax, laccaic acids, and aleuritic acid. Each contributes to the durability and aesthetic appeal of the finished product. Shellac wax provides a natural luster, while laccaic acids imbue the shellac with its characteristic hardness. Aleuritic acid, on the other hand, gifts shellac with flexibility and resilience – a trait pivotal to withstand everyday wear and tear. Furthermore, shellac's durability is unparalleled due to its resistance to water, alcohol, and other chemicals – making it a popular option for those seeking a protective coating or a lasting nail solution. This innate resistance is amplified by its fast drying time and reparability. If a shellac finish gets damaged, it can be easily touched up without a visually perceptible difference in the finish. The nature of shellac, and its adaptability to temperature changes further fortify its standing in the market. While it can become brittle in cold temperature, the warmth restores its pliability. Hence, it adjusts to the temperature changes, thereby preserving the integrity of the applied product, be it a gleaming table top or professionally done nails. By understanding shellac’s composition and how it contributes to its resilience, one can better appreciate its place in at-home procedures and why it has become a staple for DIY enthusiasts.
The Longevity of Shellac: Why It's So Resilient
Shellac's longevity and resilience could be credited to its unique and unyielding chemical structure that, when hardened, serves as an impressive protective barrier. As one of nature's finest treasures, shellac is a resin secreted by the female lac bug, found in the forests of India and Thailand, possessing qualities that make it a stand-out choice for many applications. Understanding the longevity of shellac and why it's so resilient calls for an exploration into its composition. Primarily, shellac ranks supreme due to its capacity to remain intact for a considerable period without degradation. It is resistant to water, alcohol, and even some solvents. An astounding feature of this natural resin is its ability to withstand various atmospheric conditions. Even the harshest of elements – such as high humidity levels or extreme changes in temperature – hardly have a toll on its endurance. Another unique attribute of shellac is its durability. It can adhere impeccably to an assortment of materials such as wood, metal, and plastic. This replacement resilience attributes to its popularity in many industries, ranging from cosmetics – particularly in nail polish – to food glazing, painting, and woodworking. Moreover, shellac proffers a lustrous finish adding a touch of class to any product applied. This natural tarnish over time adds a richer depth, enhancing the aesthetic of the material, which is sought out, especially in antique restorations. Its semi-transparent to opaque quality can maintain original textures, thereby preserving the authenticity of surfaces. With regards to removing shellac, it's no easy feat given its resilience. For instance, removing shellac from nails at home requires a precise method using acetone, often a lengthy process. This once again illustrates the resilience and strong preserving qualities of shellac, offering a decadent gloss and a sustainable solution due to its bio-degradability and non-toxic disposition. In essence, the longevity of shellac is tied to its impenetrable nature, durability, flexibility, and superior finish. It is a testament to nature's incredible engineering, highlighting why shellac continues to play an integral role in industries across the globe. Understanding its resilience thus provides a better perspective on why it's so prevalent and why removing it at home may require a little more time and effort.
Things to Consider Before Removing Shellac at Home
Removing shellac at home might seem like an easy task but it requires careful consideration. There are several factors to bear in mind before you embark on this process. First, you need to understand the resilience of shellac. Created from the secretion of the lac bug and dissolved in alcohol, shellac is a robust and durable non-toxic finish frequently used on wood and nails. Its resilience is one of the reasons why many prefer it over other finishes. One of the main aspects to consider is the proper tools needed for shellac removal. Acetone, a powerful solvent, is typically used to dissolve the shellac. However, acetone may irritate the skin and eyes, so using protective gloves and eyewear is strongly advisable. You should ensure adequate ventilation during removal, as the fumes from acetone can be harmful if inhaled in large amounts. Another crucial aspect is the time and patience required for the process. Removing shellac is not a rushed task. It involves applying the acetone, letting it rest for a few minutes, and gently scrubbing the shellac off. It might require several attempts to completely remove the shellac, depending on its thickness and age. Consider also the potential damage to the underlying material. Despite being harmless to various materials, acetone can discolor certain plastics and ruin varnishes. Therefore, if you’re removing shellac from these materials, a test run on a hidden area is recommended to prevent widespread damage. If you're dealing with shellac on nails, bear in mind that frequent use of acetone can dehydrate your nails and skin, making them brittle and prone to breakage. Nourishing nail treatments and creams would be beneficial after the shellac removal process. Lastly, consider the environmental implications. Despite being biodegradable, shellac removal should be done responsibly. Acetone and shellac-soaked rags can pose a fire hazard if not disposed of correctly. Furthermore, while both are considered low toxicity to humans, they might be harmful to aquatic creatures, so solvent disposal should adhere to local waste regulations. Undoing the resilient nature of shellac is a process that requires consideration and caution. Safety must always be at the forefront, along with an understanding of the potential risks involved and measures to mitigate them. Rest assured, with these considerations in mind, you have moved one step closer to a successful shellac removal at home.
Materials and Tools Required for At-Home Shellac Removal
Removing shellac nail polish at home can be an effective and cost-efficient activity, provided you have appropriate knowledge about the materials and tools required for this task. In this article, we intend to enlighten you about these essentials, aiming to make your shellac removal process smoother and hassle-free. Our primary focus will be around three pivotal aspects - The Essential Tools required for shellac removal, the Importance of Quality and Safety when Choosing the Right Removal Products, and the necessary Prep Work needed for Getting Your Nails Ready for the Removal Trip. Understanding the integral role each of these aspects plays in the process will give you a holistic view and ensure success in your at-home shellac removal endeavor. Let's embark on this informative journey by starting with the first crucial element - understanding the essential tools you would need in your shellac removal kit.
The Essential Tools: What Do You Need to Remove Shellac?
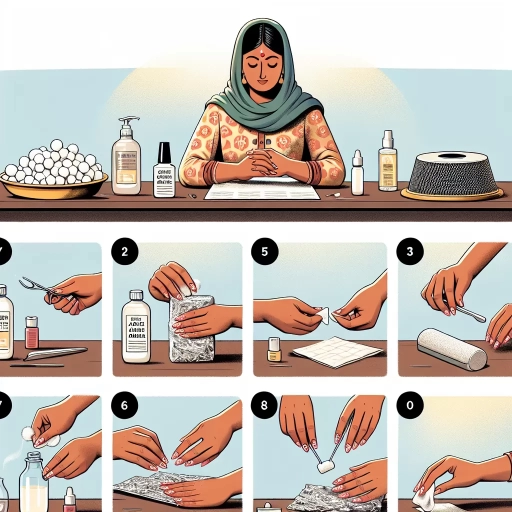
Shellac, a glossy and durable type of nail polish, is loved by many for its long-lasting properties. However, removing it can be a tricky process that requires the right set of tools. The Essential Tools: What Do You Need to Remove Shellac? To start with, you'll need pure acetone, the quintessential nail polish remover. Regular nail polish remover won't do the trick due to the strength of shellac. The acetone works to break down the sturdy shellac compound and lift the polish from your nails. Secondary, you'll require cotton balls, ones that are substantial in size and can soak up enough acetone to work efficiently at shellac removal. They will serve as the acetone's carrier to your nails. A set of aluminum foils is also needed to wrap around each finger, holding the acetone-soaked cotton balls against your nails. The foil assists in creating a mini steaming effect which aids in the softening process of the shellac. It's recommended to use precut foils for a more effortless application. Furthermore, the use of an orange stick or a cuticle pusher is crucial in this process. Once the shellac has been sufficiently softened by the acetone, these tools will help scrape off the remaining polish without assaulting the integrity of your natural nail. A nail buffer is also necessary to smooth any roughness or residue left behind after the removal process, keeping your nails looking clean and tidy. Finally, consider employing a nourishing nail oil or cream to replenish the moisture that the acetone potentially strips away. While the process of removing shellac at home requires considerable effort and time, having the correct materials at hand will make it a more manageable task. Using these essential tools in your shellac removal process ensures a safer, successful, and less damaging shellac removal experience right in the comfort of your own home. Follow the step-by-step guide using these materials and tools required for at-home shellac removal to maintain the health and beauty of your nails.
Choosing the Right Removal Products: Importance of Quality and Safety
Choosing the Right Removal Products: Importance of Quality and Safety When it comes to choosing the right products for your at-home shellac removal procedure, it is essential to prioritize both quality and safety. Too often, users are tempted to choose the cheapest option available to them, without considering the potential for subpar results or even damage to their nails and skin. In fact, quality should never be compromised when it comes to the removal products for shellac nails. Firstly, a high-quality product ensures a better result. It will effectively break down the shellac layer without requiring a harsh or aggressive rubbing, reducing the likelihood of damaging your natural nails. Superior products also tend to work more efficiently, making the removal process quicker and less tedious, which is a significant boon for those who are trying it for the first time at home. Secondly, safety is paramount. It's not uncommon for low-quality removers to contain harmful ingredients, such as harsh chemicals and toxins, that have the potential to cause skin irritation, allergies, or other health issues. A high-quality removal product, on the other hand, adheres to industry safety standards and is typically more gentle on your skin and nails. This is especially important for people with sensitive skin or who frequently apply and remove shellac as these people are more vulnerable to the possible side effects of low-quality removal products. Moreover, quality and safety usually go hand in hand with the reputation of the manufacturer. Opt for products from brands that have a well-established reputation in the market. These companies usually have stringent quality control processes in place, ensuring the consistency and safety of their products. In conclusion, when in the process of at-home shellac removal, don't just go for any generic removal product. Remember, your fingernails and skin are sensitive and deserve the best care. Hence, favor products that are not only efficient but also gentle and safe. Paying a little extra for superior quality can make a significant difference to your at-home shellac removal experience, giving you the professional-level results you desire without compromising your health and well-being.
Prep Work: Getting Your Nails Ready for the Removal Trip
Before embarking on your journey of at-home shellac removal, preparing your nails adequately is a key step that will massively improve the overall effectiveness of the process. This critical stage, referred to as the 'Prep Work', incorporates a series of actions aimed at safeguarding the strength and health of your nails, reducing potential damage, and ensuring seamless shellac removal. To begin with, it's advisable to clean your nails thoroughly to eliminate any residual polish or dirt. A simple rinse under warm water and a gentle scrub with a mild soap suffices for this. Next, consider trimming your nails. Shorter nails are generally easier to manage during the removal process and also minimize the risk of shellac chipping. However, be cautious not to cut too close to the nail bed, which can cause discomfort or even pain. During the prep work, hydration of your nails and cuticles is essential too. Dry nails are more susceptible to damage, so applying cuticle oil or a suitable moisturizer can help maintain the necessary hydration levels. It's also important to have the nail file at hand, since gently buffing the surface of the shellac-covered nails can make the removal process smoother. This, however, must be done cautiously to avoid excessive filing, leading to weakened nails. Finally, it's wise to gather all the required tools and materials within easy reach. These include cotton balls, nail polish remover (preferably containing acetone), aluminum foil, and a cuticle stick. Organizing your workspace and having all these essentials readily accessible can save you time and hassle during the actual removal process. Remember, with the proper prep work, the at-home shellac removal process can become a breeze. It not only simplifies the removal but also leaves your nails healthy and less stressed, ready for the next manicure journey.
Step-by-Step Guide to Safely Remove Shellac at Home
Nowadays, more and more beauty enthusiasts are leading towards do-it-yourself beauty treatments and nail care is no exception. This detailed guide will walk you through a step-by-step procedure to safely remove Shellac at your own convenience and pace. We will cover three significant phases of Shellac removal that are absolutely critical to maintain the health and beauty of your nails. Our comprehensive guide will commence with “Step One: Preparing Your Nails” where we will discuss the importance of nail preparation before the actual removal process to avoid damage and breakage. Next, we'll delve into “Step Two: Applying the Removal Solution”. Here, we’ll discuss the right techniques and products to effectively remove the Shellac. Finally, in “Step Three: Post-Removal Care and Maintenance", we’ll touch on the aftercare that will help rejuvenate your nails and keep them in top shape. Now, let's begin your journey to better nail health by preparing your nails for Shellac removal.
Step One: Preparing Your Nails
In the journey towards safe shellac removal at home, Step One: Preparing Your Nails is perhaps the most critical point to kick-start the process. It is the launch pad that sets the tone for a smooth and hassle-free shellac removal experience. Initially, the focus is on cleansing your nails thoroughly. This is not merely an aesthetic or hygiene concern; it is, in fact, a vital step in setting the stage for the upcoming procedure. Cleanliness wards off potential nail infections and ensures that any residue from previous applications is effectively dealt with. You might wonder, "But how exactly do I prepare my nails?" Well, let the water do the task initially. Rinse your nails under warm water to soften the shellac coating mildly. Then, reach for a gentle yet efficient non-acetone based nail polish remover and swipe it over your nails using a cotton ball. Focus on eliminating any remaining glossy gel or nail polish residues. This cleaning helps in minimizing the harsh impact of acetone on your nails in the later shellac removal steps. Moving to the second phase, it involves buffing your nails. This might appear as an optional task, but in practice, it has a significant role in loosening the shellac coating. Use a fine-grit nail buffer to gently scrub the surface of each nail. Remember, keep it gentle as over-enthusiastic buffing can lead to nail damage. Buff until you notice the shine starting to fade. Be patient, as this process might require a few minutes per nail, but every second spent buffing will equate to an easier shellac removal process. Lastly, with your nails nicely cleansed and buffed, it's time to bring in a little moisturization. the Cuticle oil can work wonders at this point. Just a light dab of oil around each nail can protect your skin and cuticles from the drying effects of acetone, which tends to be quite potent. Hence, nail preparation is not just about making your nails look pretty or satisfying a mundane procedural requirement. It's a targeted process that ensures the effectiveness of the remaining steps in the shellac removal process at home. Proper preparation can make the difference between a frustrating, damaging experience and a successful, nail-friendly shellac removal. So, take your time—your nails will thank you.
Step Two: Applying the Removal Solution
After completing step one, which requires prepping your nails by filing off the shiny surface of the shellac, you're now ready to proceed to step two: Applying the Removal Solution. This stage is pivotal within the process, demanding utmost caution to safeguard your nails in the long run. So, what does the application of the removal solution entail? You'll primarily need to embrace the use of acetone, which is renowned for effectively dissolving shellac polish. Invest in 100% pure acetone for best results, available at most drugstores or online marketplaces. Although it can be slightly more aggressive than non-acetone nail polish removers, the expedited process it offers ensures minimal exposure time. To moderate its harshness, consider incorporating nail protective substances like cuticle oil into your routine. To apply, soak cotton balls in acetone and gently place them on top of each nail. Ensure that the cotton ball fully covers the nail's surface area; this maximizes contact between the shellac and acetone, facilitating an efficient removal process. Securing the cotton balls onto your nails can often pose a challenge. Here, aluminum foil strips come in handy. Simply wrap each nail, over the cotton ball, in a small piece of foil. This holds the acetone-soaked cotton in place, allowing it time to penetrate the shellac layer. While an easy task to oversee, this step can indirectly impact the health and wellbeing of your nails based on the execution. Therefore, allow the acetone to sit on your nails for at least 10 to 15 minutes, ensuring the shellac polish is fully loosened. Do not rush this process—impatience could lead to inadequate removal or, worse, scraping and damaging your nail bed. Remember, user experiences may differ; factors like the shellac's age or your nail's health can subtly influence the removal process. Stay flexible, be patient, and always prioritize the safety of your nails. This step-by-step journey is not just about effective shellac removal at home—it's also about preserving your nails' health, guaranteeing they remain strong and vital after the polish is off. As you progress to the next step, be keen to maintain the same cautious approach. Your nails will thank you. In SEO context, this paragraph is enriched with keywords relevant to the topic, like 'shellac removal at home', 'acetone', and 'nail health'. Its structured storytelling approach makes it informative, engaging, and easy to follow, a thumb rule in SEO content creation.
Step Three: Post-Removal Care and Maintenance
Once the shellac polish is safely removed, you enter an important phase: post-removal care and maintenance. This phase is vital, as it pertains directly to the health and appearance of your nails. Shellac, though a revolutionary and durable nail polish, can often leave your nails feeling brittle and weak if not correctly removed or if thorough aftercare is not practiced. Continuous shellac application without proper care can wreak havoc on your nails, leading to long-term damage. To start, washing your hands thoroughly is recommended. It helps remove any residue of acetone and shellac fragments left. Post this, invest time in nail hydration. Acetone, being a potent solvent, might strip off the natural oils from your nails, leaving them dried out. Using a nutrition enriched nail oil or a moisturizing cream can replenish the lost hydration and restore the natural health of your nails. Cuticle oil, rich in essential nutrients like Vitamin E, is another excellent element of post-removal care. Applying it will moisturize your cuticles and foster healthier nail growth. Lastly, if you're not planning on applying new polish immediately, consider using a nail hardener or strengthener to protect your nails from potential breakage. In conclusion, while the allure of shellac polish cannot be denied, taking it off safely at home requires patience and careful steps. Importantly, it does not end with the removal. Post-removal care is equally, if not more, critical to maintain your nails' health and aesthetic. After all, nails are a reflection of our overall wellness and ought to be cared for diligently. Remember to give your nails some rest between consecutive shellac applications. This not only allows them to breathe but also ensures they are less likely to weaken over time. From cleaning to hydrating and protecting your nails, every aspect of post-removal care has distinct benefits. By incorporating these into your routine, you will not only remove your shellac safely at home but will also maintain beautiful and healthy nails.