How To Butcher A Deer
For many hunters, the thrill of the hunt is only the beginning. Once the deer is down, the real work begins - transforming the raw meat into a delicious and nutritious meal for the family. Butchering a deer can seem like a daunting task, but with the right knowledge and preparation, it can be a rewarding and enjoyable experience. To successfully butcher a deer, it's essential to understand the importance of preparation, the step-by-step butchering process, and the various methods for processing and preserving the meat. In this article, we'll take you through the entire process, starting with the crucial step of preparation. By understanding what to expect and how to prepare, you'll be well on your way to a successful and stress-free butchering experience. Preparation is Key, and it's where we'll begin our journey.
Preparation is Key
Preparation is key to a successful deer butchering experience. To ensure a smooth and efficient process, it's essential to invest time and effort into preparing yourself and your workspace. This includes investing in the right tools and equipment, choosing a safe and clean workspace, and understanding the anatomy of a deer. By doing so, you'll be able to navigate the butchering process with confidence and precision. With the right tools and equipment, you'll be able to make clean cuts and avoid accidents, setting yourself up for success from the start. Therefore, let's start by taking a closer look at the importance of investing in the right tools and equipment.
Invest in the Right Tools and Equipment
Investing in the right tools and equipment is crucial for a successful deer butchering experience. A good set of knives, including a boning knife, skinning knife, and gutting knife, is essential for making clean cuts and minimizing waste. A sharp knife is safer and more efficient than a dull one, as it requires less pressure and reduces the risk of accidents. Additionally, a meat saw or bandsaw can be useful for cutting through bones and making precise cuts. Other necessary equipment includes a gambrel or hoist for hanging the deer, a meat grinder or sausage stuffer for processing the meat, and a vacuum sealer for storing the finished products. It's also important to have a clean and sanitized workspace, including a stainless steel table or other food-grade surface, to prevent contamination and ensure food safety. By investing in the right tools and equipment, you'll be able to work more efficiently, effectively, and safely, resulting in higher-quality meat and a more enjoyable butchering experience.
Choose a Safe and Clean Workspace
When it comes to butchering a deer, having a safe and clean workspace is crucial to ensure the quality and safety of the meat. A clean workspace helps prevent contamination and the spread of bacteria, which can lead to foodborne illnesses. To choose a safe and clean workspace, consider the following factors. First, select a location that is well-ventilated and protected from the elements. This will help prevent the growth of bacteria and other microorganisms that thrive in damp and humid environments. Second, ensure the workspace is free from any debris, dust, and dirt. Sweep and mop the floor thoroughly, and cover any surfaces with plastic or stainless steel sheets to prevent cross-contamination. Third, have access to clean water and a drainage system to wash and clean the deer and equipment. Fourth, consider the lighting in the workspace. Adequate lighting is essential to ensure you can see what you're doing, especially when handling sharp knives and equipment. Finally, ensure the workspace is large enough to accommodate the deer and all the necessary equipment, with enough room to move around comfortably. By choosing a safe and clean workspace, you can ensure a successful and safe butchering experience.
Understand the Anatomy of a Deer
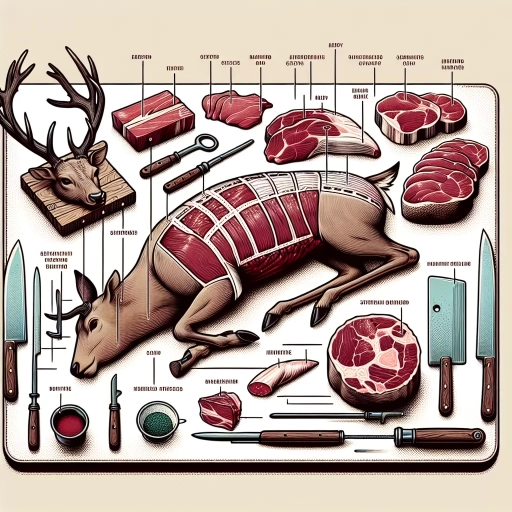
Understanding the anatomy of a deer is crucial for a successful butchering process. A deer's body is composed of several primal cuts, which are the initial sections of meat that are separated from the carcass during the butchering process. These primal cuts include the front legs, hind legs, back, and belly. The front legs, also known as the shoulders, contain the chuck and shank primal cuts. The chuck is the area between the neck and the shoulder blade, and it is typically used to make ground meat or stew meat. The shank is the lower portion of the leg and is often used to make stock or soup. The hind legs, also known as the rounds, contain the round and sirloin primal cuts. The round is the area between the rump and the shank, and it is typically used to make steaks or roasts. The sirloin is the area between the round and the back, and it is often used to make steaks or tender cuts. The back, also known as the loin, contains the loin and tenderloin primal cuts. The loin is the area between the ribs and the sirloin, and it is typically used to make steaks or roasts. The tenderloin is the long, narrow muscle that runs along the spine, and it is often used to make tender cuts or filets. The belly, also known as the brisket, contains the brisket and flank primal cuts. The brisket is the area between the front legs and the belly, and it is typically used to make corned beef or pastrami. The flank is the area between the belly and the hind legs, and it is often used to make steaks or stir-fry meat. Understanding the anatomy of a deer and the different primal cuts will help you to make informed decisions about how to butcher and process the meat.
The Butchering Process
The butchering process is a complex and multi-step procedure that requires great care and attention to detail to produce high-quality meat products. From the initial field dressing to the final packaging, each step plays a crucial role in ensuring the safety and quality of the meat. The process begins with field dressing, where the animal is prepared for further processing by removing the internal organs and entrails. This is followed by the removal of the hide and organs, which is a delicate process that requires great skill and precision. Finally, the carcass is broken down into primal cuts, which are then further processed into the various meat products that we see in stores. In this article, we will explore each of these steps in more detail, starting with the first and most critical step: field dressing.
Field Dressing: The First Step in Butchering
Field dressing is the first step in the butchering process, and it's essential to do it correctly to ensure the quality and safety of the meat. Field dressing involves removing the internal organs, including the lungs, heart, liver, and intestines, from the deer's body cavity. This process helps to cool the body quickly, which slows down bacterial growth and prevents spoilage. To field dress a deer, start by making a small incision in the belly, just below the ribcage, and cut around the anus and genitals. Be careful not to puncture the stomach or intestines, as this can contaminate the meat. Continue to cut along the belly, making sure to stay shallow and avoid cutting too deeply. Once you've made the initial incision, use your hands or a blunt instrument to carefully pry open the body cavity and remove the organs. It's essential to remove the organs quickly and efficiently to prevent contamination and spoilage. After removing the organs, use a clean cloth or paper towels to wipe down the body cavity and remove any remaining blood or debris. Finally, use a clean water source to rinse the body cavity and remove any remaining impurities. By following these steps, you can ensure that your deer is properly field dressed and ready for the next step in the butchering process.
Removing the Hide and Organs
Removing the hide and organs is a crucial step in the butchering process, as it allows for a clean and efficient removal of the meat. To begin, make a shallow incision around the anus, being careful not to cut too deeply and damage the surrounding tissue. Next, make a similar incision around the base of the tail, and then connect the two incisions with a straight cut. This will allow you to peel the hide back and access the organs. Continue to make shallow cuts around the edges of the hide, working your way around the body until the hide is completely removed. Be careful not to cut too deeply and damage the underlying tissue. Once the hide is removed, you can begin to remove the organs, starting with the diaphragm and working your way down to the intestines. Be sure to remove all of the organs, including the lungs, heart, and liver, as these can be used to make a variety of delicious dishes. Finally, rinse the carcass with cold water to remove any remaining blood or debris, and then pat it dry with paper towels to prepare it for the next step in the butchering process.
Breaking Down the Carcass into Primal Cuts
Breaking down the carcass into primal cuts is a crucial step in the butchering process. This involves separating the deer's body into its main sections, which will eventually become the recognizable cuts of meat found in a butcher shop or on a dinner plate. The primal cuts are typically divided into eight main sections: the front legs, hind legs, loins, ribs, shoulders, shanks, and neck. Each primal cut is then further subdivided into sub-primals, which are then cut into the final retail cuts. For example, the front legs are typically cut into shanks, steaks, and roasts, while the hind legs are cut into rounds, sirloins, and tenderloins. The loins are often cut into backstraps, tenderloins, and strip loins, while the ribs are typically cut into rib racks and ribeye steaks. The shoulders are often cut into shoulder steaks, roasts, and ground meat, while the shanks are typically cut into osso buco and ground meat. The neck is often cut into neck steaks and ground meat. By breaking down the carcass into primal cuts, the butcher can ensure that each cut is handled and processed correctly, resulting in a more efficient and effective butchering process.
Processing and Preserving the Meat
Processing and preserving meat is an essential step in ensuring the quality and safety of the final product. Whether you're a hunter, a butcher, or a home cook, understanding the different methods of processing and preserving meat can help you to enjoy your meat for a longer period. There are several ways to process and preserve meat, including cutting and wrapping it for storage, curing and smoking it to add flavor and preserve it, and freezing and vacuum sealing it for long-term storage. In this article, we will explore these three methods in more detail, starting with the importance of cutting and wrapping the meat for storage. By properly cutting and wrapping the meat, you can prevent contamination, reduce waste, and keep the meat fresh for a longer period. This is especially important for hunters and butchers who need to store large quantities of meat for extended periods. By following proper cutting and wrapping techniques, you can ensure that your meat remains safe and fresh, and that you can enjoy it for months to come.
Cutting and Wrapping the Meat for Storage
Cutting and wrapping the meat for storage is a crucial step in the butchering process, as it directly affects the quality and safety of the final product. To begin, it's essential to have a clean and sanitized workspace, as well as sharp knives and cutting tools to prevent contamination and ensure precise cuts. Start by cutting the meat into manageable portions, such as steaks, roasts, and ground meat, depending on your desired end products. When cutting, make sure to cut against the grain to ensure tenderness and ease of cooking. Next, trim any excess fat, connective tissue, or silver skin from the cuts, as these can affect the texture and flavor of the meat. Once the meat is cut and trimmed, it's time to wrap it for storage. Use airtight, moisture-proof wrapping materials, such as plastic wrap or freezer paper, to prevent freezer burn and contamination. Wrap each cut individually, making sure to remove as much air as possible from the wrapping material to prevent the growth of bacteria and other microorganisms. Label each package with the contents, date, and any relevant cooking instructions, and store them in a freezer at 0°F (-18°C) or below. For longer-term storage, consider vacuum-sealing the meat using a vacuum sealer, which can help to prevent freezer burn and maintain the quality of the meat for up to a year or more. By following these steps, you can ensure that your venison is properly cut, wrapped, and stored, and that it will remain safe and delicious for months to come.
Curing and Smoking: Adding Flavor and Preserving the Meat
Curing and smoking are two traditional methods used to add flavor and preserve meat, particularly when it comes to butchering a deer. Curing involves applying a combination of salt, sugar, and other ingredients to the meat to draw out moisture and prevent bacterial growth, while smoking uses low heat to cook the meat and infuse it with a rich, savory flavor. When done correctly, curing and smoking can result in delicious and tender meat that is perfect for snacking, cooking, or storing for later use. To cure meat, a mixture of kosher salt, brown sugar, and pink curing salt is typically applied to the surface of the meat, which is then left to sit in the refrigerator for several days or weeks. The curing process helps to break down the proteins in the meat, making it more tender and flavorful. Smoking, on the other hand, involves placing the cured meat in a smoker or a charcoal grill with wood chips, where it is cooked at a low temperature for several hours. The smoke from the wood chips infuses the meat with a rich, smoky flavor that is both delicious and aromatic. By combining curing and smoking, hunters and butchers can create a wide range of delicious and preserved meats, from smoked sausages to cured steaks and roasts. Whether you're a seasoned hunter or just starting out, curing and smoking are two essential techniques to master when it comes to processing and preserving deer meat.
Freezing and Vacuum Sealing: Long-Term Storage Options
Freezing and vacuum sealing are two popular long-term storage options for preserving deer meat. Freezing is a simple and effective method that involves placing the meat in airtight containers or freezer bags and storing it in a freezer at 0°F (-18°C) or below. This method helps to prevent the growth of bacteria and other microorganisms that can cause spoilage. Vacuum sealing, on the other hand, involves removing the air from a container or bag before sealing it, which helps to prevent the growth of bacteria and other microorganisms by removing the oxygen that they need to survive. Both methods can be used to store deer meat for several months, with freezing typically allowing for longer storage times. It's worth noting that freezing and vacuum sealing can be used in combination with other preservation methods, such as canning or dehydrating, to create a comprehensive preservation plan. When freezing, it's essential to label and date the containers or bags, and to store them in a consistent freezer temperature to ensure the quality and safety of the meat. Similarly, when vacuum sealing, it's crucial to use a high-quality vacuum sealer and to follow proper sealing techniques to prevent air from entering the container or bag. By following these guidelines, hunters can enjoy their deer meat for months to come, while also ensuring its quality and safety.