How To Get Press On Nails Off
Here is the introduction paragraph: Removing press-on nails can be a daunting task, especially if you're new to the world of at-home nail care. However, with the right techniques and tools, you can safely and effectively remove your press-on nails without damaging your natural nails. In this article, we'll explore the best methods for removing press-on nails, from preparation to aftercare. To start, it's essential to prepare your nails for removal, which is why we'll begin by discussing the importance of preparation. By taking the time to properly prepare your nails, you'll be able to remove your press-on nails with ease and minimize the risk of damage. So, let's dive in and explore the key steps to take before attempting to remove your press-on nails, starting with preparation.
Preparation is Key
When it comes to removing acrylic nails, preparation is key to a successful and safe process. To ensure a smooth removal, it's essential to acquire the right tools and materials, prepare your nails for removal, and choose the right removal method. Having the right tools and materials will help you to effectively break down the acrylic and avoid damaging your natural nails. Preparing your nails for removal involves cleaning and shaping them to prevent any complications during the process. Finally, choosing the right removal method will depend on the type of acrylic nails you have and your personal preferences. By taking the time to prepare properly, you can avoid common mistakes and ensure a successful removal. To start, let's take a closer look at the importance of acquiring the right tools and materials for the job.
Acquire the Right Tools and Materials
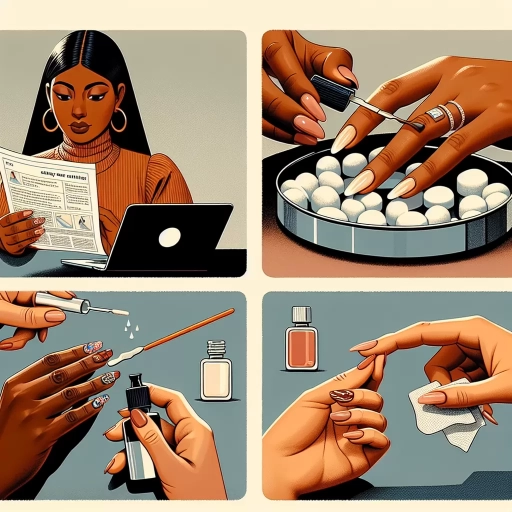
Here is the paragraphy: To successfully remove press-on nails, it's essential to acquire the right tools and materials. You'll need a few basic items, including nail glue remover, acetone, a cuticle pusher or orange stick, a nail file, and a buffer. Nail glue remover is specifically designed to break down the adhesive used to attach press-on nails, making it easier to remove them. Acetone is a strong solvent that helps to dissolve the adhesive and loosen the nail. A cuticle pusher or orange stick is used to gently pry the nail away from the natural nail, while a nail file and buffer are used to smooth out any rough edges or ridges. You may also want to have some cotton balls or pads on hand to help soak up any excess acetone or remover. Having the right tools and materials will make the removal process much easier and less damaging to your natural nails.
Prepare Your Nails for Removal
To prepare your nails for removal, start by gently pushing back your cuticles using a cuticle pusher or an orange stick. This will help loosen the adhesive and make the removal process easier. Next, soak your fingers in a bowl of acetone-based nail polish remover for about 10-15 minutes to help break down the adhesive. You can also wrap a cotton ball or swab soaked in acetone around your finger to help loosen the nail. Additionally, use a nail file to gently buff the surface of the nail, focusing on the edges and cuticles. This will help weaken the adhesive and make it easier to remove. It's also a good idea to use a nail glue remover to help dissolve the adhesive. By following these steps, you'll be able to loosen the adhesive and prepare your nails for removal, making the process much easier and less damaging.
Choose the Right Removal Method
Here is the paragraphy: When it comes to removing press-on nails, choosing the right method is crucial to avoid damaging your natural nails. There are several methods to choose from, including acetone, nail glue remover, and non-acetone nail polish remover. Acetone is a popular choice, but it can be harsh on your nails and skin. If you have weak or brittle nails, it's best to opt for a non-acetone remover. Nail glue remover is another option, but it can be messy and may not be as effective as other methods. To choose the right removal method, consider the type of adhesive used to apply the press-on nails and your personal nail type. If you're unsure, it's always best to consult with a professional nail technician for guidance. Additionally, make sure to follow the instructions carefully and take necessary precautions to avoid any damage or irritation. By choosing the right removal method, you can safely and effectively remove your press-on nails and maintain healthy, beautiful nails.
Removal Methods to Try
When it comes to removing unwanted adhesives, there are several methods to try. The key is to find the right approach for the type of adhesive and the surface it's stuck to. In this article, we'll explore three effective removal methods: the Acetone Soak Method, the Glue Dissolver Method, and the Scraping and Filing Method. Each of these methods has its own strengths and weaknesses, and understanding how they work can help you tackle even the toughest adhesive removal jobs. By the end of this article, you'll be equipped with the knowledge to tackle any adhesive removal task that comes your way. So, let's dive in and start with the Acetone Soak Method, a popular and effective approach for removing stubborn adhesives.
Acetone Soak Method
The acetone soak method is a popular and effective way to remove press-on nails. This method involves soaking the nails in a bowl of acetone for an extended period, allowing the adhesive to break down and the nail to lift off. To start, prepare a bowl of acetone and gently place the finger with the press-on nail into the liquid, making sure the nail is fully submerged. Cover the bowl with a towel or plastic wrap to prevent the acetone from evaporating and to keep the nail moist. Let it soak for about 10-15 minutes, or until the nail starts to lift off. You can also wrap a cotton ball or swab soaked in acetone around the nail to help loosen the adhesive. After soaking, use a cuticle pusher or orange stick to gently pry the nail off. Be careful not to scrape or pull too hard, as this can cause damage to the natural nail. If the nail is still stubborn, you can repeat the soaking process for a few more minutes until it comes off easily. The acetone soak method is a gentle and non-damaging way to remove press-on nails, making it a great option for those with sensitive nails or skin.
Glue Dissolver Method
When it comes to removing press-on nails, one effective method is using a glue dissolver. This technique involves applying a specialized liquid or gel to the nail to break down the adhesive that holds the press-on nail in place. The glue dissolver works by penetrating the adhesive and loosening its bond with the natural nail, making it easier to gently pry the press-on nail off. To use this method, start by applying a small amount of glue dissolver to the edge of the press-on nail and let it sit for a few minutes to allow the solution to take effect. Then, use a cuticle pusher or an orange stick to carefully lift the edge of the press-on nail and work your way around the nail to loosen the adhesive. Be careful not to scrape or pull too hard, as this can damage the natural nail. Once the press-on nail is removed, use a lint-free wipe or cotton ball to remove any remaining adhesive and clean the nail surface. It's essential to choose a glue dissolver that is specifically designed for nail use and follow the instructions carefully to avoid any damage or irritation to the nail or surrounding skin. By using a glue dissolver, you can safely and effectively remove press-on nails without causing damage to your natural nails.
Scraping and Filing Method
Scraping and filing is a popular method for removing press-on nails, but it requires caution and patience to avoid damaging the natural nail. This method involves using a cuticle pusher or a wooden stick to gently scrape off the press-on nail, starting from one edge and working your way across. Be careful not to scrape too hard, as this can cause the nail to lift or crack. Once the majority of the nail is removed, use a nail file to smooth out any remaining adhesive and shape the natural nail. It's essential to file in one direction only, from the cuticle to the tip of the nail, to avoid causing damage or ridges. To make the process easier, you can soak your fingers in a bowl of acetone or nail glue remover for a few minutes before scraping and filing. This will help loosen the adhesive and make it easier to remove the press-on nail. However, be careful not to soak for too long, as this can dry out the nail and surrounding skin. With patience and gentle care, scraping and filing can be an effective method for removing press-on nails without causing damage.
Aftercare and Maintenance
To keep your press-on nails looking their best, it's essential to prioritize aftercare and maintenance. This involves taking steps to protect your natural nails and the press-on nails themselves. Three key strategies for achieving this include moisturizing your nails and cuticles, using a nail strengthening base coat, and taking breaks from press-on nails. By incorporating these habits into your routine, you can extend the wear of your press-on nails and maintain the health of your natural nails. One of the most critical steps in aftercare is to keep your nails and cuticles hydrated, which is why moisturizing is a crucial part of the process. Note: The supporting paragraph is the introduction paragraph.
Moisturize Your Nails and Cuticles
To maintain the health and appearance of your nails and cuticles after removing press-on nails, it's essential to moisturize them thoroughly. Apply a rich cuticle oil or nail cream to your nails and cuticles, gently massaging it in to help lock in moisture. This will help to hydrate and nourish your nails and cuticles, reducing the risk of dryness, brittleness, and breakage. You can also use a nail and cuticle oil that contains ingredients such as argan oil, coconut oil, or shea butter, which are known for their moisturizing and nourishing properties. Additionally, consider applying a thick layer of moisturizer to your hands and fingers, paying special attention to the areas around your nails and cuticles. This will help to keep your skin and nails hydrated and healthy, reducing the risk of dryness and irritation. By moisturizing your nails and cuticles regularly, you can help to promote healthy nail growth, improve the appearance of your nails, and prevent common nail problems such as dryness, brittleness, and breakage.
Use a Nail Strengthening Base Coat
Using a nail strengthening base coat is an essential step in maintaining healthy and strong nails, especially after removing press-on nails. A good base coat can help to repair and restore the natural nail, promoting growth and preventing breakage. Look for a base coat that contains ingredients such as keratin, calcium, or vitamins, which can help to nourish and fortify the nail. Apply a thin layer of the base coat to each nail, making sure to cover the entire surface, and let it dry completely before applying a top coat. This will help to lock in the benefits of the base coat and provide an extra layer of protection for your nails. By using a nail strengthening base coat, you can help to extend the life of your natural nails and prevent damage from future nail applications.
Take Breaks from Press-On Nails
To maintain the health and integrity of your natural nails, it's essential to take breaks from press-on nails. Wearing press-on nails continuously can lead to nail damage, such as lifting, cracking, and weakening of the nail plate. Taking breaks allows your nails to breathe, recover, and rejuvenate. It's recommended to take a break of at least two weeks between applications to give your nails time to rest and repair. During this time, focus on nourishing your nails with a nail strengthening base coat, cuticle oil, and a moisturizing hand cream. This break will also give you the opportunity to assess the condition of your natural nails and make any necessary adjustments to your nail care routine. By taking regular breaks from press-on nails, you can prevent long-term damage and ensure that your natural nails remain healthy and strong.