How To Draw Snowflakes
Understanding the Science Behind Snowflakes
The Formation of Snowflakes
The formation of a snowflake starts in the clouds when water vapour freezes into ice. This process, known as "nucleation," often requires a microscopic dust or soot particle. As more water molecules freeze onto the original ice crystal, it grows into a hexagonal prism—the most basic form of a snowflake. When the crystal gets large enough, it starts to descend towards the earth, encountering varying temperature and humidity conditions that determine the shape of the crystal.
The Symmetry of Snowflakes
One of the most captivating aspects of snowflakes is their symmetry. Each snowflake is divided into six identical sections, courtesy of the water molecule's hexagonal shape during freezing. This symmetry is crucial to keep in mind while drawing snowflakes. Despite this, each flake is unique because it encounters slightly different conditions on its descent journey. Therein lies the magic of snowflakes: infinite variations of a basic, symmetrical design.
Classification of Snowflakes
While snowflakes are primarily hexagonal, they fall under several categories based on their shape and structure. These include columnar snowflakes (simple prisms), plane snowflakes (flat and plate-like), or a combination of the two. There also exist more complex types like dendritic snowflakes, characterized by intricate, tree-like arms radiating from the centre. Knowing different types enriches your drawings by adding variety and depth.
Drawing Snowflakes: A Step-By-Step Guide
Getting Ready: Choose The Right Tools
Drawing snowflakes doesn't necessarily require advanced tools. All you need is a good pencil for sketching, an eraser, a ruler for measuring (optional), and a sharpie or fine-liner for defining the final design. It would be beneficial to use a compass for drawing perfect circles, but this isn't essential. Depending on your preference, you can add some color to your snowflake using colored pencils or watercolor.
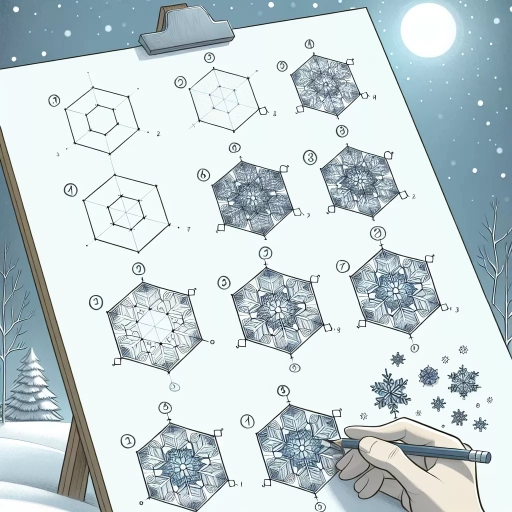
Creating the Basic Structure
The first step in drawing a snowflake is creating its basic structure. Start by drawing a small circle in the middle of your paper. Then draw three straight lines that pass through the center of the circle, making sure they are evenly spaced (60 degrees apart to get the six-fold symmetry). This six-pointed star forms the basis of your snowflake design. It's recommended to draw lightly at this stage, as these lines are guide lines.
Adding Details and Personality
Now comes the fun part: adding details to your snowflake. Each arm of the snowflake is identical, so start by picking one and start drawing designs. You could use smaller lines branching out, 'V' shapes, or more circles for a 'bubble' effect. Use your creativity but remember to keep it symmetrical: whatever detail you add to one arm should be replicated in the others. Once you're satisfied with the design, trace over the outlines with a sharpie or fine-liner and erase any pencil lines.
Taking Your Snowflakes to the Next Level
Experiment with Different Varieties
After mastering the basics, challenge yourself by exploring the different types of snowflakes. For instance, try your hand at drawing dendritic snowflakes that branches out, providing a complex yet stunning design. Stick to the six-fold principle but feel free to experiment with the intricacies of the branching pattern.
Add Depth with Shading
A simple technique to make your snowflakes pop off the page is by adding some shading. Choose a light source direction and add a slightly darker shade on the opposite side of the lines. This gives your snowflake a three-dimensional appearance, making it look more realistic.
Use Color for Visual Interest
Traditionally, snowflakes are white. However, you shouldn't confine your creativity by sticking to one color. Try adding splashes of color to your snowflakes, whether by using watercolors, colored pencils, or even digital coloring tools. This could be a fun way to bring more life and personality to your snowflake, instantly making your drawing attention-grabbing.