How To Wrap A Cylinder
 In making a great impression, a significant factor involves the art of presentation. One such aspect of this art is knowing how to perfectly wrap a cylinder, an imperative technique used in various environments including the intricacies of gift wrapping, innovative packaging, and even in certain elements of interior design. While this might seem a mundane task, it demands a certain level of skill and technique to achieve a flawless outcome. This article unfolds this craft in three comprehensive sections; initially, we delve into 'Understanding the Fundamentals of Wrapping a Cylinder' where we scratch the surface explaining the basics of cylinder wrapping. Next, we guide your hands through 'The Process: A Step-by-step Guide to Wrapping a Cylinder,' providing a detailed how-to guide on expert cylinder wrapping. Finally, we share 'Tips and Tricks: Honing Your Cylinder Wrapping Skills,' where we reveal industry-insider secrets to elevate your wrapping skills. Now, before we delve into this art form, let's start by understanding the fundamental aspects involved in wrapping a cylinder.
Getting Started: Understanding the Fundamentals of Wrapping a Cylinder
Delving into the world of wrapping a cylinder may initially seem daunting, but by understanding a few straightforward principles, this task can become second nature. Three critical concepts underpin each step of the process: comprehending the geometry of a cylinder, recognizing the necessary materials for wrapping, and understanding the importance of precise measurements. The form of a cylinder, defined by its two parallel circular bases and the curved surface connecting them, identifies the wrapping techniques needed. Furthermore, the materials used can significantly affect the outcome—a proper wrapping paper of adequate strength and a reliable adhesive are both crucial. Finally, nothing can replace the importance of correct measurements—ensuring the paper's length and width match the cylinder's dimensions is paramount to a well-executed presentation. With these principles in mind, you are ready to embark on your cylinder-wrapping journey, beginning with an exploration into the unique geometry of a cylinder. This first step sets the foundation of knowledge, upon which the rest of the understanding will be built.
Understanding the Geometry of a Cylinder
One significant part of thoroughly grasping the art of wrapping a cylinder is to understand the geometry of a cylinder. This knowledge is crucial as it decodes the fundamental aspects of a cylinder's structure, thus providing a guide to how wrapping can be perfectly executed. A cylinder is a three-dimensional geometric shape with two parallel circular bases connected by a curved surface. The cylinder's dimensions are defined by its height - the distance between the two bases, and its radius - the measurement from the center of the circular base to its edge. These two dimensions, in particular, form an integral part of calculating the cylinder's surface area, a vital parameter when figuring out the precise amount of material needed for wrapping. Visualizing a cylinder as a collection of circular disks stacked on top of each other can be useful. Its curved surface can be "unrolled" into a rectangle, with a length equal to the circumference of the bases and a width identical to the cylindrical height. This illustration makes it evident why the formula for the surface area of a cylinder is 2πr (r+h), with 'r' denoting the radius and 'h' representing the height. In practical terms, this implies that to adeptly wrap a cylinder, one must ensure the wrapping material is cut to the correct dimensions, accounting for both the cylinder's curved lateral surface and the circular bases. The material's length should ideally match the cylinder's circumference (2πr), while its width should equal the height of the cylinder. Added allowances might be required for covering the cylindrical bases or for overlapping purposes, details that can significantly enhance the aesthetic appeal of the final product. Understanding these geometrical concepts can significantly aid in the seamless execution of wrapping a cylinder accurately and proficiently. It places the framework for estimating the necessary wrapping materials, minimizing waste, and ultimately achieving a perfectly wrapped cylindrical object. Beyond this, it underlines the beauty and precision of geometry and its often unnoticed but grand application in simple tasks like wrapping a cylinder.
Identifying the Necessary Materials for Wrapping
Wrapping a cylinder is a uniquely challenging task, requiring not only skill but a clear understanding of the right materials needed. The primary requirement, wrapping paper, should be chosen with regards to the size and aesthetic value of the cylindrical item to be wrapped. For instance, lightweight and less bulky items can be comfortably wrapped with thinner, decorative papers for an appealing presentation. However, for heavier items, a sturdier wrapping material, like a heavy gauge paper or thin cardboard, is more suitable to provide support and prevent the package from tearing. Another essential material is the adhesive to secure the wrapping. Whilst most people opt for tape, its visibleness can detract from your neat presentation. Therefore, a double-sided or invisible tape may be a better choice, or even a specific wrapping adhesive that dissolves under heat or light. Matching ribbon or string is also a useful addition, not only holding the wrapping in place but adding an extra touch of flair or elegance to your cylindrical package. The color, type, and thickness of the ribbon or string should resonate with the overall theme or purpose of the item being wrapped. Furthermore, a pair of sharp scissors is crucial to ensure crisp, clean cuts in the paper, enhancing the overall 'neat' appearance of the wrapped item. In addition to paper, tape, and scissors, a measuring tape or ruler can be handy for precise cutting and wrapping, reducing wastage and ensuring a snug fit around the cylinder. Some crafters may also find a bone folder beneficial for creating firm, crisp edges and smoothing out any potential wrinkles or air bubbles in the paper. To embellish or decorate your wrapped cylinder, add-ons such as bows, tags, stickers, or even small ornaments can serve as personalized touches that make your item stand out. However, these materials are subject to the nature of the gift, the occasion, and the personal preferences of the recipient. Ultimately, the goal of wrapping a cylinder is not merely to conceal the item but to create intrigue, suspense, and a memorable unwrapping experience. Each of the mentioned materials plays a vital role in the wrapping process, and their proper selection and use are part of the art and craft of wrapping. In the broader context of understanding the fundamentals of wrapping a cylinder, the identification and selection of the necessary materials form the crucial first step.
The Importance of Proper Measurement
The importance of proper measurement in the art of wrapping a cylinder cannot be overstated. Precise measurements are the critical backbones that ensure a perfect result - whether it's for a birthday present, artistic creation, or industrial packaging process. In wrapping a cylinder, each dimension - height, diameter, and circumference - plays a pivotal role. These factors dictate the size of the material needed, such as paper or fabric, and guide the accurate placement of cut lines and fold marks. An error in measurement could lead to mismatches, wastage of resources, and even the failure in producing an appealing and correctly wrapped cylinder. Furthermore, the right measurement is also vital for efficient use of packaging material. Wastage is a persistent problem in packaging, and accurate measurements can be a solution to this. Knowing the exact dimensions of the cylinder lets you optimize material usage significantly, trimming waste while ensuring the cylinder is wrapped flawlessly. Beyond visible outcomes, proper measurement also plays a part in sustainability, financial efficiency, and mistake minimization. Overestimating dimensions could yield excessive usage of paper, contributing to environmental degradation while driving up costs. Conversely, underestimating could mean repeated attempts at wrapping, equating to waste of time, resources, and patience. In the grand scheme of things, understanding and applying the correct measuring techniques in wrapping a cylinder touch on themes larger than the act itself. They highlight the importance of precision and accuracy in every step we take and the role they play in ensuring success. The act reminds us of the significance of attention to detail, no matter how small a task might seem, as it is these small details that contribute to the big picture. Hence, grasping the measurement nuances when wrapping a cylinder provides an excellent start to mastering this skill. It captures the essence of patience, precision, responsibility, and a commitment to cause minimal impact on our resources - values that we need in our everyday life. Therefore, the importance of proper measurement goes beyond wrapping a cylinder; it permeates all aspects of our lives, intertwining our actions with the world around us.
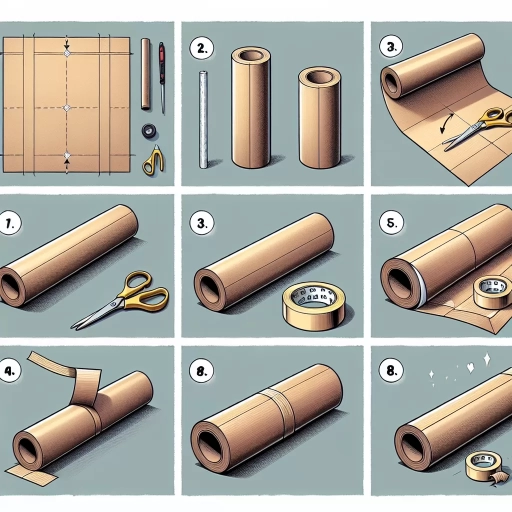
The Process: Step-by-step Guide to Wrapping a Cylinder
Understanding how to wrap a cylinder does not have to be a daunting task. The process is undoubtedly more straightforward than you think. In this comprehensive guide, we will walk you through each step of wrapping a cylinder, ensuring that you complete the task successfully and efficiently. The process of wrapping a cylinder can be divided into three main stages: Preparing Your Wrapping Material, Fitting the Material Around the Cylinder, and Securing the Wrapping Material in Place. These steps, when followed carefully, will lead to a well-wrapped cylinder that's secure and protected. By the end of this guide, you will become proficient at this task, and it may even become a skill you come to enjoy. We will start by exploring the preparations required before the actual wrapping begins. Preparing your wrapping material is crucial, as it sets the foundation for the rest of the process. Understanding this step properly ensures a smoother and satisfactory cylinder wrapping experience. With the essentials out of the way, let's delve into the first phase: Preparing Your Wrapping Material.
Preparing Your Wrapping Material
Preparing Your Wrapping Material
Before embarking on the step-by-step journey of wrapping a cylinder, it is vital to properly prepare your wrapping material – from the right selection to its meticulous arrangement. Begin by identifying the ideal wrapping material. Choices abound, from glossy and textured wrapping paper to decorative tissue or plastic wraps, depending on your present's nature and individual aesthetic preference. Always prioritize quality, as high-grade wrapping material not only enhances the end product's appeal but also eases the wrapping process, molding seamlessly around the cylinder's contour. Next, measure your chosen material. A common mistake in cylinder wrapping is either underestimating or overestimating the required material, resulting in an untidy finish or unnecessary wastage. Assess your cylinder's dimensions and be sure to provide an allowance for overlaps – a critical part of achieving a neat, seamless finish. A critical and often-neglected component in preparing your wrapping material is ensuring the surface is smooth and free of wrinkles or creases that could compromise the end result. Consider ironing or smoothing out your wrapping paper with a bone folder or comparable tool, for achieving that ideal smooth surface. Preparing your wrapping materials in a clean, clear space will facilitate a smoother process and outcome. Keep your scissors, double-sided tape, and other necessities close at hand within this space. Your scissors should be sharp for clean, precise cuts that will enhance your wrapped cylinder's visual appeal. A roll of double-sided tape is perfect for creating seamless joints, making sure the wrapping conceals any adhesives used. Lastly, remember to appeal to all senses. If you're using scented tissue paper or enclosing your cylinder in a fabric sleeve, consider if the scent or texture aligns with the recipient's taste or the occasion. The same principle applies to any ribbons, bows, or decorative embellishments you may plan to adorn your wrapped cylinder with. By preparing your wrapping materials properly, you're setting yourself up for success and ensuring each step of the wrapping process is smooth and efficient. This meticulous preparation is as much a part of the gift-giving process as the actual wrapping, underscoring your thoughtfulness and elevating your gift from ordinary to extraordinary.Fitting the Material Around the Cylinder
Fitting material around a cylinder is a critical part of the cylinder wrapping process that demands meticulous attention to detail. This step requires a perfect blend of precision and patience to ensure an immaculate fit. The cylinder, regardless of its purpose, size, or material, needs to have its wrapping material fit snugly around it to serve its function effectively and efficiently. The wrong fit could compromise the material’s purpose and lead to potential mishaps in certain applications. Begin by measuring the circumference of the cylinder accurately. This is the literal groundwork upon which you'll base the material's dimensions. A flexible measuring tape works best for this purpose as it easily conforms to the cylinder’s shape. Remember, an inaccurate measurement could result in a poorly fitting wrap, rendering the cylinder ineffective or unsightly. Next, depending upon the type of material being used, you may need to cut or mold it according to the measurement. This step involves a great deal of precision and exactitude, as any mistakes can render the material useless. It is always advisable to account for a small margin of overlap to ensure a tight fit. Once you've prepared the material, it's time to fit it around the cylinder. Begin at one end and carefully work your way around, ensuring each part of the cylinder is covered evenly. Note that the material should snugly fit the cylinder’s surface with no puckering or bulges. Any creases or air pockets can compromise the wrap’s integrity and aesthetics. Repeat the process until the entire cylinder is covered, trimming any excess material carefully. The goal is to ensure that the material fits the cylinder perfectly, like a second skin. If the material is adhesive, ensure that there is firm bonding without any bubbles or gaps. For any non-adhesive wrapping, consider using adhesives or fasteners to secure the ends and prevent them from unraveling. Fitting the material around a cylinder may seem like a daunting task at first glance, but it is eminently doable with a methodical approach, precise measurements, and meticulous handling of materials. Remember, a well-fitted cylinder wrap not only serves its function but also reflects the quality of your workmanship.
Securing the Wrapping Material In Place
Securing the wrapping material in place is crucial in ensuring that the cylinder remains tightly covered and does not unravel during transport or handling. It is often considered one of the most critical steps in the wrapping process due to the precise and careful execution required. Start by using a strong adhesive tape suitable for the material you are wrapping - be it plastic, paper, or fabric. The adhesive should be resilient and durable enough to hold the wrapping intact. Apply the tape evenly at the overlapped area of the wrapping material, ensuring that it sticks well without any air bubbles or loose ends. Make sure to apply the adhesive carefully and thoroughly so that the entire wrapping remains sturdy and intact into a cylindrical form. Try to select clear adhesive tape if possible, as this helps maintain the aesthetic integrity of the wrap. If the appearance of the tape detracts from the overall look, consider using coordinating colored or patterned tape that can add flair or a personal touch to your wrapped cylinder. However, taping might not be a suitable option for some materials like delicate fabric, which could get damaged by adhesive. In such cases, secure the wrapping using sewing pins or safety pins at the overlapped section. A tied ribbon or twine can also provide a secure wrapping and an added decorative component. Accuracy is crucial during this step. Remember, the goal is to secure the wrap without interfering with the cylinder's profile or using an excessive amount of adhesives or pins that might mar the overall visual appeal. If needed, use a measuring tool to ensure consistent spacing between the adhesive or pins. Once you've secured the wrapping in place, carefully go over the entire surface again to ensure no sections are loose or uneven. The final outcome should be a neatly wrapped cylinder that remains tightly wrapped regardless of movement or manipulation. Remember, the wrapping process is as much about aesthetics as it is about practicality. As you secure the wrapping, ensure that you're not just safeguarding the cylinder inside but also creating a visually appealing package that engages and delights the beholder. Be creative, meticulous, and patient to achieve the best result. And there you have it – A step-by-step guide to effectively securing the wrapping material on a cylinder!
Tips and Tricks: Honing Your Cylinder Wrapping Skills
Mastering cylinder wrapping requires practical knowledge, creative techniques, and the right tools. In this critical guide, we will introduce you to various tips and tricks so you can hone your cylinder wrapping skills. We aim to help you avoid common mistakes often encountered by rookies and even sometimes by professionals. We will also discuss the indispensable tools that can make your cylinder wrapping experience more precise and efficient. Lastly, we'll delve into some creative wrapping techniques for you to explore, creating a difference in your work and giving a spin to traditional processes. So if you want to take your cylinder wrapping game to the next level, continue reading, because the road to perfection starts here. Now, first up, let's delve into how to avoid those pesky common mistakes...
Avoiding Common Mistakes
Avoiding Common Mistakes One crucial aspect to tackle when wrapping cylinders is the potential for errors. Missteps can compromise the final product, both aesthetically and functionally. Therefore, it is vital to understand and foresee these common mistakes to prevent them from occurring. The most prevalent blunder involves using the wrong type of material. Not every material adheres and contours well to the cylindrical shape. Opting for flexible, yet firm materials ensures a smooth, sag-free finish. The second frequent error is using the incorrect size of the wrapping; either too large or too small cutouts. Address this by taking precise measurements of your cylinder beforehand, including its length, diameter, and curvature. This will help you cut an accurately sized wrap, preventing overhangs or under-sizing. Another common mistake is rushing the process. Cylinder wrapping is a gradual process that requires patience. Avoid rushing to adhere the wrapping all at once; instead, apply it slowly, smoothing it out as you progress to reduce air bubbles and wrinkles. Ignoring the importance of cleanliness is another major pitfall. Any presence of dust and debris on the cylinder's surface can cause the wrap to adhere imperfectly, resulting subsequent peeling. Thoroughly clean and dry the surface before applying the wrap to ensure maximum stickiness and a clean outcome. Lastly, many individuals erroneously believe that cylinder wrapping is a one-step process. However, post-wrap care is equally as crucial. Regular maintenance helps in extending the life of the wrap and keeping it in good shape. Remember to gently clean the wrap regularly to prevent accumulation of debris. By understanding these common mistakes and how to avoid them, you enhance your cylinder wrapping skills. Consequently, you achieve a professionally wrapped cylinder that's highly functional, visually pleasing, and stands the test of time. This improvement in the technique will keep frustrations at bay and transform wrapping cylinders from a task into an art.
Useful Tools for Cylinder Wrapping
Cylinder wrapping is a delicate trade skill that requires precision, acumen, and the right tools. Many people underestimate the importance of using the correct tools when wrapping a cylinder, often leading to poor-quality work. As a dedicated disciple determined to hone your cylinder wrapping skills, choosing suitable tools is a critical aspect to consider. One of the most crucial tools to possess is a heat gun. As a step up from hairdryers, this tool is an essential addition to your toolset, providing the right amount of heat to enable the wrap to adhere smoothly to the cylinder, reducing air bubbles and placed perfectly. It ensures an even application, preventing wrinkles that may disrupt the overall aesthetic appeal of your wrap. A good quality wrapping film cutter is compulsory, allowing you to cut the wrapping film precisely according to the cylinder's size. A poorly cut wrapping film can result in an unsightly finish, revealing edges or not fully covering the cylinder. Another underrated tool is the wrapping glove. Not only does it protect your hands from the heat gun, but the glove also allows a smoother application by providing a better grip and preventing unnecessary oil or dirt contact from your hands to the wrap. For those who are meticulous about precision, a laser temperature gun can provide an extra level of accuracy. This tool ensures that the heat gun is at the perfect temperature, not too hot to melt the wrap or too cold that it doesn't stick correctly. Lastly, having a handy set of squeegees will allow you to apply the wrap more uniformly on the cylinder surface. It will help smooth out the wrap, eliminate any possible air bubbles, and ensure the wrap adheres firmly to the cylinder. In a nutshell, the tools you use significantly influence the quality of your cylinder wrapping. Invest in the right tools not only to make the process more manageable, but also to ensure a more polished, professional result. Remember, expertise comes not only from skills but also the precision offered by the best tools. Focusing on acquiring the best tools for cylinder wrapping can make a world of difference in honing your skills in cylinder wrapping mastery.