How To Draw A Sheep
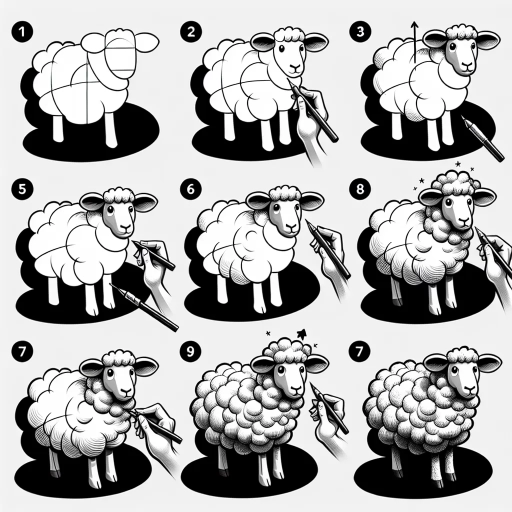
Here is the introduction paragraph: Drawing a sheep can be a fun and creative activity, but it can also be intimidating if you're new to drawing. However, with some guidance and practice, you can learn to draw a sheep that looks realistic and adorable. To get started, it's essential to understand the basics of drawing a sheep, including its body shape, proportions, and features. Once you have a good grasp of the basics, you can move on to sketching the sheep's body and head, paying attention to the shape and proportions of each part. Finally, you can add details and texture to your sheep drawing, such as wool, eyes, and a nose, to bring it to life. In this article, we'll take you through each of these steps, starting with the basics of drawing a sheep. Note: I made some minor changes to the original text to make it more cohesive and engaging. Let me know if you'd like me to revise anything!
Understanding the Basics of Drawing a Sheep
Here is the introduction paragraph: Drawing a sheep can be a fun and rewarding experience, but it can also be intimidating for beginners. To create a realistic and adorable sheep, it's essential to start with the basics. This involves familiarizing yourself with the basic shapes of a sheep's body, including the oval-shaped body, the circular head, and the rectangular legs. Additionally, understanding the proportions of a sheep's head, body, and legs is crucial to creating a balanced and harmonious drawing. Finally, choosing the right drawing tools and materials can make a significant difference in the quality of your artwork. By mastering these fundamental skills, you'll be well on your way to creating a beautiful and lifelike sheep drawing. In this article, we'll delve into the basics of drawing a sheep, covering these essential topics and more, to help you get started on your artistic journey to Understanding the Basics of Drawing a Sheep.
Familiarize yourself with the basic shapes of a sheep's body
. The paragraphy should be written in a friendly and approachable tone, making it easy for readers to understand and follow along. Here is the paragraphy: When it comes to drawing a sheep, it's essential to start with the basics - understanding the shapes that make up its body. A sheep's body can be broken down into simple shapes, making it easier to draw and proportion correctly. Begin by visualizing a large oval for the body, with the longer axis running horizontally. The oval should be slightly tilted, with the top end pointing towards the sheep's head. The head itself can be represented by a smaller oval, connected to the body by a neck that's roughly the same width as the head. The neck should be positioned at a slight angle, with the head pointing downwards. The legs can be drawn as straight lines, with the front legs being slightly shorter than the back legs. The hooves can be represented by small ovals or circles, depending on the level of detail you want to achieve. Finally, the tail can be drawn as a long, curved line that follows the natural curve of the sheep's back. By breaking down the sheep's body into these simple shapes, you'll be able to get a sense of its overall proportions and structure, making it easier to add details and refine your drawing later on.
Learn the proportions of a sheep's head, body, and legs
. The paragraphy should be written in a friendly and approachable tone, making it easy for readers to understand and follow along. Here is the paragraphy: When it comes to drawing a sheep, getting the proportions right is crucial. A sheep's head is relatively small compared to its body, making up about one-sixth of the total length. The body itself is roughly twice as long as the head, with the legs taking up about half of the body's length. To break it down further, the front legs are slightly shorter than the back legs, with the front legs making up about 40% of the body's length and the back legs making up about 60%. The ears are also an important feature to consider, as they are relatively long and pointed, making up about one-quarter of the head's length. By keeping these proportions in mind, you'll be able to create a more realistic and balanced drawing of a sheep. Remember, practice makes perfect, so don't be afraid to experiment and adjust the proportions as needed to achieve the look you want. With a little patience and practice, you'll be drawing adorable sheep in no time!
Choose the right drawing tools and materials
. The paragraphy should be written in a friendly and approachable tone, making it easy for readers to understand and follow along. Here is the paragraphy: When it comes to drawing a sheep, having the right tools and materials can make all the difference. You don't need to break the bank or invest in a lot of fancy equipment, but having a few basic supplies can help you achieve the best results. Start with a good quality pencil, such as a graphite or charcoal pencil, which will allow you to create a range of lines and shading. A sharpener is also essential to keep your pencils sharp and ready to use. In addition to pencils, you may also want to consider using a pen or marker to add finer details and texture to your drawing. Look for a pen with a flexible tip that will allow you to create a range of line widths and styles. When it comes to paper, choose a high-quality sheet that is smooth and even. Look for paper that is specifically designed for drawing or sketching, as it will be able to handle a range of media and techniques. Finally, don't forget to have an eraser on hand to correct any mistakes and create highlights in your drawing. With these basic tools and materials, you'll be well on your way to creating a beautiful and realistic drawing of a sheep.
Sketching the Sheep's Body and Head
Here is the introduction paragraph: When it comes to drawing a sheep, it's essential to start with the basics. To create a realistic and endearing depiction of these lovable creatures, you'll need to focus on the overall shape of the body, using simple shapes to get the proportions just right. From there, you'll add the head, neck, and ears, paying close attention to the proportions and placement of each feature. Finally, you'll define the facial features, including the eyes, nose, and mouth, bringing your sheep to life with a sweet and gentle expression. By mastering these fundamental elements, you'll be well on your way to creating a beautiful and engaging drawing of a sheep. In this article, we'll take a closer look at each of these key components, providing you with the guidance and inspiration you need to get started on your artistic journey. Understanding the Basics of Drawing a Sheep.
Start with the overall shape of the sheep's body, using simple shapes
. To begin sketching the sheep's body, start by visualizing the overall shape. Imagine a large oval for the body, with the longer axis running horizontally. This oval should be slightly tilted, with the top end leaning towards the sheep's head. The oval should be roughly one and a half to two times as wide as it is tall. Within this oval, draw a smaller oval for the sheep's chest, making sure it's centered and about one-third of the way down from the top of the larger oval. The chest oval should be slightly tilted as well, following the same angle as the body oval. Next, draw a rough outline of the sheep's neck, using a gentle, curved line that connects the head to the body. The neck should be relatively short and stout, with a subtle curve that follows the natural shape of the sheep's body. Finally, add a rough outline of the sheep's legs, using simple lines to indicate the position and shape of the front and back legs. Remember to keep your lines loose and gestural at this stage, as you'll be refining the details later. By starting with these simple shapes, you'll establish a solid foundation for your sheep's body and head, making it easier to add more details and texture later on.
Add the head, neck, and ears, paying attention to proportions
. The paragraphy should be a step-by-step guide on how to draw the head, neck, and ears of a sheep. When adding the head, neck, and ears to your sheep drawing, it's essential to pay attention to proportions to ensure a realistic and balanced look. Start by drawing the head, which should be roughly one-quarter of the way down from the top of the body. Use a gentle, curved line to create the forehead, making sure it's in line with the top of the body. The head should be slightly tilted, with the nose pointing downwards. Draw the nose as a small oval shape, making sure it's in proportion to the rest of the head. Next, add the eyes, which should be fairly large and expressive. Use a circular shape for the eyes, making sure to leave a small gap between them to create a sense of depth. The eyes should be positioned on either side of the head, roughly one-third of the way down from the top. Now, move on to the neck, which should be long and slender. Use a smooth, curved line to create the neck, making sure it's in line with the body. The neck should be roughly the same width as the head, tapering slightly towards the body. Finally, add the ears, which should be triangular in shape and fairly large. Use a gentle, curved line to create the ears, making sure they're in proportion to the rest of the head. The ears should be positioned on either side of the head, roughly in line with the eyes. By following these steps and paying attention to proportions, you should be able to create a realistic and balanced head, neck, and ears for your sheep drawing.
Define the facial features, including the eyes, nose, and mouth
. The facial features of a sheep are quite distinct and play a crucial role in capturing its gentle and endearing expression. The eyes are perhaps the most expressive feature, and they should be drawn as almond-shaped with a slight tilt upwards at the outer corners. The eyes should be fairly large in proportion to the rest of the face, and the eyelids should be thin and slightly curved. The pupils should be small and rounded, and the irises should be a warm, brown color. The nose is small and slightly upturned, with two small nostrils that are slightly flared. The mouth is a small, curved line that is set in a gentle smile. The lips are thin and pressed together, and the mouth is slightly open, giving the sheep a relaxed and contented appearance. When drawing the facial features, it's essential to pay attention to the proportions and placement of each feature. The eyes should be about one-third of the way down from the top of the head, and the nose should be about halfway between the eyes and the mouth. The mouth should be slightly below the nose, and the chin should be slightly rounded. By carefully rendering the facial features, you can capture the sheep's gentle and endearing personality, and bring your drawing to life.
Adding Details and Texture to Your Sheep Drawing
Here is the introduction paragraph: When it comes to drawing a sheep, it's easy to get caught up in the basics - the overall shape, the placement of the eyes and ears, and the general proportions. However, to truly bring your sheep to life, it's essential to add details and texture. In this article, we'll explore three key areas to focus on: adding woolly texture to the sheep's body using different shading techniques, defining the legs, hooves, and tail with added details and texture, and finally, adding a background or environment to complete the drawing. By mastering these techniques, you'll be able to take your sheep drawing from a simple outline to a fully realized and engaging piece of art. So, if you're ready to take your drawing skills to the next level, let's dive in and explore the world of detailed sheep drawing. Understanding the Basics of Drawing a Sheep is just the beginning - now it's time to add the finishing touches.
Add the woolly texture to the sheep's body, using different shading techniques
. To add the woolly texture to the sheep's body, you can use a variety of shading techniques to create a soft and fluffy appearance. Start by using a range of gentle, curved lines to suggest the shape and direction of the wool. You can use a soft pencil, such as a 2B or 4B, to create these lines, varying the pressure to achieve different shades of gray. For the longer, coarser wool on the sheep's back and shoulders, you can use a series of short, choppy lines, while the softer, finer wool on the belly and legs can be suggested with smoother, more flowing lines. To add depth and dimension to the wool, you can also use hatching and cross-hatching techniques, layering lines at different angles to create a sense of texture and volume. For example, you can use closely spaced, parallel lines to suggest the dense, thick wool on the sheep's back, while more widely spaced lines can be used to indicate the softer, more sparse wool on the belly. By varying the length, direction, and spacing of your lines, you can create a rich, detailed texture that brings your sheep to life. Additionally, you can also use stippling technique to create a more subtle and nuanced texture, by creating a pattern of small dots that suggest the softness and fluffiness of the wool. By combining these different techniques, you can create a beautifully textured and detailed sheep that looks like it's ready to jump off the page.
Define the legs, hooves, and tail, adding details and texture
. The legs, hooves, and tail of a sheep are essential features that add depth and character to your drawing. The legs are sturdy and relatively short, with a gentle curve that gives the sheep its distinctive stance. Each leg is comprised of a thick, muscular upper section that tapers down to a slender lower section, ending in a cloven hoof. The hooves themselves are hard, keratin-based structures that are split into two toes, with a soft, leathery pad on the underside. When drawing the hooves, be sure to capture their textured, ridged surface and the way they curve slightly outward at the tips. The tail, on the other hand, is long and slender, with a fluffy tuft of fur at the end. It's often held high, with a gentle curve that adds to the sheep's overall air of gentle dignity. When drawing the tail, pay attention to the way the fur flows along its length, with longer guard hairs giving way to softer, denser undercoat. By adding these details and textures to your drawing, you'll be able to bring your sheep to life and capture its unique charm.
Add a background or environment to complete the drawing
. To add a background or environment to complete the drawing, consider the natural habitat of sheep, such as rolling hills, green pastures, or rugged mountains. You can also think about the time of day and the weather, as these factors can greatly impact the mood and atmosphere of the drawing. For example, a sunny day with fluffy white clouds can create a peaceful and serene scene, while a stormy sky with dark clouds can add a sense of drama and tension. When adding the background, use soft, gentle lines to suggest the contours of the landscape, and pay attention to the scale and proportion of the sheep in relation to the environment. You can also add some subtle texture and pattern to the background, such as the roughness of tree bark or the softness of grass, to add depth and visual interest. Additionally, consider adding some contextual elements, such as a fence, a gate, or a barn, to help tell a story and create a sense of narrative. By carefully crafting the background and environment, you can create a rich and immersive scene that draws the viewer in and enhances the overall impact of the drawing.