How To Melt Candy Melts
Here is the introduction paragraph: Melting candy melts is a crucial step in various candy-making and decorating projects. However, it can be a bit tricky, especially for beginners. To achieve the perfect melt, it's essential to understand the properties of candy melts, the melting process itself, and how to troubleshoot common issues that may arise. In this article, we'll delve into the world of candy melts, exploring what they are, how to melt them, and how to overcome common melting problems. By the end of this article, you'll be equipped with the knowledge and skills to melt candy melts like a pro. So, let's start by understanding what candy melts are and how they work.
Understanding Candy Melts
Candy melts are a popular confectionery coating used to create a wide range of sweet treats, from dipped strawberries and cake pops to molded candies and decorations. But what exactly are candy melts, and how do you choose the right type for your project? In this article, we'll delve into the world of candy melts, exploring what they are, the different types available, and how to select the perfect ones for your needs. Whether you're a seasoned candy maker or just starting out, understanding candy melts is essential for achieving professional-looking results. So, let's start with the basics: what are candy melts?
What are Candy Melts?
Candy melts are a type of confectionery coating made from sugar, corn syrup, and vegetable oil. They are designed to be melted and molded into various shapes and forms, making them a popular choice for cake decorating, candy making, and other sweet treats. Candy melts come in a wide range of colors and flavors, allowing users to create vibrant and delicious creations. They are often used to make candies, chocolates, and other sweets, and can be molded into shapes such as hearts, stars, and animals. Candy melts are also commonly used to decorate cakes, cupcakes, and cookies, adding a professional and polished finish to baked goods. Overall, candy melts are a versatile and fun ingredient that can be used to create a wide range of sweet treats.
Types of Candy Melts
Candy melts are a versatile and popular confectionery coating used for various sweet treats, including cakes, cookies, and candies. There are several types of candy melts available, each with its unique characteristics, flavors, and uses. The most common types of candy melts include white chocolate melts, milk chocolate melts, dark chocolate melts, and colored candy melts. White chocolate melts are made from cocoa butter, sugar, and milk, and are often used for coating cakes, cookies, and other baked goods. Milk chocolate melts, on the other hand, contain a higher percentage of cocoa solids and are commonly used for making chocolate-covered pretzels, strawberries, and other fruits. Dark chocolate melts have a higher cocoa content and are often used for making truffles, cake pops, and other rich chocolate treats. Colored candy melts are available in a wide range of colors and are often used for decorating cakes, cookies, and other sweet treats. Additionally, there are also flavored candy melts, such as mint, orange, and lemon, which can add a unique twist to your sweet creations. Furthermore, some candy melts are specifically designed for certain uses, such as candy melts for making candy apples, candy melts for making chocolate-covered nuts, and candy melts for making cake pops. Overall, the type of candy melt you choose will depend on the specific project you are working on and the desired flavor and texture.
Choosing the Right Candy Melts for Your Project
When it comes to choosing the right candy melts for your project, there are several factors to consider. First, think about the color scheme you want to achieve. Candy melts come in a wide range of colors, from classic white and milk chocolate to bright pink and blue. If you're looking for a specific shade, make sure to check the color chart provided by the manufacturer to ensure you get the right hue. Next, consider the type of project you're working on. If you're making candies or chocolates, you'll want to choose a candy melt that's specifically designed for that purpose. These melts are usually formulated to have a higher cocoa butter content, which gives them a smoother, more mellow flavor. On the other hand, if you're working on a decorative project, such as making candy decorations or coating cookies, you can opt for a candy melt that's specifically designed for that purpose. These melts are usually more vibrant in color and have a higher sugar content, which makes them easier to work with. Another important factor to consider is the melting point of the candy melts. If you're working in a warm environment or plan to use the melts in a project that will be exposed to heat, you'll want to choose a melt with a higher melting point to prevent it from becoming too soft or runny. Finally, think about the brand and quality of the candy melts. While it may be tempting to opt for a cheaper option, keep in mind that higher-quality candy melts will generally have a better flavor and texture, and will be easier to work with. By considering these factors, you can choose the right candy melts for your project and achieve professional-looking results.
Melting Candy Melts
Melting candy melts is a crucial step in various confectionery and crafting projects. To achieve the perfect melt, it's essential to choose the right method. There are three primary techniques to melt candy melts: using a double boiler, microwaving, or utilizing a candy melter or thermometer. Each method has its advantages and disadvantages, and selecting the right one depends on the specific project requirements and personal preference. For instance, using a double boiler provides a gentle and controlled heat, ideal for melting large quantities of candy melts. On the other hand, microwaving is a quick and convenient option, but it requires careful monitoring to avoid overheating. Meanwhile, a candy melter or thermometer offers precise temperature control, ensuring a smooth and consistent melt. In this article, we will explore each of these methods in detail, starting with the classic technique of using a double boiler to melt candy melts.
Using a Double Boiler to Melt Candy Melts
Using a double boiler is a popular method for melting candy melts, as it allows for gentle and controlled heat. To set up a double boiler, fill a medium-sized saucepan with water to a depth of about 2-3 inches. Bring the water to a simmer over medium heat, then reduce the heat to low. Place a heat-proof bowl on top of the saucepan, making sure that the bottom of the bowl is not touching the water. Add the candy melts to the bowl and stir occasionally as they melt. The steam from the simmering water will gently heat the candy melts, allowing them to melt smoothly and evenly. This method is ideal for melting large quantities of candy melts, as it prevents the chocolate from seizing up or becoming too hot. Additionally, using a double boiler allows for easy temperature control, which is essential for achieving the perfect melt. By using a double boiler, you can ensure that your candy melts are melted to a smooth and creamy consistency, perfect for dipping, drizzling, or molding into various shapes and designs.
Microwaving Candy Melts for Quick Melting
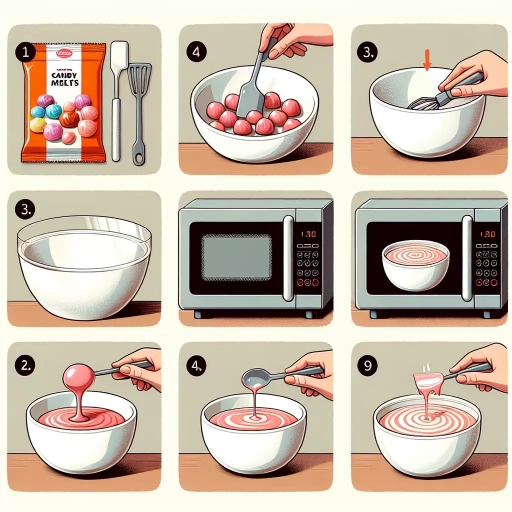
Microwaving candy melts is a quick and efficient way to melt them, but it requires some caution to avoid overheating or burning the chocolate. To microwave candy melts, place the desired amount in a microwave-safe bowl and heat in short intervals of 10-15 seconds, stirring between each interval until smooth and melted. It's essential to monitor the temperature and texture closely, as overheating can cause the chocolate to seize or become grainy. If you're using a high-powered microwave, you may need to adjust the heating time accordingly. Additionally, be aware that microwaving can create hot spots, so it's crucial to stir the chocolate thoroughly after each heating interval to ensure even melting. By following these guidelines, you can quickly and safely melt candy melts in the microwave, making it an ideal method for small batches or when you're short on time.
Using a Candy Melter or Thermometer for Precise Temperature Control
Using a candy melter or thermometer is crucial for achieving precise temperature control when melting candy melts. A candy melter is a specialized device designed specifically for melting chocolate and candy melts, and it allows for accurate temperature control, usually between 105°F and 115°F. This temperature range is ideal for melting candy melts, as it prevents the chocolate from seizing up or becoming too thin. On the other hand, a thermometer can be used in conjunction with a double boiler or a microwave-safe bowl to ensure that the candy melts reach the optimal temperature. When using a thermometer, it's essential to stir the candy melts frequently to ensure even heating and to prevent hot spots. By using a candy melter or thermometer, you can achieve a smooth, creamy, and consistent texture in your melted candy melts, which is perfect for dipping, drizzling, or molding. Additionally, precise temperature control helps to prevent the growth of sugar crystals, which can give the candy melts a grainy texture. Overall, using a candy melter or thermometer is a simple yet effective way to ensure that your candy melts are melted to perfection, and it's an essential tool for any candy maker or chocolatier.
Troubleshooting Common Issues with Melting Candy Melts
When working with candy melts, it's not uncommon to encounter issues that can be frustrating and affect the quality of your final product. Whether you're a seasoned crafter or a beginner, troubleshooting common problems with melting candy melts is essential to achieve professional-looking results. In this article, we'll explore three common issues that can arise when working with candy melts: preventing them from seizing up or becoming too thick, fixing them when they become too thin or runny, and dealing with candy melts that refuse to melt or are too hard. By understanding the causes and solutions to these problems, you'll be able to troubleshoot and overcome them with ease. To start, let's take a closer look at how to prevent candy melts from seizing up or becoming too thick, a common issue that can be caused by overheating or using the wrong type of candy melts.
Preventing Candy Melts from Seizing Up or Becoming Too Thick
When working with candy melts, it's not uncommon to encounter issues with seizing up or becoming too thick. To prevent this from happening, it's essential to follow a few simple tips. Firstly, ensure that your workspace and equipment are completely dry and free from any moisture. Candy melts are highly sensitive to water, and even a small amount of moisture can cause them to seize up. Next, use a high-quality candy melt that is specifically designed for melting and molding. These products are formulated to have a lower melting point and a more stable consistency, making them less prone to seizing up. Additionally, avoid overheating the candy melts, as this can cause them to become too thick and grainy. Instead, heat them in short intervals, stirring constantly, until they reach the desired temperature. It's also crucial to use the right type of melting equipment, such as a double boiler or a dedicated candy melt warmer. These tools are designed to provide a gentle and consistent heat, which helps to prevent the candy melts from seizing up or becoming too thick. By following these simple tips, you can ensure that your candy melts remain smooth and pliable, making it easier to work with them and achieve professional-looking results.
Fixing Candy Melts that Have Become Too Thin or Runny
When working with candy melts, it's not uncommon for them to become too thin or runny, especially if they've been overheated or exposed to high temperatures. If you find yourself in this situation, don't worry - there are a few simple fixes you can try to thicken up your candy melts. One method is to add a small amount of shortening, such as Crisco or coconut oil, to the melted candy. This will help to thicken the mixture and give it a more stable consistency. Another approach is to add a small amount of powdered sugar or corn syrup to the melted candy. These ingredients will help to absorb some of the excess moisture and thicken the mixture. If the candy melts are still too thin, you can try refrigerating them for about 10-15 minutes to allow them to firm up before re-melting. It's also important to note that if you're using a microwave to melt your candy melts, be careful not to overheat them, as this can cause them to become too thin and runny. By following these simple tips, you should be able to fix your candy melts and achieve the desired consistency for your project.
Dealing with Candy Melts that Refuse to Melt or Are Too Hard
Dealing with candy melts that refuse to melt or are too hard can be frustrating, but there are several solutions to try. If your candy melts are not melting, check the temperature of your melting device, as it may be too low. Increase the heat in small increments until the candy melts reach the desired consistency. If the candy melts are still not melting, try stirring them constantly to ensure even heating. Another possible solution is to add a small amount of shortening, such as Crisco or coconut oil, to the candy melts. This can help lower the melting point and make the candy melts more pliable. If the candy melts are too hard, try heating them in short bursts, stirring between each heating, until they reach the desired consistency. It's also important to note that old or expired candy melts may not melt properly, so try using fresh candy melts if possible. Additionally, if you're using a microwave to melt the candy melts, be careful not to overheat them, as this can cause them to seize up and become too hard. By trying these solutions, you should be able to get your candy melts to melt and reach the desired consistency.