How To Sew An Invisible Zipper
Here is the introduction paragraph: Sewing an invisible zipper can seem like a daunting task, but with the right techniques and preparation, it can be a breeze. To achieve a professional-looking finish, it's essential to understand the basics of invisible zippers and how to work with them. In this article, we'll take you through the process of sewing an invisible zipper, from preparation to completion. We'll start by discussing the importance of preparation, including choosing the right zipper and fabric, and how to properly interface and stabilize your fabric. With a solid foundation in place, you'll be able to master the invisible zipper technique, which involves carefully aligning and sewing the zipper in place. And, if you encounter any issues along the way, we'll provide troubleshooting tips to help you overcome common problems. By following these steps, you'll be able to sew an invisible zipper with confidence and achieve a beautiful, professional-looking finish. Preparation is key, so let's start there.
Preparation is Key
When it comes to sewing a zipper, preparation is key to achieving a professional-looking finish. A well-prepared zipper can make all the difference in the overall appearance of your garment or accessory. To ensure a successful zipper installation, it's essential to consider three crucial steps: choosing the right zipper, preparing your fabric, and setting up your sewing machine. By taking the time to carefully select the right zipper for your project, you'll be able to achieve a smooth and even installation. This is especially important, as the wrong zipper can lead to a bulky or uneven finish. Therefore, it's vital to start by choosing the right zipper for your project, considering factors such as the type of fabric, the desired length, and the intended use of the finished product. By doing so, you'll be able to set yourself up for success and ensure a professional-looking finish.
Choosing the Right Zipper
Choosing the right zipper is a crucial step in sewing an invisible zipper. With so many types of zippers available, it can be overwhelming to decide which one to use. The first thing to consider is the type of fabric you are working with. For delicate or lightweight fabrics, a zipper with a smaller tooth size is recommended to prevent visible holes or damage. On the other hand, for thicker or heavier fabrics, a zipper with a larger tooth size is more suitable. Another important factor to consider is the length of the zipper. Make sure to choose a zipper that is long enough to cover the entire opening, but not so long that it gets in the way of the surrounding fabric. The color of the zipper is also important, as it should match the color of the fabric as closely as possible to create a seamless look. Additionally, consider the type of zipper pull you need, such as a metal or plastic slider, or a zipper with a decorative pull. Finally, think about the functionality of the zipper, such as whether you need a zipper that can be opened from both ends or one that has a stop at the bottom to prevent it from coming undone. By considering these factors, you can choose the right zipper for your project and ensure a professional-looking finish.
Preparing Your Fabric
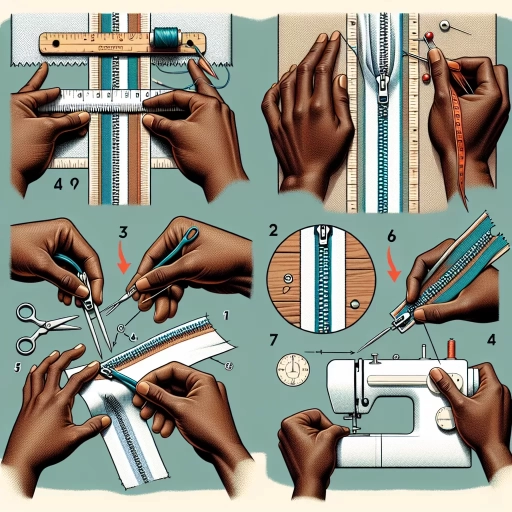
Preparing your fabric is a crucial step in sewing an invisible zipper. Before you start, make sure your fabric is clean and dry. Any dirt, dust, or moisture can affect the zipper's performance and the overall quality of your garment. Iron your fabric to remove any wrinkles, as this will help you achieve a smooth and even surface for sewing. If your fabric is prone to fraying, consider applying a fray check or zigzag stitching along the edges to prevent further damage. Additionally, if you're working with a delicate or stretchy fabric, you may want to interface it with a stabilizing material to provide extra support and prevent distortion. It's also essential to mark the center of your fabric, where the zipper will be placed, using a ruler or a marking tool. This will ensure that your zipper is aligned correctly and evenly spaced. Finally, make sure you have enough fabric on either side of the zipper to allow for a comfortable seam allowance. A general rule of thumb is to leave at least 1/4 inch of fabric on either side of the zipper. By taking the time to properly prepare your fabric, you'll be able to achieve a professional-looking finish and ensure that your invisible zipper lies flat and smooth.
Setting Up Your Sewing Machine
Setting up your sewing machine is a crucial step in preparing to sew an invisible zipper. To start, make sure you have the correct needle and thread for your fabric type. A sharp, size 8 or 10 universal needle is ideal for most fabrics, while a heavier or lighter needle may be required for thicker or thinner materials. Next, thread your machine with a matching thread color, leaving a small tail at the end to prevent it from getting tangled. If your machine has a built-in thread cutter, use it to trim the excess thread. Now, set your stitch length and width according to your machine's guidelines for a straight stitch or a zipper stitch, usually around 2-3 mm in length and 0-1 mm in width. If your machine has a zipper foot or an invisible zipper foot, attach it to the machine's presser foot holder, making sure it's securely locked in place. Finally, test your machine by sewing a few straight lines on a scrap piece of fabric to ensure it's working smoothly and evenly. By taking the time to properly set up your sewing machine, you'll be able to achieve a professional-looking finish on your invisible zipper.
Mastering the Invisible Zipper Technique
Mastering the invisible zipper technique is a game-changer for sewists of all levels. This technique allows for a seamless and professional finish, making it perfect for garments that require a high level of precision. To achieve this, it's essential to understand the key elements involved in the process. First, aligning the zipper with the fabric is crucial, as it sets the foundation for a smooth and even installation. Additionally, using the zipper foot for precision is vital, as it enables sewists to navigate the zipper's teeth with ease. Finally, backstitching for security is necessary to ensure that the zipper stays in place and doesn't come undone over time. By mastering these three essential steps, sewists can create garments with a professional finish that is both functional and visually appealing. In this article, we will delve into the first step of the process: aligning the zipper with the fabric.
Aligning the Zipper with the Fabric
When it comes to aligning the zipper with the fabric, precision is key to achieving a seamless and professional-looking finish. To start, place the zipper right side down on the wrong side of the fabric, ensuring that the teeth of the zipper are facing the edge of the fabric. Next, carefully align the edge of the zipper tape with the edge of the fabric, making sure that they are even and symmetrical. Use a ruler or measuring tape to double-check the alignment, and make any necessary adjustments before proceeding. It's also essential to consider the grain of the fabric when aligning the zipper, as this will affect the way the zipper lies flat against the fabric. For example, if the fabric has a strong grain, it's best to align the zipper with the grain to prevent it from buckling or distorting. Once the zipper is aligned, use a pin to secure it in place, starting at the top and working your way down. This will help prevent the zipper from shifting or moving during the sewing process. By taking the time to carefully align the zipper with the fabric, you'll be able to achieve a smooth, even finish that is virtually invisible.
Using the Zipper Foot for Precision
Using the Zipper Foot for Precision The zipper foot is a specialized presser foot designed to help you sew an invisible zipper with precision and accuracy. This foot is typically narrower than a standard presser foot, allowing you to get closer to the zipper teeth and maintain a consistent seam allowance. To use the zipper foot, start by attaching it to your sewing machine according to the manufacturer's instructions. Next, place the zipper right side down on the wrong side of the fabric, aligning the edge of the zipper with the edge of the fabric. Then, place the zipper foot on the zipper, making sure the edge of the foot is aligned with the edge of the zipper. As you begin to sew, the zipper foot will guide the fabric and zipper, allowing you to maintain a consistent seam allowance and prevent the fabric from bunching up. The zipper foot also helps to prevent the zipper from getting caught in the presser foot, which can cause the zipper to pucker or distort. By using the zipper foot, you can achieve a professional-looking invisible zipper that is smooth, even, and virtually invisible.
Backstitching for Security
Backstitching for security is a crucial step in sewing an invisible zipper, as it ensures the zipper remains securely in place and prevents it from coming undone over time. To backstitch for security, start by sewing a few reverse stitches at the beginning and end of the zipper seam, making sure to sew in the same direction as the rest of the seam. This will create a strong anchor point that prevents the zipper from shifting or coming loose. Next, sew a few additional reverse stitches at regular intervals along the length of the zipper seam, spacing them about 1-2 inches apart. This will provide extra security and prevent the zipper from coming undone due to stress or wear and tear. It's also a good idea to backstitch at any points where the zipper seam intersects with other seams or edges, as these areas can be prone to stress and strain. By taking the time to backstitch for security, you can ensure that your invisible zipper remains secure and functional for years to come.
Troubleshooting Common Issues
Troubleshooting common issues is an essential skill for anyone who wants to create professional-looking garments. When working with different types of fabric, it's not uncommon to encounter problems that can be frustrating and time-consuming to resolve. In this article, we'll explore three common issues that can arise during the sewing process and provide practical solutions to help you overcome them. We'll start by looking at how to deal with bulky fabric, which can be challenging to work with, especially when sewing seams or creating smooth curves. We'll also discuss how to fix a twisted zipper, a common problem that can be easily resolved with a few simple steps. Additionally, we'll cover how to conceal visible stitches, a technique that can make a big difference in the overall appearance of your finished garment. By mastering these troubleshooting techniques, you'll be able to tackle common issues with confidence and create beautiful, professional-looking garments. Dealing with bulky fabric is a great place to start, as it requires some special techniques to work with effectively.
Dealing with Bulky Fabric
Dealing with bulky fabric can be a challenge when sewing an invisible zipper. To overcome this issue, start by using a longer zipper than you think you'll need, as this will give you more room to maneuver the fabric. Next, use a walking foot or Teflon foot on your sewing machine, as these specialized feet are designed to handle thick or slippery fabrics with ease. Additionally, use a denim or heavy-duty needle, which is stronger and more durable than a standard needle. When sewing, use a slow and steady pace, and make sure to backstitch at the beginning and end of the seam to secure it. If the fabric is still being stubborn, try using a zipper foot with a built-in guide, which will help keep the zipper in place as you sew. Finally, don't be afraid to use a little bit of force to push the fabric through the machine, but be careful not to push too hard, as this can cause the fabric to pucker or distort. By following these tips, you should be able to successfully sew an invisible zipper into even the bulkiest of fabrics.
Fixing a Twisted Zipper
Fixing a twisted zipper can be a frustrating experience, but it's a common issue that can be easily resolved with a few simple steps. First, identify the source of the twist, which is usually caused by the zipper being pulled up or down at an angle. To fix this, start by locating the zipper stop, which is the small plastic or metal piece at the top of the zipper that prevents it from coming off the track. Gently pull the zipper stop down towards the bottom of the zipper, while simultaneously pulling the zipper teeth apart. This will help to release any tension that may be causing the twist. Next, use a pair of needle-nose pliers to gently grasp the zipper teeth and twist them back into alignment. Be careful not to apply too much pressure, as this can cause the teeth to break or become misshapen. Once the teeth are aligned, use a seam ripper or a pair of scissors to carefully trim any excess thread or fabric that may be caught in the zipper. Finally, re-zip the zipper and test it to make sure it's working smoothly. If the twist persists, you may need to repeat the process a few times until the zipper is fully aligned. By following these simple steps, you should be able to fix a twisted zipper and get your garment or bag back in working order.
Concealing Visible Stitches
Concealing visible stitches is a crucial step in sewing an invisible zipper, as it ensures a professional finish and prevents the stitches from being noticeable from the outside. To conceal visible stitches, start by using a matching thread color that blends with the fabric. This will help the stitches to blend in and become less noticeable. Next, use a blind hem stitch or a whipstitch to sew the seam allowance to the wrong side of the fabric, making sure to keep the stitches small and even. You can also use a serger or overlock machine to finish the seam allowance, which will give a clean and professional finish. Another option is to use a seam binding or seam tape to cover the stitches, which is especially useful for delicate or stretchy fabrics. Additionally, you can use a hand-sewing needle and thread to pick up the stitches and weave them into the fabric, creating a nearly invisible finish. By using one or a combination of these techniques, you can effectively conceal visible stitches and achieve a professional-looking finish on your invisible zipper.