How To Draw 3d Letters
Here is the introduction paragraph: Learning to draw 3D letters can be a fun and creative way to add depth and visual interest to your artwork, designs, and even handwriting. With a few simple techniques and some practice, you can create impressive 3D letters that seem to jump off the page. To get started, it's essential to understand the basics of 3D lettering, including the principles of perspective and how to create the illusion of depth. From there, you can move on to designing and sketching 3D letters, experimenting with different fonts, styles, and layouts. Finally, you can bring your 3D letters to life with shading and color, adding texture, dimension, and emotion to your artwork. In this article, we'll explore these three key aspects of drawing 3D letters, starting with the fundamentals. Let's begin by understanding the basics of 3D lettering.
Understanding the Basics of 3D Lettering
Understanding the basics of 3D lettering is a fundamental skill for any artist, designer, or crafty individual looking to add an extra dimension to their work. To get started, it's essential to familiarize yourself with various 3D lettering techniques, which can range from simple paper crafting to intricate metalwork. Additionally, choosing the right tools and materials is crucial to achieving the desired look and feel of your 3D lettering. Understanding perspective and depth is also vital to creating visually appealing and realistic 3D lettering. By mastering these fundamental concepts, you'll be well on your way to creating stunning 3D lettering that adds an extra layer of depth and visual interest to your work. In this article, we'll delve into the world of 3D lettering, starting with the basics of familiarizing yourself with 3D lettering techniques.
Familiarizing Yourself with 3D Lettering Techniques
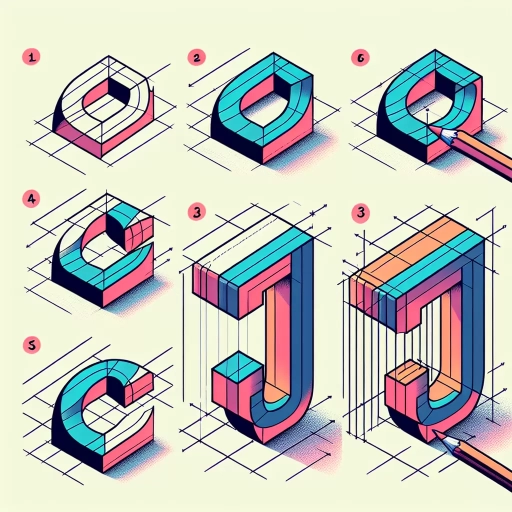
Familiarizing yourself with 3D lettering techniques is an essential step in mastering the art of creating three-dimensional letters. To begin, it's crucial to understand the fundamental principles of 3D lettering, including perspective, shading, and depth. Start by practicing basic shapes and forms, such as cubes, spheres, and cylinders, to develop your understanding of how to create depth and dimension. Next, experiment with different lettering styles, such as serif, sans-serif, and script, to see how they can be adapted to 3D. Pay attention to the way letters interact with each other and their surroundings, taking note of how to create a sense of hierarchy and balance. As you become more comfortable with the basics, try adding texture, pattern, and other visual elements to enhance the visual interest of your 3D letters. Additionally, study the work of other artists and designers who specialize in 3D lettering, analyzing their techniques and approaches to gain inspiration and insight. By dedicating time and practice to familiarizing yourself with 3D lettering techniques, you'll be well on your way to creating stunning, eye-catching letters that seem to jump off the page.
Choosing the Right Tools and Materials
When it comes to creating 3D letters, having the right tools and materials is essential to achieve the desired effect. The type of tool or material you choose will depend on the style and complexity of the lettering you want to create. For simple 3D lettering, a pencil or a fine-tip pen is sufficient. However, for more intricate designs, you may need to use a range of tools such as markers, colored pencils, or even digital drawing software. The quality of the paper or surface you are drawing on is also crucial, as it can affect the overall appearance of the lettering. Look for paper with a smooth finish, such as Bristol board or hot press watercolor paper, to ensure that your lines are crisp and even. Additionally, consider using a light box or tracing paper to help you achieve accurate proportions and spacing. If you're working digitally, choose a software that allows you to manipulate and customize your lettering, such as Adobe Illustrator or Procreate. By selecting the right tools and materials, you'll be able to bring your 3D lettering ideas to life and achieve professional-looking results.
Understanding Perspective and Depth
Understanding perspective and depth is crucial in creating convincing 3D lettering. Perspective refers to the way objects appear to shrink or converge as they recede into the distance, while depth refers to the illusion of three-dimensionality on a flat surface. To create depth in 3D lettering, artists use various techniques such as layering, shading, and atmospheric perspective. Layering involves creating multiple layers of elements, such as outlines, fills, and shadows, to build up a sense of depth. Shading involves adding gradations of tone and texture to create a sense of volume and dimensionality. Atmospheric perspective, also known as aerial perspective, involves creating a sense of depth by fading objects into the background, often using cooler colors and softer edges. By mastering these techniques, artists can create 3D lettering that appears to jump off the page, engaging the viewer and adding an extra layer of visual interest to their work.
Designing and Sketching 3D Letters
Designing and sketching 3D letters is a creative and challenging task that requires a combination of artistic and technical skills. To achieve a high-quality 3D letter design, it's essential to follow a structured approach that involves several key steps. First, creating a concept and sketching the letterform is crucial in establishing the foundation of the design. This involves brainstorming ideas, researching typography, and sketching out rough drafts of the letter. Next, adding dimension and texture to the letter is vital in giving it a realistic and engaging appearance. This can be achieved through the use of shading, lighting, and texture techniques. Finally, refining the design and making adjustments is necessary to ensure that the final product meets the desired standards. By following these steps, designers can create stunning 3D letters that capture the viewer's attention and effectively communicate the intended message. With a clear concept in mind, the next step is to start creating a concept and sketching the letterform.
Creating a Concept and Sketching the Letterform
When creating a concept and sketching the letterform, it's essential to consider the overall aesthetic and style you want to achieve. Start by brainstorming ideas and researching different typography styles, lettering techniques, and 3D design elements. Think about the message you want to convey and the emotions you want to evoke with your 3D lettering. Sketch out rough ideas and experiment with different letterforms, shapes, and textures. Consider the negative space around the letters and how it can be used to create depth and visual interest. As you refine your concept, think about the proportions, balance, and harmony of the letterform. Use simple shapes and lines to block out the basic form of the letter, and then add details and embellishments. Don't be afraid to try out different variations and iterations until you land on a design that feels cohesive and effective. Remember to keep your sketches loose and gestural, as this will help you stay focused on the overall form and structure of the letter. By taking the time to develop a solid concept and sketch out your ideas, you'll be able to create a strong foundation for your 3D lettering design.
Adding Dimension and Texture to the Letter
Adding dimension and texture to the letter is a crucial step in creating a visually appealing 3D letter design. To achieve this, you can use various techniques such as shading, hatching, and cross-hatching. Shading involves creating gradual transitions from light to dark to give the letter a sense of depth and volume. Hatching and cross-hatching involve creating a series of closely spaced lines that follow the contours of the letter to create texture and dimension. You can also experiment with different line weights and styles to add visual interest to your design. Additionally, you can incorporate patterns, such as stripes or polka dots, to add an extra layer of texture and visual appeal. Another technique is to use atmospheric perspective, where objects in the background are lighter and less detailed than those in the foreground, creating a sense of depth and distance. By combining these techniques, you can create a 3D letter design that is not only visually striking but also engaging and dynamic. Furthermore, you can also use digital tools to add dimension and texture to your design, such as layering and blending modes, to achieve a more realistic and detailed look. By experimenting with different techniques and tools, you can push the boundaries of your design and create a truly unique and captivating 3D letter design.
Refining the Design and Making Adjustments
Refining the design and making adjustments is a crucial step in creating 3D letters that are visually appealing and effective. Once you have a solid foundation in place, it's time to fine-tune your design and make any necessary adjustments. Start by reviewing your sketch and identifying areas that need improvement. Consider the proportions, balance, and overall aesthetic of your design. Ask yourself if the letters are symmetrical, if the lines are smooth and flowing, and if the overall design is cohesive. Make adjustments as needed, paying close attention to the details that will make your 3D letters stand out. You may need to tweak the shape of a letter, adjust the spacing between letters, or add additional details such as shading or texture. By refining your design and making adjustments, you can create 3D letters that are not only visually stunning but also effective in communicating your message. Additionally, refining your design can also help you to identify any potential issues or problems that may arise during the construction process, allowing you to make necessary adjustments before it's too late. By taking the time to refine your design and make adjustments, you can ensure that your 3D letters are of the highest quality and meet your expectations.
Bringing 3D Letters to Life with Shading and Color
Bringing 3D letters to life with shading and color is an art form that requires a deep understanding of visual elements and techniques. To create a truly immersive experience, designers and artists must consider several key factors, including the manipulation of light sources and shading techniques, the strategic addition of color and texture, and the creation of realistic shadows and highlights. By mastering these elements, creatives can add depth, dimension, and emotion to their 3D lettering, drawing the viewer in and engaging them on a deeper level. In this article, we'll explore the intricacies of bringing 3D letters to life, starting with the fundamental principles of understanding light sources and shading techniques.
Understanding Light Sources and Shading Techniques
Understanding light sources and shading techniques is crucial in creating realistic and visually appealing 3D letters. Light sources can be categorized into two main types: natural and artificial. Natural light sources include sunlight, moonlight, and ambient light, while artificial light sources include lamps, candles, and computer screens. Each light source has its unique characteristics, such as intensity, color, and direction, which affect the way it interacts with the 3D letters. Shading techniques, on the other hand, refer to the ways in which light and shadow are used to create the illusion of depth and volume on a 2D surface. There are several shading techniques, including hatching, cross-hatching, stippling, and gradient shading. Hatching involves creating parallel lines that follow the contours of the 3D letters, while cross-hatching involves layering hatching lines at different angles to create a more textured and dimensional appearance. Stippling involves creating patterns of small dots to create shading and texture, while gradient shading involves gradually transitioning from one color to another to create a smooth and subtle shading effect. By understanding light sources and shading techniques, artists can create 3D letters that appear lifelike and engaging, with a sense of depth and dimensionality that draws the viewer in. By experimenting with different light sources and shading techniques, artists can add complexity and nuance to their 3D letters, creating a unique and captivating visual effect.
Adding Color and Texture to Enhance the 3D Effect
Adding color and texture to your 3D letters can elevate the overall visual impact and create a more immersive experience. To achieve this, start by selecting a color scheme that complements the theme or message of your artwork. You can use a single color or a combination of colors to create contrast and depth. For example, using a bold, bright color for the main letter and a softer, pastel color for the shading can create a striking visual effect. Additionally, consider adding texture to your 3D letters by incorporating different materials or patterns. This can be achieved through various techniques such as layering, blending, or using texture brushes. For instance, adding a rough, stone-like texture to a bold, metallic letter can give it a rugged, industrial feel. You can also experiment with different font styles and sizes to add visual interest and create a sense of hierarchy. By combining color, texture, and font variations, you can create a visually stunning 3D lettering artwork that grabs the viewer's attention and conveys your message effectively.
Creating Realistic Shadows and Highlights
When it comes to creating realistic shadows and highlights, there are several techniques to consider. One approach is to use a range of values, from light to dark, to create depth and dimension. This can be achieved by layering different shades of gray or color, with the lightest values at the top and the darkest at the bottom. Another technique is to use atmospheric perspective, where objects in the distance appear lighter and less detailed than those in the foreground. This can help create a sense of depth and distance in your 3D lettering. Additionally, paying attention to the direction of light sources can help create realistic shadows and highlights. For example, if the light source is coming from the top left, the shadows will fall on the bottom right. By carefully considering these factors, you can create realistic shadows and highlights that add depth and dimension to your 3D letters.