How To Remove Tint From Car Windows
Removing tint from car windows can be a daunting task, but with the right approach, it can be done effectively and safely. Whether you're looking to restore your car's original appearance or simply want to upgrade to a new tint, understanding the process is crucial. To successfully remove tint from car windows, it's essential to consider three key aspects: preparation, removal techniques, and post-removal care. Preparation is vital to ensure a smooth and damage-free process, as it involves gathering the necessary tools and materials, assessing the type of tint, and taking safety precautions. Once prepared, you can move on to the removal techniques, which involve using various methods to break down and remove the tint. Finally, post-removal care is necessary to restore your car's windows to their original condition. In this article, we'll delve into each of these aspects, starting with the importance of preparation. By understanding the preparation process, you'll be well on your way to successfully removing tint from your car windows.
Preparation is Key
When it comes to removing old flooring, preparation is key to a successful and stress-free process. To ensure a smooth transition to your new flooring, it's essential to take the time to prepare properly. This involves several crucial steps, including choosing the right removal method, gathering the necessary tools and materials, and preparing the work area. By doing so, you'll be able to avoid common mistakes, save time and money, and achieve professional-looking results. In this article, we'll explore each of these steps in detail, starting with the importance of choosing the right removal method. This critical first step will set the tone for the entire process, and making the right choice will make all the difference in the success of your flooring removal project.
Choose the Right Removal Method
When it comes to removing tint from car windows, choosing the right removal method is crucial to avoid damaging the glass or leaving residue behind. There are several methods to choose from, including using a heat gun, a scraper, or a chemical adhesive remover. A heat gun is a popular choice, as it can help loosen the adhesive and make it easier to remove the tint. However, it's essential to be cautious not to apply too much heat, which can cause the glass to crack or shatter. A scraper is another option, but it requires more elbow grease and can be time-consuming. Chemical adhesive removers, on the other hand, are a more aggressive option and can be effective, but they can also damage the glass or leave residue behind if not used properly. It's essential to read the instructions carefully and test a small area first to ensure the chosen method won't damage the glass. Additionally, some removal methods may require specialized tools, such as a tint removal kit, which can make the process easier and more efficient. Ultimately, the right removal method will depend on the type of tint, the age of the vehicle, and the individual's level of comfort with the removal process. By choosing the right method, car owners can ensure a safe and successful removal of the tint from their car windows.
Gather the Necessary Tools and Materials
To remove tint from car windows, it's essential to gather the necessary tools and materials beforehand. Start by collecting a few basic supplies, including a razor blade or a specialized tint removal tool, a credit card or similar tool for scraping, a spray bottle filled with a mixture of water and soap or a commercial adhesive remover, a microfiber cloth or paper towels for cleaning, and a trash bag for disposing of the removed tint. Additionally, consider investing in a tint removal kit, which usually includes a specialized solution and tools designed specifically for this task. If you're dealing with a particularly stubborn tint, you may also want to have some heat guns or a hair dryer on hand to help loosen the adhesive. Having all the necessary tools and materials within reach will make the removal process much smoother and less frustrating.
Prepare the Work Area
Before starting the process of removing tint from car windows, it is essential to prepare the work area to ensure a smooth and efficient process. Begin by moving your vehicle to a shaded area or a garage to prevent the sun's rays from interfering with the removal process. Next, cover the surrounding surfaces, including the dashboard, seats, and carpets, with drop cloths or old sheets to protect them from any debris or cleaning solutions that may spill during the process. Remove any loose items from the area, such as trash or personal belongings, to prevent them from getting in the way. Additionally, ensure that the work area is well-ventilated to prevent the buildup of fumes from the cleaning solutions. Finally, gather all the necessary tools and materials, including a heat gun, a scraper, a cleaning solution, and a microfiber cloth, and place them within easy reach to save time and effort during the removal process. By preparing the work area, you can minimize the risk of damage to your vehicle and ensure a successful tint removal process.
Removal Techniques
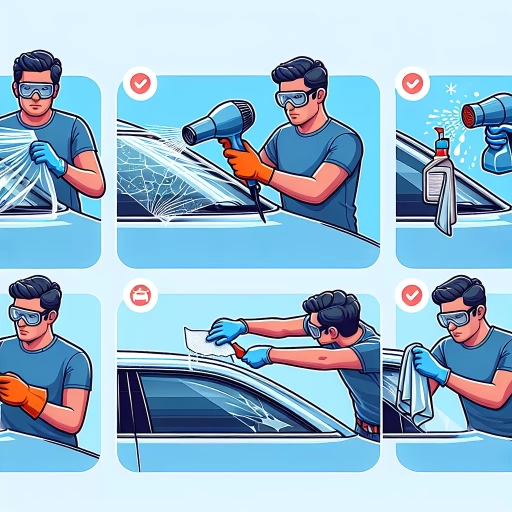
When it comes to removing old window tints, there are several techniques that can be employed to achieve a successful outcome. Three of the most effective methods include using a heat gun and scraping tool, applying a tint removal solution, and utilizing a steamer and razor blade. Each of these techniques has its own unique advantages and can be used in different situations. For instance, using a heat gun and scraping tool is ideal for removing tints that are stuck to the glass, while applying a tint removal solution is better suited for tints that are more stubborn. On the other hand, using a steamer and razor blade is a more gentle approach that can be used on tints that are not as stuck. Regardless of the technique used, the key to successful tint removal is to be patient and gentle to avoid damaging the glass. By using the right technique and taking the necessary precautions, you can effectively remove old window tints and achieve a clear and streak-free finish. Using a heat gun and scraping tool is a popular method that can be used to remove old window tints, and it will be discussed in more detail in the next section.
Using a Heat Gun and Scraping Tool
Using a heat gun and scraping tool is a popular method for removing tint from car windows. This technique involves applying heat to the tinted area to loosen the adhesive, making it easier to scrape off. To start, apply the heat gun to the tinted area, moving it slowly back and forth to ensure even heating. Be careful not to apply too much heat, as this can damage the window or the surrounding trim. Once the adhesive is loosened, use a scraping tool, such as a razor blade or a specialized tint removal tool, to gently scrape off the tint. Start at one edge and work your way across the window, using a gentle prying motion to avoid scratching the glass. As you scrape, use a cloth or paper towel to wipe away the removed tint and adhesive. Repeat the process as needed until all of the tint is removed. It's also a good idea to use a cleaning solution and a microfiber cloth to clean the window and remove any remaining adhesive residue. This method can be time-consuming and requires some elbow grease, but it is effective and can be done at home with the right tools.
Applying a Tint Removal Solution
Applying a tint removal solution is a popular method for removing old or damaged window tint from cars. This method involves using a specialized solution that breaks down the adhesive properties of the tint, making it easier to remove. To apply a tint removal solution, start by cleaning the window thoroughly to remove any dirt or debris that may interfere with the solution. Next, apply the solution to the tinted area using a spray bottle or a lint-free cloth. Make sure to saturate the area evenly, but avoid getting the solution on the surrounding paint or trim. Allow the solution to sit on the tint for the recommended amount of time, usually 10-30 minutes, depending on the type of solution and the age of the tint. During this time, the solution will penetrate the adhesive and start to break it down. After the solution has sat for the recommended time, use a razor blade or a credit card to gently scrape away the tint. Start at one edge and work your way across the window, using a gentle prying motion to avoid scratching the glass. As you scrape away the tint, use a lint-free cloth or paper towels to wipe away the solution and any remaining adhesive. Repeat the process as needed until all of the tint has been removed. It's also a good idea to use a glass cleaner and a microfiber cloth to clean the window thoroughly after the tint has been removed, to remove any remaining residue or streaks. Overall, applying a tint removal solution is a safe and effective way to remove old or damaged window tint from cars, and can be done at home with the right tools and materials.
Using a Steamer and Razor Blade
Using a steamer and razor blade is a popular method for removing tint from car windows. This technique is effective because the steamer helps to loosen the adhesive, making it easier to remove the tint with a razor blade. To start, apply the steamer to the tinted window, holding it about 6 inches away. Move the steamer slowly back and forth, covering the entire surface of the window. This will help to loosen the adhesive and make the tint more pliable. Next, use a razor blade to carefully scrape away the tint, starting from one edge and working your way across the window. Be careful not to apply too much pressure, as this can scratch the glass. It's also a good idea to use a credit card or similar tool to help scrape away the tint, as this can be gentler on the glass than a razor blade. As you scrape away the tint, use the steamer to continue loosening the adhesive, making it easier to remove the tint. This process can be time-consuming, but it is effective and can be done at home with minimal equipment.
Post-Removal Care
After removing old window film, it's essential to take the necessary steps to ensure the window surface is restored to its original condition. Post-removal care is crucial to prevent damage, maintain the window's integrity, and prepare it for new film installation. A thorough cleaning of the window surface is the first step in this process, as it removes any remaining adhesive residue and debris. Additionally, removing residual adhesive is also vital to prevent it from interfering with the new film's adhesion. Finally, inspecting and touching up the window is necessary to identify and address any scratches or imperfections. By following these steps, you can ensure a smooth and successful window film installation. To start, let's dive into the importance of cleaning the window surface.
Cleaning the Window Surface
Cleaning the window surface is a crucial step in the post-removal care process after taking off the tint from your car windows. It's essential to remove any remaining adhesive, residue, or debris to ensure a smooth and streak-free finish. Start by using a mixture of soap and water to gently scrub the window surface, working from the top down to prevent any dirt or debris from spreading. Use a soft-bristled brush or a microfiber cloth to scrub the area, paying particular attention to any stubborn spots or areas with heavy adhesive buildup. Once you've scrubbed the entire surface, rinse the window thoroughly with clean water to remove any soap residue. Next, use a glass cleaner and a lint-free cloth or paper towel to wipe down the window, removing any remaining streaks or residue. Be sure to clean the window sills and trim as well, as these areas can harbor dirt and debris. For any particularly stubborn spots or adhesive residue, you can use a specialized adhesive remover or a product like Goo Gone. Apply the product to the affected area, let it sit for a few minutes, and then wipe clean with a lint-free cloth or paper towel. Finally, use a dry microfiber cloth to wipe down the window and remove any remaining streaks or residue, leaving your car windows clean and sparkling. By following these steps, you'll be able to remove any remaining adhesive or debris and ensure a smooth, streak-free finish on your car windows.
Removing Residual Adhesive
Removing residual adhesive from car windows can be a challenging task, but it's essential to do it correctly to ensure a smooth and streak-free finish. After removing the tint, you may notice a sticky residue left behind, which can be difficult to remove. To start, use a mixture of equal parts water and white vinegar in a spray bottle. Spray the solution onto the adhesive and let it sit for a few minutes to help loosen the bond. Next, use a lint-free cloth or a microfiber towel to gently scrub the area, working from the outside in. Be careful not to scratch the glass, as this can create more problems. If the adhesive is particularly stubborn, you can use a specialized adhesive remover or a product like Goo Gone. Apply the product to the affected area, let it sit for a few minutes, and then wipe it away with a clean cloth. Repeat the process as needed until the adhesive is completely removed. Once the adhesive is gone, use a glass cleaner and a lint-free cloth to wipe down the window and remove any remaining streaks or residue. This will help ensure a clear and streak-free finish.
Inspecting and Touching Up the Window
Inspecting and touching up the window is a crucial step in the post-removal care process. After removing the old tint, it's essential to inspect the window for any remaining adhesive, debris, or scratches. Start by cleaning the window thoroughly with a mixture of soap and water to remove any dirt or residue. Then, use a lint-free cloth or microfiber towel to dry the window and inspect it for any imperfections. If you notice any remaining adhesive or debris, use a gentle adhesive remover or a credit card to scrape it off. Be careful not to scratch the window in the process. If you find any scratches, you can use a glass repair kit to touch them up. It's also a good idea to apply a glass treatment or coating to protect the window from future damage and make cleaning easier. Additionally, if you plan to install new tint, make sure the window is completely clean and dry before applying the new film. This will ensure a smooth and bubble-free installation. By taking the time to inspect and touch up the window, you can ensure a professional-looking finish and prevent any future problems.