How To Spool A Baitcaster
Spooling a baitcaster can be a daunting task for many anglers, especially those new to the sport. However, with the right techniques and preparation, it can be a straightforward process that sets you up for a successful fishing trip. To spool a baitcaster effectively, it's essential to understand the importance of preparation, the actual spooling process, and how to troubleshoot common issues that may arise. In this article, we'll break down the steps to spool a baitcaster, starting with the crucial preparation phase. By understanding the key elements of preparation, you'll be able to ensure a smooth and efficient spooling process, setting you up for a day of successful fishing. Preparation is Key, and it's where we'll begin our journey to mastering the art of spooling a baitcaster.
Preparation is Key
Preparation is key to a successful fishing trip. Before you head out on the water, it's essential to make sure you have the right gear and know how to use it. This includes choosing the right baitcaster, selecting the correct line and lure, and threading the line through the guides. By taking the time to prepare, you can avoid common mistakes and ensure a fun and productive day of fishing. In this article, we'll take a closer look at the importance of preparation and provide tips on how to get started. First, let's start with the basics: choosing the right baitcaster.
Choose the Right Baitcaster
When it comes to choosing the right baitcaster, there are several factors to consider. First and foremost, you need to think about the type of fishing you'll be doing. Different types of fishing require different types of baitcasters, so it's essential to choose one that's suitable for your specific needs. For example, if you're going to be fishing in heavy cover or for large species, you'll want a baitcaster with a high gear ratio and a lot of drag power. On the other hand, if you're going to be fishing in open water or for smaller species, a baitcaster with a lower gear ratio and less drag power may be more suitable. Additionally, you should also consider the weight and size of the baitcaster, as well as the material it's made of. A baitcaster that's too heavy or too large can be cumbersome to use, while one that's too light or too small may not have enough power to handle larger fish. Finally, you should also think about the price and brand reputation of the baitcaster. While it's true that you get what you pay for, there are many high-quality baitcasters available at affordable prices. By considering these factors, you can choose the right baitcaster for your needs and ensure a successful fishing trip.
Select the Correct Line and Lure
When it comes to spooling a baitcaster, selecting the correct line and lure is crucial for a successful fishing experience. The type of line and lure you choose will depend on the type of fishing you plan to do, the species of fish you're targeting, and the water conditions. For example, if you're fishing for bass in heavy cover, you'll want to use a heavier line, such as 15-20 lb test, and a lure that can withstand the thick vegetation, such as a spinnerbait or a crankbait. On the other hand, if you're fishing for trout in open water, you may want to use a lighter line, such as 6-10 lb test, and a lure that can imitate the natural baitfish, such as a small jig or a fly. It's also important to consider the action of the lure and how it will interact with the line. For instance, a lure with a lot of action, such as a spinnerbait, will require a line with a bit of stretch to it, while a lure with a more subtle action, such as a plastic worm, can be used with a line that has less stretch. Ultimately, the key is to experiment with different lines and lures to find what works best for you and the specific fishing conditions you're in.
Thread the Line Through the Guides
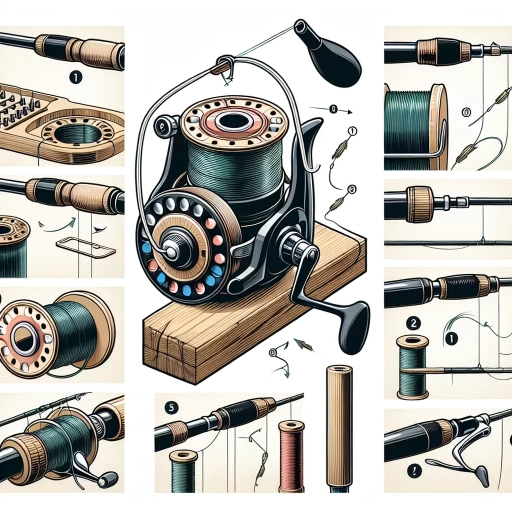
When it comes to spooling a baitcaster, one of the most crucial steps is threading the line through the guides. This process requires attention to detail and a bit of patience, but with practice, you'll get the hang of it. To start, locate the first guide on your baitcaster, which is usually the one closest to the reel. Take the end of the line and pass it through the guide, making sure it's seated properly and not twisted. Next, gently pull the line to remove any slack and ensure it's not tangled. Continue this process, threading the line through each guide, working your way down the rod. As you thread the line, keep a steady tension to prevent tangles and knots. It's also essential to keep the line at a 90-degree angle to the guides to prevent it from rubbing against the rod and causing damage. By taking your time and carefully threading the line through the guides, you'll ensure a smooth and even spooling process, which is critical for optimal casting performance.
Spooling the Baitcaster
Spooling a baitcaster can be a daunting task for beginners, but with the right techniques and knowledge, it can be a straightforward process. To spool a baitcaster effectively, there are three key steps to follow: attaching the line to the spool, filling the spool with the desired amount of line, and applying the correct tension to the line. By mastering these steps, anglers can ensure that their baitcaster is properly set up and ready for use. In this article, we will explore each of these steps in detail, starting with the first and most crucial step: attaching the line to the spool.
Attach the Line to the Spool
When attaching the line to the spool, it's essential to follow a few simple steps to ensure a smooth and tangle-free experience. First, locate the spool's line guide, which is usually a small metal or plastic loop located at the base of the spool. Next, thread the end of the line through the line guide, making sure it's seated properly. Then, tie a knot to secure the line to the spool, using a reliable knot such as the arbor knot or the improved clinch knot. Be sure to leave a small amount of slack in the line, as this will help prevent the line from becoming too tight and causing tangles. Finally, trim the excess line close to the knot, and your line is now securely attached to the spool. It's also a good idea to apply a small amount of line conditioner or lubricant to the line to help reduce friction and prevent tangles. By following these simple steps, you'll be able to attach your line to the spool quickly and easily, and be ready to start spooling your baitcaster.
Fill the Spool with the Desired Amount of Line
To fill the spool with the desired amount of line, start by determining how much line you need for your specific fishing application. A good rule of thumb is to fill the spool to about 1/8 inch from the top. This will give you enough line to cast effectively without overfilling the spool, which can lead to tangles and knots. Next, thread the line through the guides on your rod, leaving a small amount of slack. Then, attach the line to the spool using the arbor knot or the improved clinch knot. Once the line is attached, begin winding it onto the spool in a clockwise direction, keeping a steady tension on the line. As you wind, make sure to keep the line taut and avoid twisting or overlapping the line. It's also a good idea to use a line conditioner or lubricant to help reduce friction and prevent line twist. Continue winding the line until you reach the desired amount, then trim the excess line with scissors or a line cutter. Finally, inspect the spool to ensure the line is evenly wound and not twisted, and you're ready to start fishing.
Apply the Correct Tension to the Line
When spooling a baitcaster, it's crucial to apply the correct tension to the line to prevent tangles, knots, and uneven line distribution. To achieve the right tension, start by holding the spool in your non-dominant hand, with the line coming off the top of the spool. Use your dominant hand to gently pull the line away from the spool, keeping it taut but not too tight. You want to feel a slight resistance, but not so much that the line starts to dig into the spool. As you pull the line, rotate the spool slowly to distribute the line evenly. If the line starts to twist or tangle, stop and adjust the tension accordingly. It's better to err on the side of caution and apply too little tension than too much, as excessive tension can lead to line damage and poor casting performance. By applying the correct tension, you'll ensure a smooth, even spooling process that sets you up for successful casting and fishing.
Troubleshooting Common Issues
Troubleshooting common issues is an essential skill for any angler to master, as it can make all the difference between a successful fishing trip and a frustrating one. When faced with problems on the water, it's crucial to remain calm and methodically work through the possible causes. Three common issues that anglers often encounter are line twist and tangles, bird's nests or backlash, and drag system malfunctions. By understanding how to address these problems, anglers can minimize downtime and get back to fishing quickly. In this article, we'll explore these common issues and provide practical solutions for overcoming them. First, let's take a closer look at dealing with line twist and tangles, a problem that can be particularly frustrating when it occurs repeatedly.
Dealing with Line Twist and Tangles
Dealing with line twist and tangles is a common issue that many anglers face when using a baitcaster. To prevent line twist, it's essential to spool the line correctly, ensuring that the line is wound tightly and evenly onto the spool. One way to achieve this is by using a line spooling tool, which helps to maintain consistent tension and prevent twists. Additionally, using a high-quality monofilament or fluorocarbon line can also help reduce line twist, as these materials are less prone to twisting than other types of lines. When it comes to tangles, the best approach is to prevent them from occurring in the first place. This can be done by keeping the line organized and tidy, avoiding over-handling the line, and using a line conditioner to reduce friction and prevent tangles. If a tangle does occur, the best course of action is to carefully and patiently work out the knot, taking care not to pull too hard and risk breaking the line. In severe cases, it may be necessary to cut the line and re-spool the reel. By taking these precautions and being mindful of line twist and tangles, anglers can minimize the risk of these issues and enjoy a more successful and enjoyable fishing experience.
Fixing a Bird's Nest or Backlash
When fixing a bird's nest or backlash on a baitcaster, it's essential to remain calm and patient, as it can be a frustrating experience. Start by turning the handle slowly to see if the line will come out of the nest on its own. If not, locate the source of the tangle and gently tease out the line with your fingers or a pair of needle-nose pliers. Be careful not to pull too hard, as this can cause the line to break or the nest to become worse. If the nest is severe, you may need to remove the spool and manually unwind the line to remove the tangle. To prevent future bird's nests, make sure to always keep a steady tension on the line while casting, and avoid casting into strong winds or over obstacles. Regularly cleaning and maintaining your baitcaster can also help reduce the likelihood of a bird's nest occurring. By following these steps and taking preventative measures, you can quickly and easily fix a bird's nest and get back to fishing.
Adjusting the Drag System for Smooth Casting
Adjusting the drag system is a crucial step in ensuring smooth casting with a baitcaster. The drag system is designed to apply pressure to the spool, preventing it from spinning too quickly and causing backlash. To adjust the drag system, start by locating the drag dial or lever, usually found on the top or side of the reel. Turn the dial or lever clockwise to increase the drag pressure or counterclockwise to decrease it. It's essential to find the optimal drag setting, as too little pressure can result in a loose spool, while too much pressure can cause the line to break. A good starting point is to set the drag to about 1/3 to 1/2 of the maximum setting. Next, test the drag by pulling on the line gently. The drag should engage smoothly, and the line should not slip or jerk. If the drag is too loose, increase the pressure in small increments until you achieve the desired level of resistance. Conversely, if the drag is too tight, decrease the pressure until the line can be pulled out smoothly. It's also important to note that the drag system may need to be adjusted depending on the type of fishing you're doing and the size of the fish you're targeting. For example, if you're fishing for larger species, you may need to increase the drag pressure to prevent the line from breaking. On the other hand, if you're fishing for smaller species, you may need to decrease the drag pressure to avoid pulling the hook out of the fish's mouth. By adjusting the drag system correctly, you can ensure smooth casting and prevent common issues such as backlash and line breakage.