How To Hang Floating Shelves
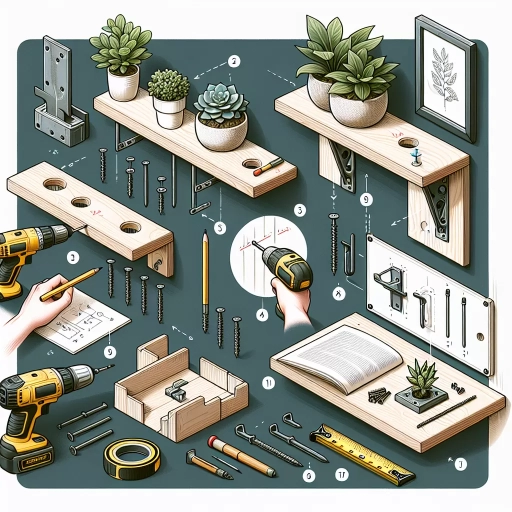
Floating shelves are a popular choice for home decor, offering a sleek and modern look that can elevate any room. However, installing them can be a daunting task, especially for those who are new to DIY projects. To ensure a successful installation, it's essential to follow a step-by-step approach. First, you need to plan your floating shelves, considering factors such as the type of material, size, and location. This will help you determine the best placement and design for your shelves. Next, you'll need to prepare the wall and shelves, which involves measuring, marking, and drilling holes for the brackets. Finally, you'll be ready to install the floating shelves, carefully placing them onto the wall and securing them with the brackets. By following these three key steps, you can achieve a professional-looking result that adds style and functionality to your space. So, let's start by planning your floating shelves.
Plan Your Floating Shelves
Floating shelves can be a fantastic addition to any room, providing a sleek and modern way to display decorative items, books, or other household essentials. However, to ensure that your floating shelves are both functional and visually appealing, it's essential to plan carefully before installation. This involves considering several key factors, including choosing the right location, determining the number of shelves you need, and considering the weight capacity of your shelves. By taking the time to think through these details, you can create a beautiful and functional storage solution that enhances the overall aesthetic of your space. So, let's start by exploring the first crucial step in planning your floating shelves: choosing the right location.
Choose the Right Location
When it comes to hanging floating shelves, choosing the right location is crucial to ensure they are both functional and aesthetically pleasing. The first step is to identify the purpose of the shelves. Are they meant to display decorative items, store books, or hold kitchen utensils? Once you have determined the purpose, consider the room's layout and the location of other furniture pieces. For example, in a living room, you may want to place the shelves near a seating area to create a cozy reading nook. In a kitchen, you may want to install the shelves near a countertop to provide easy access to frequently used items. Additionally, consider the height at which you want to install the shelves. Floating shelves can be installed at various heights, but it's essential to ensure they are not too high or too low. A good rule of thumb is to install the shelves at a height that is comfortable for you to reach, usually between 30 and 60 inches from the floor. Furthermore, consider the surrounding architecture and design elements, such as windows, doors, and moldings, to ensure the shelves blend in seamlessly. By carefully considering these factors, you can choose the perfect location for your floating shelves and create a beautiful and functional space.
Determine the Number of Shelves
To determine the number of shelves you need, start by measuring the width of the wall where you plan to install the shelves. Consider the size and number of items you want to display or store on the shelves. Think about the style and aesthetic you're aiming for - do you want a minimalist look with a few statement pieces, or a more maximalist approach with multiple shelves and lots of decorative items? Make a list of the items you want to display or store, and group them by size and type. This will help you determine how many shelves you need and how much space each shelf should have. A good rule of thumb is to leave about 6-8 inches of space between each shelf, and to make sure each shelf is at least 6-8 inches deep to accommodate the items you want to display or store. You should also consider the weight capacity of each shelf and the type of material you're using - for example, glass shelves may require more support than wooden shelves. By taking these factors into account, you can determine the number of shelves you need to create a functional and visually appealing display.
Consider the Weight Capacity
When planning your floating shelves, it's essential to consider the weight capacity to ensure they can hold the items you intend to display. The weight capacity of a floating shelf depends on several factors, including the type of material used, the thickness of the shelf, and the type of wall it's being installed on. A general rule of thumb is to assume a weight capacity of 20-30 pounds per linear foot of shelf space. However, this can vary greatly depending on the specific design and installation. For example, a shelf made of solid wood or metal can typically hold more weight than one made of MDF or glass. Additionally, shelves installed on studs can hold more weight than those installed on drywall. To determine the weight capacity of your floating shelves, consult the manufacturer's instructions or consult with a professional if you're unsure. It's always better to err on the side of caution and choose a shelf with a higher weight capacity to avoid any potential safety hazards.
Prepare the Wall and Shelves
To prepare the wall and shelves for installation, it's essential to take a few crucial steps to ensure a sturdy and level setup. First, you need to locate the wall studs, which will provide the necessary support for your shelves. This involves using a stud finder or knocking gently on the wall to identify the studs' locations. Next, you'll need to measure and mark the wall to determine the optimal placement of your shelves, taking into account the size and weight of the items you plan to store. Finally, if your shelves require assembly, you'll need to follow the manufacturer's instructions to ensure they're stable and secure. By completing these steps, you'll be able to create a solid foundation for your shelves and ensure they remain safe and functional for years to come. With a clear understanding of the process, let's start by locating the wall studs.
Locate the Wall Studs
To locate the wall studs, you can use a stud finder, which is a specialized tool designed to detect the presence of studs behind a wall. This tool works by emitting a magnetic field that is disrupted by the presence of a stud, causing the device to light up or beep. You can also use a more traditional method by knocking gently on the wall with your knuckles. Studs will produce a more solid sound compared to the hollow sound of drywall. Another method is to measure 16 inches from the corner of a room, as studs are typically spaced 16 inches on center. You can also check electrical outlets and switches, as they are usually attached to studs. By using one or a combination of these methods, you can accurately locate the wall studs and ensure a secure installation of your floating shelves.
Measure and Mark the Wall
To measure and mark the wall for your floating shelves, start by determining the desired height and location of the shelves. Use a level to ensure the wall is straight and a pencil to mark the spot where you want to install the shelf. Measure the width of the shelf and mark the wall with a pencil at the center point, using a ruler or measuring tape to ensure accuracy. Next, measure the distance between the wall studs, which are usually 16 inches on center, and mark the spot where you want to drill the holes for the shelf brackets. Use a stud finder to locate the wall studs if you're unsure. Once you have marked the wall, use a level to double-check that the marks are straight and level. Finally, use a marker or a piece of painter's tape to mark the wall with a line or a dot, indicating where the shelf will be installed. This will serve as a guide for drilling the holes and installing the shelf brackets. By taking the time to measure and mark the wall carefully, you can ensure that your floating shelves are installed level, secure, and look great.
Assemble the Shelves (if necessary)
If your floating shelves require assembly, follow the manufacturer's instructions carefully. Typically, this involves attaching the shelf boards to the wall brackets or supports using screws or clips. Make sure to align the shelves properly and tighten the screws firmly to ensure stability. If your shelves come with adjustable feet or leveling systems, use them to ensure the shelves are perfectly level and plumb. This step is crucial in preventing the shelves from tipping or sagging over time. Additionally, if your shelves have a decorative trim or edging, attach it according to the manufacturer's instructions to complete the assembly process. Once assembled, double-check that the shelves are sturdy and can support the intended weight.
Install the Floating Shelves
Installing floating shelves can be a great way to add some extra storage and style to any room in your home. To get started, you'll need to drill pilot holes for the brackets that will hold the shelves in place. This is a crucial step, as it will ensure that the shelves are securely attached to the wall and can hold the weight of whatever you plan to store on them. Once the pilot holes are drilled, you can mount the brackets to the wall, making sure they are level and evenly spaced. Finally, you can place the shelves onto the brackets, and you'll have a beautiful and functional storage solution. In this article, we'll take a closer look at each of these steps, starting with the first and most important one: drilling pilot holes for the brackets.
Drill Pilot Holes for the Brackets
Drill pilot holes for the brackets by using a drill bit that is slightly smaller than the screws provided with the floating shelf brackets. This will ensure a snug fit and prevent the screws from splitting the wall. Hold the drill straight and level, and apply gentle to moderate pressure, depending on the type of wall you are working with. For drywall, use a drywall anchor or a screw with a coarse thread to provide extra grip. For plaster or concrete walls, use a masonry bit and a screw with a fine thread. Drill slowly and carefully to avoid damaging the surrounding area. If you are unsure about the type of wall or the best drilling technique, consult the manufacturer's instructions or seek advice from a professional. Once the pilot holes are drilled, you can proceed to install the brackets and hang your floating shelves.
Mount the Brackets to the Wall
Mounting the brackets to the wall is a crucial step in installing floating shelves. To do this, start by locating the wall studs using a stud finder. This is important because the brackets need to be anchored to the studs to support the weight of the shelves and any items that will be placed on them. Once you have located the studs, mark the spot where you want to install the bracket with a pencil. Next, hold the bracket against the wall and use a level to ensure it is straight. Then, use a drill to make pilot holes for the screws. Finally, screw the bracket into place, making sure it is securely fastened to the wall stud. It's a good idea to use a screw anchor or wall anchor to provide extra support and prevent the bracket from pulling out of the wall. By following these steps, you can ensure that your floating shelves are safely and securely installed.
Place the Shelves onto the Brackets
To place the shelves onto the brackets, start by carefully lifting the shelf and aligning it with the bracket. Make sure the shelf is centered and evenly spaced on the bracket. Gently lower the shelf onto the bracket, ensuring it is securely seated and level. If necessary, use a level tool to double-check the shelf's position. Once the shelf is in place, use the screws or clips provided with the bracket to secure it firmly. Tighten the screws or clips in a clockwise direction until they are snug, but avoid overtightening, which can damage the shelf or bracket. Repeat this process for each shelf, working from the bottom up to ensure stability and even weight distribution. As you place each shelf, double-check that it is level and securely attached to the bracket to prevent any shifting or movement. By following these steps, you can successfully place the shelves onto the brackets and achieve a sturdy and visually appealing floating shelf installation.