How To Draw Wings
Understanding the Basics of Drawing Wings
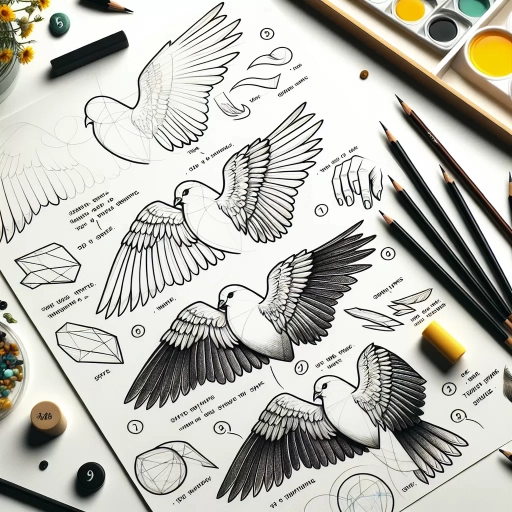
The Anatomy of Wings
The first step in learning how to draw wings is to understand their anatomy. In the world of birds, different species have wings of varied shapes and sizes, each adapted to their specific needs. For instance, birds of prey have broad wings with deep gaps between the feathers for gliding while smaller birds have more compact wings for quick maneuvering. When drawing wings, it's essential to identify the type of bird your wings are inspired by to better replicate their structure. The primary features to note are the wing's overall shape, the arrangement and size of the feathers, and the curves and angles that give the wings their form. This understanding provides a realistic foundation for your drawings.
- Study images of wings from different angles and observe their details.
- Understand the variation in wing shapes among different bird species.
- Learn about the specific anatomy of the wing you want to draw to ensure authenticity in your artwork.
Breaking Down the Drawing Process
Once you've got a firm understanding of wing anatomy, the next part of the process is to break down the drawing into manageable steps. Start by sketching the basic shape of the wing, focusing on getting the proportions correct rather than adding details. Next, outline the individual feathers based on their arrangement in the wing. Smaller feathers should be closer to the body, and larger feathers farther away. From there, you can begin to add detail, such as the veins of the feathers and any color patterns. Breaking down the drawing process into steps can make a complex subject like wings more approachable and manageable.
- Begin with a basic sketch of the wing's shape, focusing on accurate proportions.
- Outline the feathers based on their arrangement and size within the wing.
- Add detail gradually, including finer aspects like feather veins and color patterns.
Perfecting Your Wing Drawings with Advanced Techniques
Creating Dynamic Poses and Perspectives
When you're comfortable with the basics, you can start to challenge yourself by drawing wings in different poses and perspectives. You could draw a wing spread wide in flight, folded neatly at a bird's side, or somewhere in between. Each pose presents its own challenges and will require a slightly different approach. Drawing wings from various perspectives - front view, side view, or a three-quarters view - can also add dynamism to your work. Understanding the structure and movement of wings will help you in this regard. Practice effectively using shading and highlighting to depict the three-dimensional form of the wing.
- Experiment with drawing wings in different poses and from various perspectives.
- Use advanced techniques like shading and highlighting to create a three-dimensional effect.
- Study the movement of real wings to understand how to depict different poses accurately.
Developing Your Own Style
Finally, developing your own distinctive style can set your wing drawings apart. While the fundamentals are important, art is also about self-expression. Perhaps you're drawn to a more realistic style, or maybe you prefer something fantastical. Your style could be influenced by a certain timeframe, like the delicate and detailed depictions of the Renaissance, or by a particular culture, such as the bold and stylized forms seen in Japanese art. Experiment with different techniques and mediums until you find what resonates with you. Remember, the journey of an artist is all about growth and exploration.
- Experiment with different artistic styles and techniques to discover what you enjoy.
- Draw inspiration from various sources, such as different eras or cultures.
- Don't be afraid to step outside of the box and create something uniquely yours.