How To Make A Projector
Here is the introduction paragraph: Creating a projector from scratch can be a fun and rewarding DIY project, allowing you to bring your ideas to life and display them on a large screen. With the right materials and a bit of creativity, you can build a projector that is capable of producing high-quality images and videos. But before you start building, it's essential to understand the basics of how a projector works, design and build the projector with the right components, and test and refine it to ensure optimal performance. In this article, we will guide you through the process of making a projector, starting with the fundamentals. Understanding the basics of a projector is crucial to building a successful one, so let's dive in and explore the inner workings of a projector.
Understanding the Basics of a Projector
Understanding the basics of a projector is essential for anyone looking to purchase or use one for presentations, entertainment, or educational purposes. A projector is a device that displays images or videos onto a screen or surface, and it's crucial to know how it works, the different types available, and its key components. In this article, we will delve into the world of projectors, exploring what a projector is and how it works, the various types of projectors and their characteristics, and the key components that make up a projector. By understanding these fundamental aspects, you'll be better equipped to choose the right projector for your needs and use it effectively. So, let's start by understanding the basics of a projector, beginning with the question: what is a projector and how does it work?
What is a Projector and How Does it Work?
A projector is an electronic device that projects images or videos onto a screen or surface using light. It works by using a light source, such as a lamp or LED, to illuminate a digital image, which is then magnified and projected onto a screen through a lens system. The digital image is created by a digital light processing (DLP) chip, liquid crystal on silicon (LCoS) chip, or liquid crystal display (LCD) panel, which are the three main technologies used in projectors. The projector's lens system, which includes a combination of lenses and mirrors, focuses the light and enlarges the image to the desired size. The projected image can be adjusted for brightness, contrast, and focus to ensure optimal viewing quality. Projectors are commonly used in various settings, including classrooms, conference rooms, home theaters, and outdoor events, to display presentations, videos, and images.
Types of Projectors and Their Characteristics
There are several types of projectors available in the market, each with its unique characteristics, advantages, and disadvantages. The most common types of projectors include LCD (Liquid Crystal Display), DLP (Digital Light Processing), LCoS (Liquid Crystal on Silicon), and LED projectors. LCD projectors use a liquid crystal display to block or allow light to pass through a matrix of pixels, creating images on the screen. They are known for their high brightness, good color accuracy, and relatively low cost. DLP projectors, on the other hand, use a digital micromirror device to reflect light and create images. They are known for their high contrast ratio, good brightness, and compact size. LCoS projectors use a liquid crystal on silicon chip to block or allow light to pass through a matrix of pixels, creating images on the screen. They are known for their high contrast ratio, good color accuracy, and relatively low cost. LED projectors use light-emitting diodes to produce images on the screen. They are known for their high brightness, good color accuracy, and long lifespan. Other types of projectors include laser projectors, which use a laser to produce images, and 3D projectors, which can display 3D content. When choosing a projector, it's essential to consider factors such as brightness, resolution, contrast ratio, and connectivity options to ensure that it meets your specific needs and requirements.
Key Components of a Projector
The key components of a projector include the light source, image processing unit, and projection lens. The light source is typically a high-intensity lamp or LED that produces the light needed to project the image. The image processing unit, also known as the digital light processing (DLP) chip, is responsible for converting the digital signal from the source device into a visible image. The projection lens is used to focus the light and image onto the screen, creating a clear and sharp image. Additionally, many projectors also include a cooling system to prevent overheating, a power supply to provide power to the components, and a control system to adjust settings such as brightness and contrast. Some projectors may also include additional features such as keystone correction, which allows the projector to adjust the image to fit the screen, and wireless connectivity, which allows the projector to connect to devices without the need for cables. Understanding these key components is essential to making a projector, as they work together to produce a high-quality image.
Designing and Building the Projector
Designing and building a projector requires careful consideration of several key factors to ensure a high-quality image and reliable performance. When embarking on this project, it is essential to choose the right materials and tools, design an effective optical system and lens, and assemble the projector housing and mount the components with precision. By selecting the appropriate materials and tools, you can ensure that your projector is built to last and can withstand the demands of frequent use. A well-designed optical system and lens are also crucial for producing a clear and vibrant image, while a sturdy projector housing and secure component mounting are necessary for maintaining the projector's stability and performance. In this article, we will explore each of these critical aspects of designing and building a projector, starting with the importance of choosing the right materials and tools.
Choosing the Right Materials and Tools
When it comes to designing and building a projector, choosing the right materials and tools is crucial to ensure a successful and high-quality outcome. For the projector's body, you can use a durable and lightweight material such as aluminum or PVC, which can be easily cut and shaped to fit your design. For the lens, you'll need a high-quality glass or acrylic lens that can focus light effectively. You can purchase a pre-made lens or create your own using a lens-making kit. Additionally, you'll need a light source, such as an LED or halogen bulb, and a reflector to direct the light towards the lens. A high-quality reflector can be made from a material such as aluminum or silver-coated plastic. In terms of tools, you'll need a drill press, jigsaw, or laser cutter to cut and shape the materials, as well as a soldering iron and wire to connect the electronics. A multimeter and oscilloscope can also be useful for testing and troubleshooting the projector's electrical components. Furthermore, a 3D printer can be used to create custom parts and components, such as the projector's housing or lens holder. By selecting the right materials and tools, you can ensure that your projector is built to last and produces high-quality images.
Designing the Optical System and Lens
Designing the optical system and lens is a crucial step in building a projector. The optical system is responsible for collecting light from the light source, focusing it onto the digital micromirror device (DMD) or liquid crystal on silicon (LCoS) chip, and then projecting the image onto the screen. The lens plays a critical role in this process, as it must be able to focus the light onto the DMD or LCoS chip with high precision and accuracy. To design the optical system and lens, you will need to consider several factors, including the type of light source, the size and resolution of the DMD or LCoS chip, and the desired throw distance and image size. You will also need to choose a lens design that is compatible with your projector's optical system, such as a Fresnel lens or a aspherical lens. Additionally, you may need to consider the use of additional optical components, such as a condenser lens or a prism, to improve the efficiency and quality of the optical system. By carefully designing the optical system and lens, you can ensure that your projector produces a bright, clear, and high-quality image.
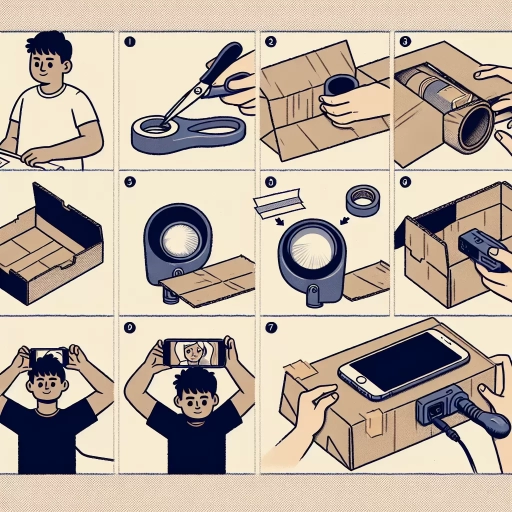
Assembling the Projector Housing and Mounting the Components
Assembling the projector housing and mounting the components is a crucial step in building a projector. To start, gather all the necessary components, including the projector housing, lens, mirror, LED light source, and circuit board. Begin by attaching the lens to the projector housing using a lens mount or adhesive. Ensure the lens is securely fastened and properly aligned. Next, attach the mirror to the housing using a mirror mount or clips, making sure it is securely fastened and aligned with the lens. The LED light source should be mounted to the housing using a heat sink or LED mount, taking care to ensure proper ventilation and heat dissipation. The circuit board should be mounted to the housing using stand-offs or a circuit board mount, ensuring it is securely fastened and connected to the other components. Finally, connect the components together using wires and connectors, following the circuit diagram and ensuring all connections are secure and properly insulated. Once all the components are mounted and connected, test the projector to ensure it is functioning properly.
Testing and Refining the Projector
Once you've chosen the perfect projector for your needs, it's essential to test and refine it to ensure optimal performance. This process involves several crucial steps that help you get the most out of your device. First, you'll need to set up the projector and adjust the focus to achieve a clear and sharp image. Next, you'll want to test the projector's brightness and image quality to ensure it meets your expectations. Finally, you may need to troubleshoot common issues and make adjustments to fine-tune the projector's performance. By following these steps, you'll be able to enjoy a high-quality viewing experience. In this article, we'll dive deeper into each of these steps, starting with setting up the projector and adjusting the focus.
Setting Up the Projector and Adjusting the Focus
Setting up the projector and adjusting the focus is a crucial step in ensuring a clear and sharp image. To begin, place the projector on a stable and level surface, making sure it is at the correct distance from the screen or projection surface. The distance will depend on the projector's throw distance, which can be found in the user manual. Next, connect the projector to the desired device, such as a laptop or gaming console, using an HDMI cable. Turn on the projector and the device, and select the correct input on the projector. Adjust the projector's zoom and focus rings to achieve a clear and sharp image. The zoom ring controls the size of the image, while the focus ring adjusts the clarity. It's essential to adjust the focus ring slowly and carefully, as over-focusing can lead to a blurry image. Additionally, some projectors may have a keystone adjustment feature, which allows you to adjust the image's shape and alignment. This feature is useful if the projector is not directly in front of the screen or if the screen is not perfectly flat. Once the focus is adjusted, you can fine-tune the image by adjusting the brightness, contrast, and color settings to your liking. It's also a good idea to check the projector's menu for any additional settings or features that may enhance the image quality. By following these steps, you can ensure a clear and sharp image that enhances your viewing experience.
Testing the Projector's Brightness and Image Quality
When testing the projector's brightness and image quality, it's essential to consider the ambient light in the room, as it can significantly impact the projector's performance. Start by setting up the projector in a room with minimal light, ideally with blackout curtains or shades to block out any external light sources. Next, adjust the projector's brightness settings to the optimal level, taking into account the room's lighting conditions. You can use a light meter to measure the lux level in the room and adjust the projector's brightness accordingly. Additionally, check the projector's color accuracy and contrast ratio to ensure that the image is vivid and clear. You can use a test pattern or a high-quality image to evaluate the projector's image quality. Pay attention to any signs of pixelation, blurriness, or color bleeding, and adjust the projector's settings as needed. It's also crucial to test the projector's keystone correction and focus to ensure that the image is sharp and clear. By thoroughly testing the projector's brightness and image quality, you can ensure that your DIY projector produces high-quality images that are engaging and immersive.
Troubleshooting Common Issues and Making Adjustments
When testing and refining your projector, you may encounter some common issues that need to be addressed. One of the most common problems is a blurry or distorted image. To troubleshoot this, check the focus of the lens and adjust it accordingly. Make sure the lens is clean and free of any debris or smudges. If the image is still blurry, try adjusting the distance between the projector and the screen or the object being projected. Another common issue is a dim or unevenly lit image. To fix this, check the brightness and contrast settings of the projector and adjust them as needed. You may also need to adjust the position of the light source or add additional lighting to achieve the desired level of brightness. If the image is still not clear, try adjusting the projector's keystone settings to ensure the image is properly aligned. Additionally, if you're using a DIY projector kit, you may need to make adjustments to the mirror or lens alignment to achieve a clear and focused image. By making these adjustments and troubleshooting common issues, you can refine your projector and achieve a high-quality image.