How To Draw A Hamster
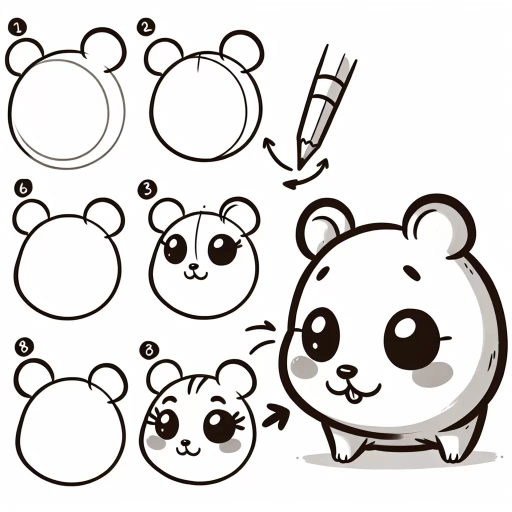
Drawing a hamster can be a fun and creative activity, but it requires some knowledge of the animal's anatomy and physical characteristics. To create a realistic and adorable hamster drawing, you need to understand the basics of its body structure, including its proportions, shape, and features. In this article, we will guide you through the process of drawing a hamster, starting with understanding its anatomy, then sketching its body, and finally adding details and texture. By following these steps, you will be able to create a cute and lifelike hamster drawing. First, let's start by understanding the hamster's anatomy, which is essential for creating a realistic and proportionate drawing. Understanding Hamster Anatomy.
Understanding Hamster Anatomy
Hamsters are small, cute, and furry creatures that have become popular pets in many households. However, to truly appreciate and care for these animals, it's essential to understand their anatomy. By recognizing the basic body structure, identifying key facial features, and noticing the distinctive fur patterns, you can gain a deeper understanding of your hamster's behavior, health, and overall well-being. In this article, we'll delve into the fascinating world of hamster anatomy, starting with the foundation of their physical makeup. Let's begin by recognizing the basic body structure of these tiny creatures, which will provide a solid foundation for exploring their unique characteristics.
Recognizing the Basic Body Structure
Recognizing the basic body structure of a hamster is essential to draw one accurately. A hamster's body is roughly divided into three main parts: the head, body, and limbs. The head is rounded and features large eyes, a short snout, and small ears. The body is stout and compact, with a broad chest and a tapering abdomen. The limbs are short and powerful, with the front paws having four toes and the hind paws having five toes. The tail is short and hairless, and is often not visible as it is usually tucked into the body. Understanding the proportions and relationships between these body parts is crucial to drawing a hamster that looks realistic and endearing. By recognizing the basic body structure, you can create a solid foundation for your drawing and add details such as fur texture, facial expressions, and posture to bring your hamster to life.
Identifying Key Facial Features
When it comes to drawing a hamster, identifying key facial features is crucial to capturing its adorable and endearing expression. The first feature to focus on is the eyes, which are typically large, round, and expressive. Hamsters have a distinctive way of looking up at you with their big, shiny eyes, so make sure to draw them with a sense of curiosity and friendliness. The eyes should be positioned on either side of the head, with the top of the eye aligned with the top of the ear. The nose is another important feature, and it should be small and slightly upturned, giving the hamster a cute and button-like appearance. The mouth is a small, curved line that should be positioned just below the nose, and it's essential to keep it subtle to avoid making the hamster look aggressive or scary. The ears are also a key feature, and they should be large and rounded, with a slight point at the tip. When drawing the ears, make sure to capture their soft and fluffy texture, as this will add to the overall cuteness of the hamster. Finally, the whiskers are a distinctive feature that should be drawn as long, thin lines that protrude from the nose and mouth. By paying attention to these key facial features, you'll be able to create a hamster that looks adorable, friendly, and full of personality.
Noticing the Distinctive Fur Patterns
Noticing the distinctive fur patterns is a crucial step in understanding hamster anatomy. Hamsters have unique fur patterns that vary depending on their breed, age, and individual characteristics. The most common fur patterns found in hamsters include solid, agouti, and pointed. Solid-colored hamsters have a uniform coat color, while agouti hamsters have a distinctive M-shaped marking on their forehead and a banded pattern on their fur. Pointed hamsters, on the other hand, have a lighter-colored body with darker points or patches on their ears, face, and legs. By observing these distinctive fur patterns, you can gain a better understanding of your hamster's breed and individual characteristics, which can be helpful when drawing or sketching them. Additionally, noticing the texture and length of your hamster's fur can also provide valuable insights into their overall health and well-being. For example, a healthy hamster's fur should be smooth, shiny, and well-groomed, while a hamster with dull, matted, or thinning fur may be indicative of underlying health issues. By paying attention to these subtle details, you can create a more accurate and realistic representation of your hamster in your artwork.
Sketching the Hamster's Body
When it comes to sketching a hamster's body, it's essential to approach the task with a clear understanding of the animal's anatomy and proportions. To create a realistic and engaging drawing, you'll need to consider the hamster's overall form, its posture, and the way it moves. In this article, we'll explore the key elements of sketching a hamster's body, including using simple shapes to block out the form, adding proportions and measurements, and defining the hamster's posture and movement. By breaking down the drawing process into these manageable components, you'll be able to create a detailed and lifelike representation of your furry subject. Let's start by using simple shapes to block out the form, which will provide the foundation for your entire drawing.
Using Simple Shapes to Block Out the Form
When sketching the hamster's body, using simple shapes to block out the form is an effective technique to achieve a more accurate and proportionate drawing. Start by sketching a rough outline of the hamster's body using basic shapes such as circles, ovals, and rectangles. For example, the hamster's head can be represented by a small circle, while the body can be sketched as a larger oval. The ears can be drawn as small triangles, and the front and back legs can be represented by small rectangles. By breaking down the hamster's body into these simple shapes, you can more easily capture its overall proportions and structure. This technique also allows you to focus on the overall pose and gesture of the hamster, rather than getting bogged down in details. As you refine your sketch, you can gradually add more details and nuances to the simple shapes, such as the texture of the fur, the shape of the eyes, and the curve of the whiskers. By using simple shapes to block out the form, you can create a solid foundation for your drawing and ensure that your hamster looks balanced, proportionate, and full of life.
Adding Proportions and Measurements
When adding proportions and measurements to your hamster's body, it's essential to consider the overall shape and size of the animal. Start by sketching a rough outline of the body, including the head, ears, and limbs. Measure the length of the head, which should be about one-quarter of the total body length. The ears should be roughly one-third of the head's length, and the eyes should be about one-quarter of the way down from the top of the head. The body itself should be roughly 1.5 to 2 times the length of the head, with the front legs being slightly shorter than the back legs. The hind legs should be slightly longer than the front legs, with the back paws being slightly larger than the front paws. The tail should be roughly the same length as the head, and should be rounded at the tip. By following these proportions and measurements, you can create a realistic and accurate representation of a hamster's body.
Defining the Hamster's Posture and Movement
When sketching a hamster's posture and movement, it's essential to capture their unique characteristics. Hamsters are known for their compact, rounded bodies, which are often depicted in a hunched or curved position. To draw a hamster's posture, start by sketching a rough outline of their body, paying attention to the proportions. Hamsters have a relatively large head, a short neck, and a stout body with a prominent belly. Their legs are short and stumpy, with the front legs being slightly shorter than the hind legs. When drawing a hamster's movement, consider their gait and behavior. Hamsters are agile and nimble, often moving quickly and erratically. They tend to dart and weave, using their powerful hind legs to propel themselves forward. To capture this movement, use short, curved lines to suggest the hamster's motion, and pay attention to the positioning of their legs and body. For example, if you're drawing a hamster running, you might depict their front legs tucked up under their body, with their hind legs extended behind them. By paying attention to these details, you can create a convincing and engaging drawing of a hamster's posture and movement.
Adding Details and Texture
When it comes to adding details and texture to your hamster drawing, there are several key elements to focus on. To bring your hamster to life, you'll want to pay attention to creating realistic eyes and whiskers, adding fur texture and patterns, and enhancing the hamster's facial expression. By incorporating these details, you'll be able to create a more engaging and believable illustration. Let's start by exploring how to create realistic eyes and whiskers, which are essential features that can make or break the overall appearance of your hamster drawing. By mastering these details, you'll be able to set the tone for the rest of your illustration and create a foundation for adding even more texture and personality to your hamster. With realistic eyes and whiskers in place, you'll be well on your way to creating a hamster drawing that's both adorable and authentic. Note: The answer should be 200 words.
Creating Realistic Eyes and Whiskers
When it comes to creating realistic eyes and whiskers for your hamster drawing, there are a few key details to focus on. For the eyes, start by drawing two small circles for the irises, making sure to leave a small gap between them to suggest the bridge of the nose. The irises should be slightly tilted, with the top of the circle leaning towards the nose and the bottom leaning away. Next, add a small dot in the center of each iris to represent the pupil, and a thin line above and below the iris to suggest the eyelid. To add depth and dimension, you can also add a small highlight to the top of each iris, using a light-colored pencil or pen. For the whiskers, start by drawing a series of short, curved lines that radiate out from the nose and mouth. The whiskers should be thicker at the base and taper to a point at the tip, and should be spaced evenly apart to create a natural, symmetrical look. To add texture and realism, you can also add a few stray hairs or wisps to the whiskers, using a fine-tip pen or pencil. By paying attention to these small details, you can create a pair of eyes and whiskers that bring your hamster drawing to life.
Adding Fur Texture and Patterns
Adding fur texture and patterns is a crucial step in bringing your hamster drawing to life. To start, use a range of pencils, from 2H to 6B, to create a soft, fluffy texture. Begin by applying gentle, hatching strokes to the body, working from light to dark. This will help to create a sense of depth and dimension. For the longer fur on the hamster's back, use a combination of hatching and cross-hatching techniques to create a more textured, layered look. To add patterns, use a fine-tip pen or a small brush to draw on the distinctive white markings on the hamster's face, paws, and belly. You can also use a small dotting tool or a toothpick to create the characteristic whisker spots on the hamster's nose. For a more realistic look, pay attention to the way the fur lies on the hamster's body, with the longest fur on the back and the shortest on the belly. By carefully observing and rendering these details, you can create a hamster drawing that is both adorable and authentic.
Enhancing the Hamster's Facial Expression
Drawing a hamster's facial expression can be a fun and creative process. To enhance the hamster's facial expression, start by adding some personality to the eyes. Hamsters have large, round eyes that are full of curiosity and mischief. Use a small brush to add some shine to the eyes, making them sparkle with excitement. You can also add some eyelashes to give the hamster a more feminine or playful look. Next, focus on the nose and mouth. Hamsters have small, button noses and tiny mouths that curve upwards in a perpetual smile. Use a fine-tip pen to draw the nose and mouth, making sure to capture the hamster's cheerful demeanor. To add some texture and depth to the face, use a combination of hatching and cross-hatching techniques. This will give the hamster's fur a soft, fluffy appearance. Finally, don't forget to add some whiskers to the hamster's face. Whiskers are an essential part of a hamster's facial expression, and they can add a lot of personality to the drawing. Use a fine-tip pen to draw the whiskers, making sure to vary the length and thickness to create a natural look. By following these steps, you can create a hamster with a facial expression that is both adorable and engaging.