How To Remove A Pop-up Sink Drain Without Lever
Removing a pop-up sink drain without a lever can be a challenging task, but with the right tools and a bit of patience, it can be done successfully. A pop-up sink drain is a type of drain that uses a spring-loaded mechanism to open and close, and it is commonly found in bathroom sinks. If you're experiencing issues with your pop-up sink drain, such as clogs or leaks, removing it may be the best solution. In this article, we will provide you with a step-by-step guide on how to remove a pop-up sink drain without a lever, including the tools and materials needed, a detailed removal process, and troubleshooting tips for common issues that may arise during the process. To get started, let's take a look at the tools and materials needed to remove a pop-up sink drain.
Tools and Materials Needed to Remove a Pop-Up Sink Drain
Removing a pop-up sink drain can be a daunting task, but with the right tools and materials, it can be done efficiently and effectively. To start, you'll need an adjustable basin wrench, which is specifically designed to reach and loosen the slip nuts that hold the drain in place. Additionally, channel-type pliers will come in handy for gripping and twisting the old drain's mounting nuts. Finally, having some Teflon tape on hand will ensure a watertight seal when reinstalling the new drain. With these essential tools and materials, you'll be well-equipped to tackle the job. Let's take a closer look at the adjustable basin wrench, a crucial tool for removing a pop-up sink drain.
Adjustable Basin Wrench
An adjustable basin wrench is a versatile tool that is essential for any homeowner or DIY enthusiast. This handy tool is designed to provide a secure grip on various sizes of basin nuts, making it easy to loosen and tighten them. The adjustable basin wrench features a long, curved handle that allows for maximum leverage and a comfortable grip, reducing the risk of slipping and straining. The wrench head is typically made of durable materials, such as chrome vanadium steel, and is designed to fit snugly around the basin nut, providing a secure grip. The adjustable feature of the wrench allows it to accommodate different sizes of basin nuts, making it a valuable addition to any toolkit. With an adjustable basin wrench, you can easily remove and install pop-up sink drains, faucet mounting nuts, and other basin-related fixtures, making it an indispensable tool for any plumbing or DIY project.
Channel-Type Pliers
Channel-type pliers, also known as needle-nose pliers, are a versatile tool that can be used to remove a pop-up sink drain without a lever. These pliers are designed with long, thin jaws that can reach into tight spaces, making them ideal for gripping small objects or fittings. The channel-type design allows for a secure grip on the pop-up drain's retaining ring or clip, enabling you to loosen and remove it with ease. When using channel-type pliers, it's essential to ensure a firm grip on the retaining ring to avoid slipping and damaging the surrounding sink or drain components. With the right amount of force and control, channel-type pliers can be an effective tool for removing a pop-up sink drain without a lever, making them a valuable addition to your toolkit.
Teflon Tape
Teflon tape, also known as plumber's tape, is a type of adhesive tape used to create a watertight seal in threaded pipe connections. It is a crucial tool in plumbing and is widely used to prevent leaks and ensure a secure connection between pipes and fittings. Teflon tape is made from a thin, flexible material coated with a layer of Teflon, a non-stick substance that provides a smooth surface for threads to engage. When applied to the threads of a pipe, the tape fills in the microscopic gaps between the threads, creating a tight seal that prevents water from escaping. Teflon tape is easy to use and can be applied to a variety of pipe materials, including copper, PVC, and ABS. It is also resistant to corrosion and can withstand high temperatures, making it an ideal solution for use in a wide range of plumbing applications. In the context of removing a pop-up sink drain, Teflon tape is often used to reassemble the drain assembly and ensure a watertight seal. By applying a few wraps of Teflon tape to the threads of the drain assembly, you can create a secure connection that will prevent leaks and ensure proper drainage. Overall, Teflon tape is a simple yet effective tool that is essential for any plumbing project, including removing a pop-up sink drain.
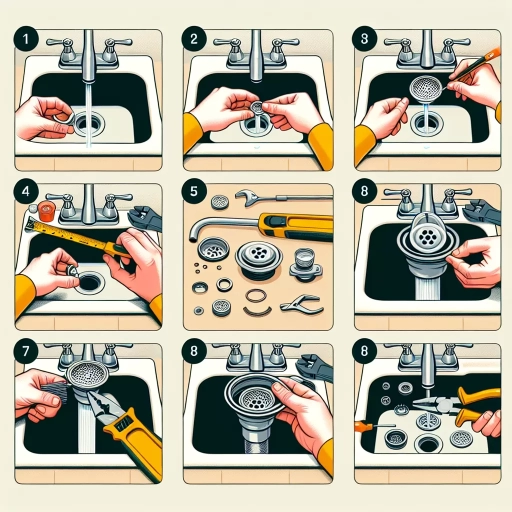
Step-by-Step Instructions to Remove a Pop-Up Sink Drain
Removing a pop-up sink drain can be a daunting task, especially for those who are not familiar with plumbing. However, with the right tools and a step-by-step guide, it can be done efficiently and effectively. To remove a pop-up sink drain, you will need to disconnect the P-trap and drain assembly, remove the old pop-up drain assembly, and install a new one. In this article, we will walk you through each of these steps in detail, starting with disconnecting the P-trap and drain assembly. By following these instructions, you will be able to successfully remove your old pop-up sink drain and replace it with a new one. So, let's get started by disconnecting the P-trap and drain assembly.
Disconnecting the P-Trap and Drain Assembly
To disconnect the P-trap and drain assembly, start by locating the slip nuts that hold the P-trap in place. These nuts are usually located at the bottom of the sink drain and are connected to the wall or floor. Use an adjustable wrench or basin wrench to loosen the slip nuts by turning them counterclockwise. Once the nuts are loose, you should be able to remove the P-trap from the sink drain. Be prepared for any water that may spill out when the P-trap is removed. Next, locate the drain assembly, which is usually connected to the sink drain by a series of pipes and fittings. Use a wrench or pliers to loosen any fittings or connections that hold the drain assembly in place. Once the fittings are loose, you should be able to remove the drain assembly from the sink drain. Take care not to damage any of the pipes or fittings during the removal process. If you encounter any stubborn connections, use a penetrating oil to help loosen them. With the P-trap and drain assembly removed, you should now have access to the pop-up sink drain and be able to proceed with the removal process.
Removing the Old Pop-Up Drain Assembly
Here is the paragraphy: To remove the old pop-up drain assembly, start by disconnecting the P-trap from the sink drain. You can do this by loosening the slip nuts that hold the P-trap in place, then carefully lifting it off the sink drain. Next, use a wrench to loosen the large slip nut that holds the pop-up drain assembly to the sink. Once the nut is loose, you should be able to lift the entire assembly out of the sink. Be careful, as the assembly may be stuck in place due to mineral buildup or old plumber's putty. If it doesn't come out easily, you can use a bit of penetrating oil to help loosen it. Once the assembly is removed, take a moment to inspect the sink drain and surrounding area for any mineral buildup or debris. Clean out any debris or buildup to ensure a smooth installation of the new pop-up drain assembly. With the old assembly removed, you're now ready to move on to the next step in the process.
Installing a New Pop-Up Drain Assembly
Here is the paragraphy: Installing a new pop-up drain assembly is a relatively straightforward process that can be completed with a few basic tools. To start, you'll need to purchase a new pop-up drain assembly that matches the specifications of your sink and old drain. Once you have the new assembly, begin by disconnecting the P-trap from the sink drain. You can do this by loosening the slip nuts that hold the P-trap in place, then lifting it off the sink drain. Next, use a wrench to loosen the old pop-up drain assembly's mounting nut, which is usually located at the bottom of the sink. Once the nut is loose, you should be able to lift the old assembly out of the sink. Before installing the new assembly, take a moment to inspect the sink drain and surrounding area for any mineral buildup or debris. Clean out any debris or buildup to ensure a smooth installation. To install the new assembly, simply place it into the sink drain and hand tighten the mounting nut. Then, use a wrench to tighten the nut an additional 1-2 turns to secure the assembly in place. Finally, reconnect the P-trap to the sink drain and tighten the slip nuts to complete the installation. With the new pop-up drain assembly in place, your sink should be functioning properly once again.
Troubleshooting Common Issues When Removing a Pop-Up Sink Drain
When removing a pop-up sink drain, homeowners may encounter a variety of issues that can be frustrating and challenging to resolve. Three common problems that can arise during this process include stuck or corroded parts, incorrectly installed drain assembly, and leaks or water damage. Stuck or corroded parts can make it difficult to disassemble the drain, while an incorrectly installed drain assembly can lead to further complications and potentially cause damage to the sink or surrounding areas. Leaks or water damage can also occur if the removal process is not done properly, resulting in costly repairs. In this article, we will explore each of these common issues in more detail, starting with stuck or corroded parts.
Stuck or Corroded Parts
When dealing with stuck or corroded parts, it's essential to approach the situation with caution and patience. In the context of removing a pop-up sink drain, stuck or corroded parts can be a major obstacle. To overcome this challenge, start by applying penetrating oil, such as WD-40 or Liquid Wrench, to the affected area. Let it sit for a few hours or overnight to allow the oil to seep into the corroded parts and loosen the grime. Next, use a wrench or pliers to gently try and loosen the stuck part. If it still doesn't budge, you can try applying heat using a hair dryer or heat gun to expand the metal and loosen the corrosion. However, be careful not to apply too much heat, as this can damage the surrounding material. If the part is still stuck, you may need to resort to using a breaker bar or a impact wrench to apply more force. In extreme cases, you may need to use a hacksaw or a pipe cutter to cut through the corroded part and replace it with a new one. It's also important to note that prevention is the best medicine when it comes to stuck or corroded parts. Regularly cleaning and maintaining your sink drain can help prevent corrosion and make future removals much easier. By following these steps and taking the necessary precautions, you should be able to successfully remove stuck or corroded parts and complete the removal of your pop-up sink drain.
Incorrectly Installed Drain Assembly
Incorrectly installed drain assembly is a common issue that can cause problems when removing a pop-up sink drain. If the drain assembly was not installed correctly, it can lead to a range of issues, including leaks, clogs, and difficulty removing the drain. One of the most common mistakes made during installation is not ensuring the drain assembly is properly aligned with the sink drain hole. This can cause the drain to sit at an angle, making it difficult to remove. Additionally, if the drain assembly is not securely fastened to the sink, it can come loose over time, causing leaks and other issues. Furthermore, if the drain assembly is not properly connected to the P-trap, it can cause clogs and backups. To avoid these issues, it's essential to ensure the drain assembly is installed correctly, with the drain aligned with the sink drain hole and securely fastened to the sink. Regular maintenance and inspections can also help identify any potential issues before they become major problems. By taking the time to ensure the drain assembly is installed correctly, homeowners can avoid the frustration and hassle of dealing with a stubborn pop-up sink drain.
Leaks or Water Damage
Leaks or water damage can be a significant issue when dealing with a pop-up sink drain. If not addressed promptly, it can lead to costly repairs, mold growth, and even compromise the structural integrity of your home. To avoid such problems, it's essential to identify and fix any leaks or water damage as soon as possible. Start by inspecting the drain assembly and pipes for any signs of moisture, mineral buildup, or corrosion. Check the gasket or O-ring for any signs of wear or damage, and replace it if necessary. Additionally, ensure that all connections are secure and tightened properly. If you notice any water damage or mineral deposits, clean the area thoroughly with a mixture of baking soda and vinegar to remove any debris and prevent further damage. In severe cases, you may need to replace the entire drain assembly or seek professional help to repair any underlying issues. By being proactive and addressing leaks or water damage promptly, you can prevent more extensive problems and ensure a smooth and functional pop-up sink drain removal process.