How To Fix A Zipper That Came Off
A broken zipper can be frustrating, especially when it comes off completely. However, with the right tools and techniques, it's possible to fix a zipper that came off. To do this, you'll need to assess the damage to determine the best course of action. This involves examining the zipper and the surrounding fabric to identify any potential issues. Once you've assessed the damage, you can prepare for the repair by gathering the necessary materials and tools. Finally, you can reattach the zipper, making sure it's secure and functional. In this article, we'll walk you through each of these steps, starting with assessing the damage to your zipper.
Assessing the Damage
Assessing the damage to a zipper that has come off is a crucial step in determining the best course of action for repair or replacement. To accurately evaluate the situation, it's essential to consider several key factors. First, identifying the type of zipper is vital, as different types of zippers have unique characteristics that affect the repair process. Next, determining the cause of the zipper coming off is necessary to prevent future occurrences. Finally, evaluating the extent of the damage will help you decide whether to repair or replace the zipper. By carefully considering these factors, you can make an informed decision and ensure a successful outcome. With this in mind, let's start by identifying the type of zipper.
Identifying the Type of Zipper
When assessing the damage, it's essential to identify the type of zipper you're dealing with. There are several types of zippers, each with its unique characteristics and repair requirements. The most common types of zippers are coil zippers, tooth zippers, and invisible zippers. Coil zippers have interlocking coils that can be easily separated and reattached, making them relatively easy to repair. Tooth zippers, on the other hand, have individual teeth that can be more challenging to repair, especially if they are broken or missing. Invisible zippers are designed to be hidden from view and often require specialized tools and techniques to repair. Other types of zippers include metal zippers, plastic zippers, and magnetic zippers, each with its own set of repair challenges. By identifying the type of zipper you're working with, you can determine the best course of action for repair and ensure a successful fix.
Determining the Cause of the Zipper Coming Off
When a zipper comes off, it's essential to determine the cause of the problem to ensure a proper fix. One common reason is that the zipper slider has come off the track, which can happen due to wear and tear, misalignment, or excessive force. In this case, the slider may have simply popped off, or the teeth on the zipper track may have become damaged, causing the slider to detach. Another possible cause is that the zipper stop or retainer box at the bottom of the zipper has broken or come loose, allowing the slider to slide off. Additionally, the zipper teeth may have become bent or damaged, preventing the slider from moving smoothly and causing it to come off. In some cases, the zipper may have been installed incorrectly or may be of poor quality, leading to a faulty slider or teeth that are prone to coming off. By identifying the root cause of the problem, you can take the necessary steps to repair or replace the zipper and prevent future issues.
Evaluating the Extent of the Damage
Evaluating the extent of the damage is a crucial step in fixing a zipper that came off. To do this, you need to carefully examine the zipper and the surrounding fabric. Check if the zipper has come off completely or if it's still attached to one side of the fabric. If it's still attached, you can try to reattach it, but if it's come off completely, you'll need to re-sew it. Next, inspect the fabric for any signs of damage, such as tears or fraying. If the fabric is damaged, you may need to repair it before reattaching the zipper. You should also check the zipper's teeth and slider for any damage or misalignment. If the teeth are bent or the slider is damaged, you may need to replace the zipper entirely. Additionally, check the zipper's stop at the bottom to ensure it's still intact. If it's missing or damaged, you'll need to replace it to prevent the zipper from coming off again. By carefully evaluating the extent of the damage, you can determine the best course of action to fix the zipper and prevent future problems.
Preparing for the Repair
Preparing for the repair of a broken zipper can be a daunting task, but with the right approach, it can be done efficiently and effectively. To ensure a successful repair, it is essential to gather the necessary tools and materials, remove any obstructions or debris that may be hindering the zipper's movement, and position the zipper for repair. By taking these steps, you can set yourself up for success and avoid any potential complications that may arise during the repair process. In this article, we will explore each of these steps in more detail, starting with the importance of gathering the necessary tools and materials.
Gathering the Necessary Tools and Materials
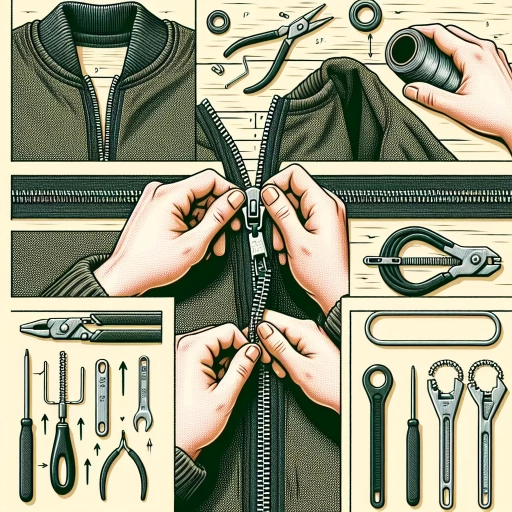
When preparing to fix a zipper that has come off, it's essential to gather the necessary tools and materials to ensure a successful repair. Start by collecting a few basic tools, including a seam ripper, scissors, a needle, and a thimble. A seam ripper will help you carefully remove any stitching that may be holding the zipper in place, while scissors will come in handy for cutting any excess thread or fabric. A needle and thimble will be necessary for reattaching the zipper to the garment. Additionally, you'll need some basic sewing supplies, such as thread, fabric glue, and a sewing machine (if you plan to use one). It's also a good idea to have some spare zipper parts on hand, such as zipper stops or zipper teeth, in case you need to replace any damaged or missing components. If you're dealing with a particularly stubborn zipper, you may also want to have some pliers or a zipper repair kit on hand to help you manipulate the zipper's internal mechanisms. By gathering all of these tools and materials, you'll be well-prepared to tackle the repair and get your zipper working smoothly again.
Removing Any Obstructions or Debris
When preparing for the repair, it's essential to remove any obstructions or debris that may be hindering the zipper's movement or interfering with the repair process. Start by gently pulling out any loose threads, fabric scraps, or other debris that may have accumulated in the zipper's teeth or surrounding area. Use a pair of tweezers or a small brush to carefully remove any stubborn particles or fibers. If the zipper is stuck due to dirt, grime, or old lubricant, use a soft cloth and a mild soap solution to clean the area. Avoid using harsh chemicals or abrasive materials that may damage the zipper's components or the surrounding fabric. Once the area is clean, use a dry cloth to wipe away any excess moisture and prevent rust or corrosion. By removing any obstructions or debris, you'll be able to assess the extent of the damage and determine the best course of action for the repair.
Positioning the Zipper for Repair
Positioning the zipper for repair is a crucial step in the process of fixing a zipper that has come off. To start, lay the garment or item with the zipper flat on a surface, with the zipper facing upwards. Identify the area where the zipper has come off and locate the zipper stop, which is usually a small plastic or metal piece at the top of the zipper. Gently pull the zipper stop away from the garment, taking care not to damage the surrounding fabric. Next, locate the zipper slider, which is the movable part of the zipper that joins and separates the two sides of the zipper. Slide the zipper slider down to the bottom of the zipper, making sure it is fully disengaged from the teeth. This will give you access to the area where the zipper has come off. If the zipper is stuck or jammed, you may need to use a pair of pliers or a zipper lubricant to help loosen it. Once the zipper is in the correct position, you can begin the repair process, which may involve reattaching the zipper to the garment or replacing the zipper entirely.
Reattaching the Zipper
Reattaching a zipper can be a daunting task, but with the right steps, it can be done efficiently. To reattach a zipper, one must first realign the zipper teeth, ensuring they are properly aligned and facing the correct direction. This is crucial as it sets the foundation for the rest of the process. Next, the zipper slider must be reattached, which requires careful handling to avoid damaging the surrounding material. Finally, the zipper must be secured in place, using a strong adhesive or stitching to prevent it from coming loose over time. By following these steps, one can successfully reattach a zipper and have it functioning like new. In this article, we will delve into the specifics of each step, starting with the crucial process of realigning the zipper teeth.
Realigning the Zipper Teeth
Realigning the zipper teeth is a crucial step in reattaching a zipper that has come off. To do this, start by examining the zipper teeth to identify any misaligned or bent teeth. Gently grasp the teeth with a pair of needle-nose pliers and carefully bend them back into place. If the teeth are severely bent or damaged, you may need to replace them entirely. Next, use a zipper stop or a small piece of tape to hold the teeth in place while you reattach the zipper. This will ensure that the teeth remain aligned and the zipper functions smoothly. Once the teeth are realigned, you can proceed with reattaching the zipper to the garment or bag. It's essential to be patient and gentle when realigning the zipper teeth, as rough handling can cause further damage. By taking the time to properly realign the teeth, you can ensure a successful repair and extend the life of your zipper.
Reattaching the Zipper Slider
Reattaching the zipper slider is a relatively simple process that requires some basic tools and a bit of patience. To start, you'll need to gather a few essential items, including a zipper slider, a zipper stop, and a pair of needle-nose pliers. If your zipper slider has come off completely, you may also need to purchase a new one, which can be found at most craft stores or online. Once you have all the necessary materials, begin by examining the zipper track to determine where the slider was originally attached. Look for a small metal or plastic stop at the top of the track, which is usually where the slider is secured. Next, take your needle-nose pliers and gently grasp the stop, pulling it away from the track. This will give you access to the small hole or slot where the slider is attached. Now, take your new slider and insert the small pin or tab into the hole, making sure it's securely seated. Use your pliers to gently push the stop back into place, ensuring the slider is firmly attached. Finally, test the zipper by sliding it up and down to make sure it's working smoothly. If it's still not functioning properly, you may need to adjust the slider or replace the entire zipper. With a little patience and practice, reattaching a zipper slider is a simple DIY task that can save you money and extend the life of your favorite garments.
Securing the Zipper in Place
Securing the zipper in place is a crucial step in the reattachment process. To ensure a sturdy and long-lasting fix, it's essential to use a few simple techniques. First, apply a small amount of fabric glue or clear nail polish to the zipper's teeth and the surrounding fabric. This will help hold the zipper in place while you work on reattaching it. Next, use a needle and thread to sew a few small stitches on either side of the zipper, making sure to sew through both the zipper's fabric and the garment's fabric. This will provide additional support and prevent the zipper from coming loose over time. Finally, use a pair of pliers to gently squeeze the zipper's teeth together, ensuring they are securely locked in place. By following these steps, you can confidently secure the zipper in place and complete the reattachment process.