How To Draw A Skeleton
Understanding the Anatomy of a Skeleton
The Importance of Knowing Basic Skeleton Structure
The first step to drawing a skeleton accurately is an understanding of its basic structure. The human skeleton is a complex model that provides both support and protection to the bodies vital organs. As an artist, having a clear grasp of this structure is essential when designing realistic artwork. Not only does understanding the skeleton's fundamentals enhance accuracy, but it also allows the artist to depict movement and positioning with more confidence and precision. Every bone, joint, and curve plays a pivotal role in conveying the final output of the art piece. Therefore, learning about these aspects can help improve your art significantly.
Key Parts of the Skeleton to Learn
Some of the key aspects to learn when studying a skeleton include the skull, the spinal cord, the rib cage, and the limbs. Each comes with its unique set of challenges. The skull, for instance, is not a simple sphere but rather a complicated structure with cavities and protrusions. Similarly, the ribcage is not a line of identical bones but a structure of carefully arranged and differentiated ribs. Learning these structures individually and understanding their relationships can help create a whole skeleton that flows naturally and coherently.
Drawing Techniques for Skeletons
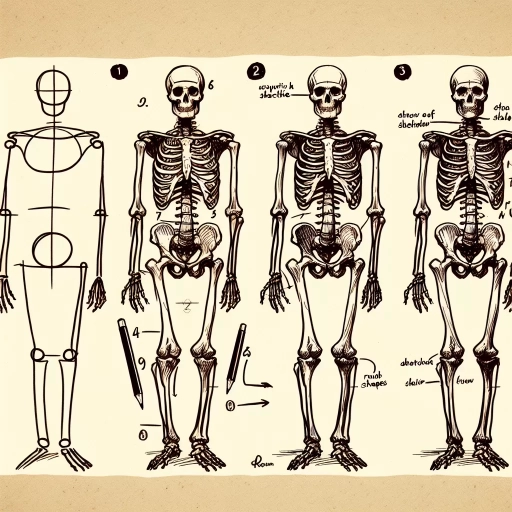
There are numerous drawing techniques that are employed when creating a skeleton. These range from shading techniques to depict depth, using simple shapes to initially outline the structures before adding details, and employing perspective to capture the three-dimensional aspects of the structure. Good practice is to start with a simple wireframe or stick figure, then gradually add the skeletal details. Lastly, the artist can apply shading to give a realistic look and feel to the drawing.
Step-by-Step Process to Drawing a Skeleton
Starting with Basic Shapes
The best way to start drawing a skeleton is to create a basic framework using simple shapes and lines. This provides a quick overview of the skeleton's overall size, proportion, and pose. From this point, you can start to define the major parts of the skeleton, such as the skull, ribcage, and pelvis. These can be simplified into oval or circular shapes initially, to help establish their positioning within the body.
Adding the Detailed Structures
Once you have a basic outline of the skeleton, the next step is to begin adding details. Different areas of the human skeleton have different detailed structures, such as the vertebrates in the spinal cord, the unique curvature and form of the ribs, and the joint areas in the limbs. It's crucial to take time in this step, ensuring that these parts are drawn accurately.
Finishing with Shading and Texture
The final part of drawing a skeleton involves adding shading and texture. Shading helps to give your drawing a three-dimensional and realistic appearance. Pay close attention to the light source and how it affects the bones' appearance, considering the slight variations in textures for different parts of the skeleton.
Tips and Tricks for Drawing a Skeleton
Use of Reference Images
Using reference images while drawing is incredibly useful, as it provides a clear depiction of how a skeleton looks. Different angles can aid in understanding the dimensions and details better. Therefore, having several reference images from different views will help tremendously in getting your skeleton drawing accurate.
Practice Makes Perfect
As with any skill, practice is key when it comes to drawing. No one masters the art of drawing overnight. It's all about trying repeatedly, learning from your mistakes and successes, and never giving up. So, keep practicing drawing different parts of a skeleton, and before you know it, you'll be able to draw an accurate, whole skeleton with ease.
Using the Right Art Materials
Choosing the right art materials also plays a significant role in how your drawing will turn out. For beginners, a normal HB or 2B pencil and a simple sketchbook will work just fine. As you advance, you may want to add more specialized equipment like different types of pencils, high-quality paper, erasers, and shading tools to your arsenal.