How To Draw A Phone
Drawing a phone can be a fun and creative activity, but it can also be intimidating if you're new to drawing. With the constant evolution of phone designs, it's essential to understand the basics of drawing a phone to create a realistic and accurate representation. To get started, you'll need to understand the fundamental elements of a phone's design, including its shape, size, and features. Once you have a solid grasp of these basics, you can move on to sketching the phone's basic form and features, paying attention to proportions and details. Finally, you can refine your drawing by adding textures and details that bring your phone to life. In this article, we'll take you through the process of drawing a phone, starting with the basics. Let's begin by understanding the basics of drawing a phone.
Understanding the Basics of Drawing a Phone
Drawing a phone can seem like a daunting task, especially for those who are new to drawing. However, with the right approach and techniques, anyone can learn to draw a phone with ease. To get started, it's essential to familiarize yourself with the basic shapes and structures that make up a phone. This includes understanding the proportions, lines, and curves that define a phone's design. Additionally, choosing the right drawing tools and materials can make a significant difference in the quality of your drawing. A pencil, eraser, and paper are the basic tools you'll need to get started. Finally, setting up your drawing space for efficiency can help you stay focused and avoid distractions. By following these steps, you'll be well on your way to creating a realistic and detailed drawing of a phone. In this article, we'll start by exploring the different shapes and structures that make up a phone, and how to accurately represent them in your drawing.
Familiarizing Yourself with Phone Shapes and Structures
When it comes to drawing a phone, it's essential to familiarize yourself with its various shapes and structures. A standard phone typically consists of a rectangular body with rounded edges, a flat screen, and a series of buttons and ports. The screen usually takes up most of the front surface, with a small bezel surrounding it. The back of the phone often features a camera lens, flash, and sometimes a fingerprint sensor. The sides of the phone typically have a power button, volume controls, and a SIM card slot. The bottom of the phone usually has a charging port, such as a USB-C or Lightning port, and sometimes a headphone jack. Understanding these basic shapes and structures will help you accurately draw a phone and get the proportions right. Additionally, paying attention to the phone's dimensions, such as its length, width, and thickness, will also aid in creating a realistic drawing. By breaking down the phone into its individual components and studying their relationships, you'll be able to create a detailed and accurate drawing of a phone.
Choosing the Right Drawing Tools and Materials
When it comes to drawing a phone, having the right tools and materials can make all the difference in achieving a realistic and detailed representation. To start, you'll need a pencil with a range of hardness levels, such as a set of graphite pencils (HB, 2B, 4B, 6B) or a mechanical pencil with interchangeable leads. This will allow you to create a variety of line weights and shading effects. A sharpener is also essential for keeping your pencils sharp and ready to use. In addition to pencils, a set of fine-tip pens or markers, such as Micron or Copic, can be used to add details and textures to your drawing. A blending stump or tortillon can be used to smooth out shading and create subtle transitions between different values. A kneaded eraser is also a must-have for correcting mistakes and erasing guide lines. When it comes to paper, look for a high-quality, smooth paper with a medium to heavy weight (around 80-100 gsm). This will provide a stable surface for drawing and help prevent smudging or bleeding. Finally, a drawing board or other stable surface can help you keep your paper steady and prevent it from moving around while you work. By investing in these basic drawing tools and materials, you'll be well on your way to creating a realistic and detailed drawing of a phone.
Setting Up Your Drawing Space for Efficiency
Setting up your drawing space for efficiency is crucial when it comes to drawing a phone. A cluttered and disorganized workspace can lead to distractions, mistakes, and frustration. To create an efficient drawing space, start by clearing a flat surface, such as a desk or table, of any unnecessary items. This will give you a clean slate to work on and help you focus on your drawing. Next, gather all the necessary tools and materials, including your drawing paper, pencils, eraser, and sharpener, and organize them in a way that makes sense to you. Consider using a pencil case or container to keep your supplies within easy reach. Good lighting is also essential for drawing, so position your workspace near a natural light source or invest in a good desk lamp. Finally, consider investing in a drawing board or tablet, which can help you achieve more precise lines and angles, and make it easier to draw your phone accurately. By setting up your drawing space in this way, you'll be able to work more efficiently and effectively, and produce a high-quality drawing of your phone.
Sketching the Phone's Basic Form and Features
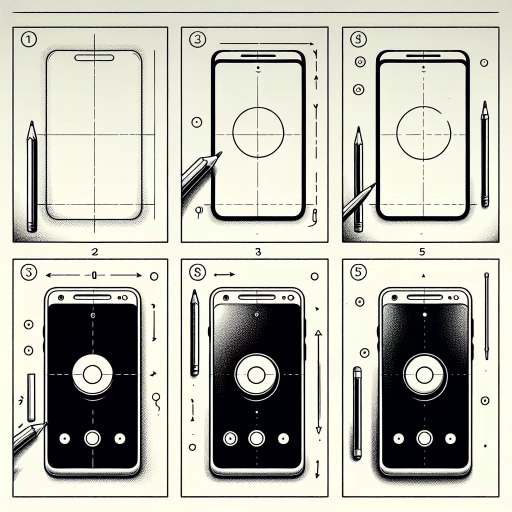
When sketching a phone, it's essential to start with the basics. This involves creating a rough outline of the phone's body and screen proportions, which will serve as the foundation for adding more details later on. To achieve this, you'll need to consider the phone's overall shape, size, and screen-to-body ratio. A well-proportioned phone sketch will make it easier to add features like buttons, ports, and antennas, which will be discussed in subsequent steps. By focusing on the phone's basic form and features, you'll be able to create a more realistic and detailed sketch. In this article, we'll explore the key elements to consider when sketching a phone, including drawing the phone's body and screen proportions, adding basic features like buttons and ports, and sketching the phone's antennas and camera. By following these steps, you'll be able to create a high-quality phone sketch that accurately represents the device's design. Let's start by drawing the phone's body and screen proportions.
Drawing the Phone's Body and Screen Proportions
When drawing the phone's body and screen proportions, it's essential to get the measurements right to achieve a realistic and accurate representation. Start by sketching a rectangle with a length that is roughly 1.5 to 2 times its width. The exact proportions may vary depending on the phone model, but this is a good starting point. Pay attention to the screen-to-body ratio, which is typically around 80-90%. This means that the screen should occupy about 80-90% of the phone's front surface. To achieve this, draw a smaller rectangle within the larger one, leaving a small border around the edges. The border should be slightly thicker at the top and bottom to accommodate the phone's bezels. Next, add the screen's rounded corners, which should be subtle and not too pronounced. The radius of the corners should be around 1-2 mm, depending on the phone model. Finally, add the phone's buttons and ports, such as the power button, volume controls, and charging port, making sure to place them in their correct positions. By following these steps, you'll be able to draw a phone with accurate body and screen proportions, setting the foundation for a detailed and realistic drawing.
Adding Basic Features Like Buttons and Ports
When adding basic features like buttons and ports to your phone drawing, start by identifying the essential elements that are commonly found on most smartphones. Typically, these include a power button, volume controls, a charging port, and a headphone jack. Begin by sketching the power button, usually located on the top right side of the phone, as a small rectangle with rounded edges. Next, add the volume controls, often situated on the right side of the phone, as two small buttons or a single rocker switch. The charging port, typically a USB-C or Lightning port, can be drawn as a small oval or rectangle on the bottom of the phone. If your phone has a headphone jack, add it as a small circle or oval on the top or bottom of the phone. Consider the phone's design and layout when placing these features, ensuring they are balanced and visually appealing. You can also add other features like a SIM card slot, microphone, or speaker grills, depending on the phone's specifications. Remember to keep your lines clean and precise, and use reference images to ensure accuracy. By adding these basic features, you'll be able to create a more detailed and realistic phone drawing.
Sketching the Phone's Antennas and Camera
When sketching the phone's antennas and camera, it's essential to pay attention to their placement and design. Typically, the antennas are located at the top and bottom of the phone, often in the form of thin lines or small rectangles. The camera, on the other hand, is usually positioned on the back of the phone, either in the top left or top right corner. To sketch the antennas, start by drawing two small rectangles or lines at the top and bottom of the phone, making sure to leave a small gap between them. For the camera, draw a small circle or oval shape, depending on the phone's design. Add some details such as a small lens in the center of the camera and a few lines to indicate the camera's sensor. You can also add some subtle shading to give the camera a more realistic look. When sketching the antennas and camera, remember to keep your lines smooth and confident, and don't be afraid to experiment with different designs and placements to create a unique and personalized phone sketch.
Refining Your Drawing with Details and Textures
When it comes to refining your drawing, details and textures play a crucial role in bringing your artwork to life. A well-crafted drawing can transport viewers to a new world, evoke emotions, and convey complex ideas. To take your drawing to the next level, it's essential to focus on the finer details that make your artwork more engaging and realistic. This can be achieved by adding screen details like icons and notifications, incorporating textures and patterns on the phone's body, and enhancing the drawing with shadows and lighting effects. By paying attention to these elements, you can create a more immersive and captivating visual experience. In this article, we'll explore how to refine your drawing with details and textures, starting with the importance of adding screen details like icons and notifications.
Adding Screen Details Like Icons and Notifications
When adding screen details like icons and notifications to your phone drawing, it's essential to consider the overall aesthetic and functionality you want to convey. Start by sketching the basic shape of the screen, including the edges and any notable features like a notch or home button. Next, think about the types of icons and notifications you want to include. You can draw inspiration from real-life phone screens or create your own custom designs. For a more realistic look, pay attention to the size, shape, and placement of each icon, as well as the typography and color scheme used in the notifications. To add depth and visual interest, consider layering elements like icons, widgets, and notifications, and experiment with different textures and shading techniques to give your screen a more dynamic appearance. Additionally, don't forget to include any relevant details like a battery life indicator, signal strength, or time display to make your phone drawing look more authentic. By carefully balancing these elements, you can create a screen that looks both visually appealing and functional, drawing the viewer's eye to the heart of your phone design.
Incorporating Textures and Patterns on the Phone's Body
Incorporating textures and patterns on the phone's body can add an extra layer of realism and visual interest to your drawing. To achieve this, you can use a range of techniques, such as hatching, cross-hatching, and stippling. For a metallic finish, you can use short, curved lines to suggest the smooth, reflective surface. For a matte finish, you can use longer, more irregular lines to create a sense of texture. You can also add patterns, such as the phone's logo or a subtle grid, to break up the surface and add visual interest. When drawing textures and patterns, pay attention to the scale and proportion of the details, ensuring that they are consistent with the overall size and shape of the phone. Additionally, consider the phone's material and how it would affect the texture and pattern. For example, a phone with a glass back would have a smoother, more reflective surface than one with a plastic or metal back. By incorporating textures and patterns, you can create a more detailed and realistic drawing of a phone that captures its unique characteristics and visual appeal.
Enhancing the Drawing with Shadows and Lighting Effects
When it comes to adding depth and dimension to your phone drawing, shadows and lighting effects are essential elements to consider. To create a realistic and visually appealing image, you'll want to pay attention to the way light interacts with the phone's surface. Start by identifying the light source in your scene, whether it's natural or artificial, and then use a range of shading techniques to suggest the way the light falls on the phone's curves and contours. For example, you can use hatching and cross-hatching to create areas of deep shadow, while softer, more gentle shading can be used to suggest the subtle play of light on the phone's screen and buttons. To add an extra layer of realism, consider using a range of shading tools, such as pencils, markers, or even digital drawing software, to create a range of subtle, nuanced shading effects. By carefully balancing light and shadow, you can create a drawing that looks truly three-dimensional and engaging. Additionally, you can also experiment with different lighting effects, such as highlights, reflections, and glare, to add an extra layer of visual interest to your drawing. For instance, you can use a small dot of white or light gray to suggest a highlight on the phone's screen or a subtle reflection on the phone's surface. By incorporating these lighting effects, you can create a drawing that looks dynamic, engaging, and full of life.