How To Remove Baseboard
 DIY home improvement tasks can be both fulfilling and cost-effective. One such task that often presents in the course of renovations or redecorating is the removal of baseboards. Though it may seem like a daunting task, it can actually be accomplished with ease by familiarizing yourself with the process and tools required. This article will guide you through three main aspects to help you ace the job. First, we'll shed light on what baseboards are and why they sometimes need to be replaced, providing a comprehensive understanding of their role within your home. Following that, we'll delve into a detailed, step-by-step guide on how to effectively remove your baseboards on your own, ensuring that you know exactly what to do at every stage. Lastly, we'll explore maintenance, repair, and replacement of baseboards, giving you insights on how to keep them in optimal condition or when it might be time to invest in replacing them. Let's start by understanding what baseboards are, and why it is sometimes necessary to replace them.
Understanding what baseboards are and why they need replacement
Baseboards might seem like a small detail in the grand scheme of your home, but they actually play a critical role in your home’s overall aesthetic and functional appeal. They usher in a subtle yet crucial elegance, serving as a framing element between your walls and your flooring. However, an understanding of these simple architectural pieces goes beyond just their beauty. In this detailed guide, we will navigate through the ABC's of baseboards such as their basic structure and the integral role they play in your home. Additionally, we will shed light on certain indicators that suggest your baseboard requires replacement. Last but not least, we'll guide you through factors that warrant consideration as you decide on the process of baseboard removal. As we delve into the essentials of baseboards, let’s commence with understanding the basics of baseboards and how they contribute to the functionality and aesthetics of your home.
The basics of baseboards and their function in your home
Understanding the basics of baseboards and their function in your home is crucial, especially when contemplating a replacement. Baseboards, also known as skirting boards, are more than just decorative elements that add aesthetic value to your home. Their primary function is to protect the lowest part of your walls from potential damage. They act as a barrier, warranting protection from everyday wear and tear that can result from moving furniture or regular house cleaning chores. In a home with flooring such as hardwood or tile, baseboards contribute to the containment of dirt, dust, and water spillage to the floor alone, preventing them from damaging the wall and causing discoloration or any structural harm. Other than that, baseboards also serve the purpose of hiding the uneven joint where the wall and floor meet, giving your home a more polished and cohesive look. Notably, baseboards are also instrumental in covering up gaps that might exist due to temperature and humidity fluctuations causing the walls or the floor to expand and contract. They help in masking these little inconsistencies that might, over time, compromise the structural integrity of your residence and provide an eye-pleasing transition between the wall and the floor. Just as anything else in your home, your baseboards need to be suitable for the interior décor style. Be it colonial, modern, or farmhouse style, the suitable design and size of the baseboard can significantly affect the overall ambiance of the space. In the long run, baseboards are subjected to a lot of wear and tear. Over time they may get chipped, discolored, or even warped due to moisture exposure. That's why, given their protective and aesthetic functions, a timely decision to replace them will help in maintaining the home's charm and structural integrity. Remember, the striking balance in understanding what baseboards are, the roles they play, and when they need replacement is key in home maintenance.
The signs that your baseboard needs to be replaced
Baseboards serve an important role in our homes, acting as buffers that protect the lower parts of our walls from impact, dirt, and wear. These often-overlooked home elements get subjected to a lot of pressure over time and might need to be replaced due to a number of reasons. A primary sign that your baseboard requires replacement is water damage. Water or moisture can have detrimental effects on baseboards, especially on those made from wood or MDF. Water damage can result in defects such as warping, swelling, rot, and discoloration. This not only undermines the baseboard's function but also detracts from the aesthetic appeal of the room. Damage from household pests could also necessitate replacement. Insects such as termites and carpenter ants are notorious for hollowing out wooden baseboards, leaving behind noticeable trails or holes, while rodents can chew or scratch them, leaving visible signs. Another sign to look out for is outdated or unappealing design. Home renovation is not just about repairing damage, but also about making aesthetic improvements. If you're revamping your interiors and your current baseboards don't match the new design concept, they may need to be replaced. The baseboard’s physical condition is another significant factor. Over time, baseboards can get chipped, dented, or cracked due to daily wear and tear or accidents. Even the highest quality baseboard won't last forever and will eventually show signs of old age. It is also very possible that you will need to replace baseboards if they have been poorly installed in the first place. Misaligned or loose baseboards not only look bad but could also lead to more serious problems, such as elements getting stuck behind them or losing heat through gaps. Regular inspection of your baseboards is beneficial not only for maintaining the aesthetic quality of your home but more importantly, for warding off potentially more serious problems that could stem from damaged or deteriorated baseboards. By learning to identify these signs, homeowners can ensure they act promptly when it's time for replacement.
Factors to consider before deciding on a baseboard removal
When contemplating a baseboard removal, there are several factors to consider before making your final decision. One primary element to think about is the age and condition of the baseboards. If they were installed several decades ago or show signs of wear and tear, removal might be the best option. You also need to assess the material of your baseboards. Older homes often use high-quality wood which can be expensive and difficult to replace. Furthermore, you must consider the architectural style of your home. Some styles, such as Victorian or Colonial, heavily rely on baseboards for their aesthetic appeal. Removing them could significantly alter the look and feel of your interior. On the flip side, more modern design styles often favor a clean, minimalist look where bulky baseboards could be deemed unnecessary. Investigate the presence of any hazardous materials before deciding to remove your baseboards. These could potentially include lead paint or asbestos, particularly in older homes. If you suspect these substances are present, it's crucial to enlist the services of a certified removal professional to ensure safe extraction. Cost is another critical factor. Depending on the scope and scale of the removal process, baseboard removal could be a significant financial undertaking. You will need to factor in the cost for labor, new materials, and possibly repairing any damage done to the wall during removal. Lastly, the difficulty of the removal process is also a key aspect. Some baseboards, depending on how they were installed, can be challenging to remove without causing damage to the wall or the floor. It can sometimes be a time-consuming task that requires precise tools and techniques. Remember, it's necessary to weigh all these elements before deciding on baseboard removal. It'll help you anticipate any potential issues, transform your space effectively, and ensure that it aligns with your desired aesthetic. Making a careful and informed decision will ultimately save you both time and money in the long run.
Step-by-step guide on how to remove baseboards completely on your own
Firstly, the process of baseboard removal may seem daunting, but with the right know-how and appropriate tools, it can be a straightforward task that any DIY enthusiast can accomplish. In this article, we will guide you through the process step-by-step, ensuring you achieve a clean, professional result, as well as highlighting the importance of safety preparation. We begin by outlining the crucial tools required when tackling a baseboard removal. We will also lay out guidelines that not only safeguard your property but also ensure your personal safety. Finally, we will delve into the procedure itself, providing a detailed, step-by-step guide that will coach you through every phase of a successful baseboard removal. So let's roll up our sleeves and learn about the tools we need to get this job done.
What tools are necessary for baseboard removal
In the journey to removing your baseboards, certain tools are indispensable for the process. The first noteworthy tool is a utility knife. This unassuming yet indispensable tool is used to cut through the caulk that is often found along the top edge of the baseboards. By slicing through this caulk, you ease the removal process and minimize damaging the wall during the procedure. Next, a pry bar or a small crowbar comes in handy to gently pry the baseboards off the wall. While a larger crowbar might seem like it would do the job more quickly, it's the smaller pry bar that offers more control and reduces the likelihood of damaging the wall or baseboards, particularly if you plan on reusing them. In some instances, the baseboards may be attached with nails rather than adhesive. If this is the case, a nail puller becomes an essential tool. This tool allows for the careful extraction of nails from the baseboard or wall while causing minimal harm to the materials. To protect your wall during the prying process, a putty knife is a must. Place this thin blade between the pry bar and the wall to prevent scuffs or dents in the wall when applying pressure to remove the baseboards. Another helpful tool is a stud finder. Before you start prying, use this device to locate the studs in your wall. This will help guide you on where to expect nails or screws that may be holding your baseboard in place. Lastly, pliers and a hammer are essential tools in your baseboard removal process. Pliers can be used to pull out any remaining nails, while the hammer can be used to tap stubborn spots or help adjust the pry bar. All these tools up your sleeve will make your baseboard removal task more efficient, leaving you with a clean wall ready for your next home improvement project. It's not just about removing the baseboard, but the way you remove it matters, considering the minimal damage and potential for reusing materials. These tools, coupled with patience and care, hold the key to a successful DIY baseboard removal process.
Guidelines to ensure a safe baseboard removal process
Baseboard removal can seem like a daunting task. However, following a few key guidelines can ensure the process is as safe and efficient as possible. Firstly, it's crucial to prepare the right tools. Pry bars, utility knives, and a hammer can be incredibly useful in this task. Individuals should focus on quality tools, especially ones with rubber or padded handles, to prevent blisters or hand fatigue during the arduous process. Preparation also involves donning the right safety gear. Goggles or safety glasses are non-negotiable to protect from dust and sharp objects that could slip during the removal process. Likewise, wearing gloves can protect your hands from splinters, particularly when dealing with older baseboards which may have become brittle over time. Before making the first cut or pry, it's important to clear your workspace. Remove furniture and cover the floor to protect against scratches or damage from falling debris. Clearing the space is also a safety measure to prevent tripping or other potential accidents. Equally important is the approach to the actual removal of the baseboard. Starting with a utility knife can help cut through the caulk that usually seals baseboards to the wall. Following this, a pry bar can be carefully used to detach the baseboard from the wall. Remember, the keyword here is 'carefully.' A reckless approach may damage the wall or the baseboard itself if you plan on repurposing it. Lastly, remember to short the nails sticking out from the removed baseboard immediately. Leaving this task for later inadvertently sets a safety hazard in your workspace. Understanding these guidelines underpinning a safe baseboard removal process can make the difference between a smooth DIY project and a troublesome one. It prepares you for potential complications and ensures both your safety and the protection of your space. As you brace yourself to reclaim your living space, remember that the right mix of caution, preparation, and patience is integral to successful baseboard removal.
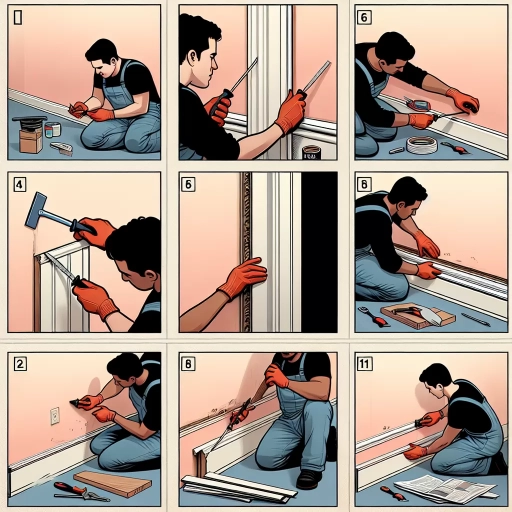
Step-by-step procedure on how to successfully and cleanly remove baseboards
Understanding the step-by-step procedure on how to successfully and cleanly remove baseboards is crucial in maintaining the integrity of your walls and floor. This procedure, if done correctly, can save you from unnecessary expenses on wall and floor repairs. Firstly, it's essential to gather all the necessary tools: a utility knife, a small pry bar, and a block of wood. These tools are readily available in any hardware shop and are the cornerstone of a clean and successful baseboard removal. Commence the process by using the utility knife to cut through the caulk that usually seals the top edge of the baseboard to the wall. This action prevents tearing the drywall paper or leaving a ragged edge when you start prying off your baseboard. Then, use the pry bar and wood block next. The purpose of the wood block is to distribute the force applied by the pry bar evenly and prevent potential damage to your wall. Slip the pry bar behind the baseboard, using the wood block as a fulcrum, and gently pry the baseboard away from the wall. Common mistakes during this step includes applying too much force, which may crack the baseboard or damage the wall. Always remember, a gentle and gradual approach is vital. Frequently, baseboards are secured by nails driven into the wall studs. As you move along the baseboard, you'll likely encounter resistance areas, these are where the nails are located. Continue using the pry bar and wood block method at these points. Once the baseboard is detached, pull out any nails left on the wall with pliers, ensuring to do so gently to maintain the drywall. In conclusion, the cleanliness and success of removing baseboards rely heavily on the careful use of appropriate tools and handling. However, it's essential to remember that while DIY can save costs, our safety should always be prioritized, and seeking professional help when needed is encouraged.
Maintenance, repair, and replacement of your baseboards
When it comes to maintaining the aesthetic appeal and structural stability of your home, every little detail matters - including your baseboards. This integral portion of your house not only adds to the visual appeal, but also protects your walls. Neglecting this aspect can lead to severe damages that need comprehensive repair, or even total replacement in worst-case scenarios. Therefore, it's paramount to understand the significance of baseboard maintenance, repair, and timely replacement. This article delves deep into this matter, commencing with the importance of preserving your baseboards. We'll decipher the small yet significant maintenance checks and measures to boost longevity. Next, we'll proceed to discuss how homeowners can repair minor damages on their baseboards, elucidating straightforward DIY methods. Finally, we transition to some key pointers on knowing the right time for a replacement and how to execute it effectively. This cascade of information will serve as a comprehensive guide for both seasoned homeowners and those new to the world of home maintenance. Now, let’s gatecrash into the first pivotal facet - the importance of maintaining your baseboards.
The importance of maintaining your baseboards
Baseboards are often overlooked in home maintenance routines, but they should not be underestimated in the overall harmony and cleanliness of your home. Maintaining your baseboards is crucial, not just for the aesthetic appeal, but for the functional and economic benefits as well. Proper maintenance of your baseboards keeps them from decaying or accumulating dust and allergens, which prevents allergies and consequent health costs. It also protects your walls from damages that often go unnoticed, such as scuffs, impact damage, and damp from cleaning or spills. The durability of baseboards is often underestimated, but like all other aspects of your home, they are not invincible; they require regular maintenance and timely repairs to keep them in excellent shape. Neglecting the care of your baseboards could lead to a serious repair or an expensive replacement later on, which could have been avoided with regular maintenance. A baseboard that is soggy, rotting, or coming away from the wall can be a sign of moisture problems, which can quickly escalate into more serious structural issues if not addressed promptly. Investing time and effort in the maintenance of your baseboards can extend their lifespan, saving you from the unnecessary expense and inconvenience of premature replacement. Regularly cleaning your baseboards, for example, will help you spot any signs of potential damage or wear and tear early enough to take corrective action. Immediate repairs, such as repainting, recaulking, or replacing damaged sections, can also prevent long-term damages to both the baseboard and wall. Moreover, maintaining your baseboards not only guarantees that they remain functional and last longer, but it also contributes to the overall attractiveness of your home. Well-maintained baseboards give a fresh and polished finish to your rooms, enhancing the feel and appearance of your décor. In turn, this could increase the perceived value of your home, making it more appealing to potential buyers or tenants. In conclusion, the importance of maintaining your baseboards cannot be overstated. This small but crucial part of your home plays a huge role in protecting your walls from damages, improving the indoor air quality, enhancing your décor, and saving you money in the long run. So, do not neglect it - include baseboard maintenance, repairs, and occasional replacements in your regular home care routine to enjoy all its associated benefits.
How to carry out minor repairs on your baseboards
Carrying out minor repairs on your baseboards can add an impressive independent facet to your home maintenance skills. To start, inspect your baseboards thoroughly for any damages such as chips, scrapes, scratches, or cracks. Surface scratches and chips can be quickly fixed with a putty knife and some wood filler. Apply the wood filler evenly into the scratches, overfilling just slightly as the filler tends to shrink as it dries. With the dried wood filler, sand it down to be flush with the rest of the baseboard, cleaning away any dust or debris. For deeper scratches and chips, you may need to use epoxy putty. The advantage of epoxy putty is that it hardens quickly and can even be used on larger holes. Before using epoxy putty, clean and dry the damaged area. Once the putty dries, you can shape, sand, drill, and paint it just like you would with real wood. When it comes to cracked baseboards, you may need to consider a minor replacement, especially if the cracks are severe. To do so, measure the cracked baseboard's length and purchase or cut a new piece to match. Carefully pry the damaged piece away from the wall, taking care not to damage the paint or plaster. Once removed, fit the new piece into place, nailing it securely. Remember, a great paint job can seamlessly blend small repairs into the baseboard’s original appearance. Before repainting the whole baseboard for minor scratches and chips, try spot painting using a small brush or a dabbing technique with a sponge, blending outward for a seamless look. In conclusion, minor baseboard repairs are manageable tasks that don't always require professional attention. With the right tools and a bit of patience, you can restore your baseboards to their original glory, prolonging their lifetime and adding personality to your living space. It's a rewarding endeavor that plays a critical role in maintenance, repair, and replacement of your baseboards. The skills you gain could serve to enhance your DIY capacity and lend your space an aura of being well-cared-for and treasured.
When and how to replace your baseboards
Baseboard maintenance, repair, and replacement are essential aspects to maintain the aesthetic of your home, yet often overlooked by many homeowners until things begin to look shabby. Make a note, the ‘when’ to replace your baseboards comes not only when they're damaged beyond repair, but also when they start to lose their luster, become discolored, or simply when they no longer align with your home's interior design or renovation plans. As to the 'how', replacing baseboards can be a DIY task if you possess the necessary handy skills and tools. However, hiring a professional is always an option for flawless work. It begins with gently removing the old baseboard using a pry bar, ensuring you don't damage the drywall above. Next, measure and cut your new material—wood or PVC—using a miter saw, factoring in the intricate corner cuts. Secure the new baseboard to the wall using a nail gun, or if doing manually, be sure to locate the wall studs for solid anchoring. Address the gaps between the wall and the baseboard with caulk, making sure it blends with the baseboard color. Finally, a touch of paint, if necessary, will render a professionally finished look. This process may sound simple, but it is quite intricate and requires meticulous precision. It's always advisable to gauge the complexity of the project, your skill-set, and the time required before embarking on this home-improvement task. With the right decisions and either a professional hand or a well-executed DIY, the replacement of your baseboards can breathe new life into the aesthetic of your home.