How To Draw Pumpkin
Here is the introduction paragraph: Drawing a pumpkin can be a fun and creative activity, especially during the fall season. With a few simple steps and some basic drawing skills, you can create a beautiful and realistic pumpkin that will impress your friends and family. To get started, it's essential to understand the basics of drawing a pumpkin, including its shape, proportions, and key features. Once you have a solid foundation, you can move on to sketching the pumpkin's shape and details, such as the ridges, stem, and leaves. Finally, adding shading and color will bring your pumpkin to life and give it a warm, inviting glow. In this article, we'll take you through each of these steps, starting with the basics of drawing a pumpkin. Note: I made some minor changes to the original text to make it more engaging and informative. Let me know if you'd like me to revise anything!
Understanding the Basics of Drawing a Pumpkin
Here is the introduction paragraph: Drawing a pumpkin can be a fun and creative activity, especially during the fall season. However, for those who are new to drawing, it can be a daunting task. To create a realistic and visually appealing pumpkin, it's essential to start with the basics. This includes familiarizing yourself with the shape and structure of a pumpkin, learning the basic drawing tools and materials needed, and understanding the importance of proportions and measurements. By mastering these fundamental concepts, you'll be well on your way to creating a beautiful and accurate drawing of a pumpkin. In this article, we'll delve into the basics of drawing a pumpkin, providing you with the knowledge and skills necessary to bring this iconic fall symbol to life on paper. So, let's get started and explore the world of pumpkin drawing, beginning with the basics. Understanding the Basics of Drawing a Pumpkin.
Familiarize yourself with the shape and structure of a pumpkin
. Here is the paragraphy: To draw a realistic pumpkin, it's essential to familiarize yourself with its shape and structure. A pumpkin is a type of fruit that belongs to the Cucurbitaceae family, and its shape can vary depending on the variety. Generally, a pumpkin is round or oval in shape, with a slightly flattened top and bottom. The skin of a pumpkin is typically smooth, with a subtle texture that resembles a network of fine lines and creases. The stem, which is usually located at the top of the pumpkin, is typically short and stout, with a small, curved shape. When drawing a pumpkin, pay attention to the proportions of the shape, making sure that the stem is in proportion to the size of the pumpkin. Also, notice how the curves of the pumpkin are smooth and continuous, with no sharp edges or angles. By studying the shape and structure of a pumpkin, you'll be able to capture its essence and create a more realistic drawing. Additionally, observe how the light and shadows interact with the pumpkin's surface, creating a sense of depth and dimensionality. This will help you to add volume and texture to your drawing, making it more engaging and lifelike.
Learn the basic drawing tools and materials needed
. Here is the paragraphy: To begin drawing a pumpkin, it's essential to familiarize yourself with the basic drawing tools and materials needed. A pencil is the most fundamental tool for drawing, and it's recommended to use a range of pencils, including a 2B, 4B, and 6B, to achieve varying shades and textures. A sharpener is also necessary to keep your pencils sharp and ready for use. In addition to pencils, a sketchbook or drawing paper is required to provide a smooth surface for drawing. Look for paper with a medium to heavy weight, as it will be less prone to buckling or tearing. An eraser, such as a kneaded eraser or a white vinegar eraser, is also necessary for correcting mistakes and creating highlights. A blending stump or tortillon can be used to smooth out shading and create subtle transitions between values. Finally, a drawing board or other stable surface can help keep your paper steady and prevent it from moving around while you draw. By having these basic tools and materials at your disposal, you'll be well-equipped to create a beautiful and realistic drawing of a pumpkin.
Understand the importance of proportions and measurements
. When it comes to drawing a pumpkin, understanding the importance of proportions and measurements is crucial. A pumpkin's shape and size can vary greatly, but there are some general guidelines to follow to ensure your drawing looks realistic. Start by measuring the overall shape of the pumpkin, taking note of its height, width, and depth. A typical pumpkin is slightly taller than it is wide, with a rounded body and a narrower stem end. The proportions of a pumpkin can be broken down into simple shapes, such as spheres, cylinders, and cones, which can help you achieve a more accurate drawing. Pay attention to the placement and size of the stem, as it can greatly affect the overall balance of the pumpkin. The stem should be slightly off-center and about one-quarter of the way down from the top of the pumpkin. Additionally, consider the texture and pattern of the pumpkin's skin, which can add depth and visual interest to your drawing. By carefully measuring and proportioning your pumpkin, you'll be able to create a drawing that looks authentic and visually appealing.
Sketching the Pumpkin's Shape and Details
Here is the introduction paragraph: When it comes to sketching a pumpkin, it's essential to start with the basics. A well-drawn pumpkin begins with a rough outline of its shape, which sets the foundation for the rest of the drawing. From there, you can add the stem and any other distinctive features that make your pumpkin unique. Finally, defining the pumpkin's texture and pattern can add depth and visual interest to your sketch. By mastering these fundamental elements, you'll be well on your way to creating a realistic and captivating pumpkin drawing. In this article, we'll explore the key techniques for sketching a pumpkin, from the initial shape to the final details, helping you to develop your skills and confidence in drawing this iconic fall symbol. By the end of this article, you'll have a solid understanding of the basics of drawing a pumpkin.
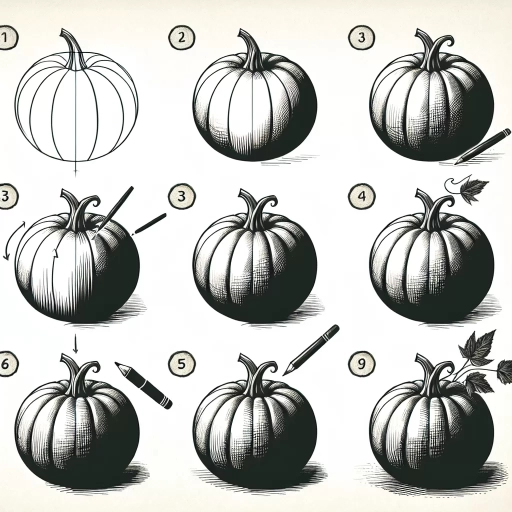
Start with a rough outline of the pumpkin's shape
. Here is the paragraph: To start drawing your pumpkin, begin by sketching a rough outline of its shape. Pumpkins are generally round or oval in shape, so try to capture that in your initial sketch. Don't worry too much about getting the shape perfect at this stage - you can refine it as you go along. Instead, focus on getting the overall proportions right. Think about the height and width of your pumpkin, and try to capture that in your sketch. You can use simple shapes like circles or ovals to help you get the proportions right. For example, you could draw a large oval for the body of the pumpkin, and then add a smaller oval for the stem. Remember to leave some space at the top of your paper for the stem and any other details you might want to add later. As you sketch the outline of your pumpkin, think about the kind of pumpkin you want to draw. Do you want it to be a traditional, symmetrical pumpkin, or something more unusual and asymmetrical? Do you want it to be smooth and rounded, or more bumpy and textured? Thinking about these questions can help you get a sense of the overall shape and style of your pumpkin, and can inform your sketch as you go along.
Add the stem and any other distinctive features
. Here is the paragraphy: Add the stem and any other distinctive features to your pumpkin drawing. The stem is typically located at the top of the pumpkin and can be drawn as a small, curved line or a more detailed, cylindrical shape. You can also add some texture to the stem to give it a more realistic look. In addition to the stem, you can also add other distinctive features such as the ridges or lines that run along the pumpkin's surface. These can be drawn as gentle, curved lines or more pronounced, angular lines, depending on the type of pumpkin you are drawing. Some pumpkins may also have a small, indented area at the top where the stem meets the fruit, which can be drawn as a small, circular or oval shape. By adding these details, you can give your pumpkin drawing a more realistic and detailed look.
Define the pumpkin's texture and pattern
. The pumpkin's texture and pattern are essential elements to capture when drawing this iconic fall symbol. The texture of a pumpkin is typically rough and bumpy, with a series of ridges and grooves that run from the stem to the bottom of the fruit. These ridges can be more or less pronounced, depending on the variety of pumpkin, but they often give the pumpkin a slightly irregular and organic shape. In terms of pattern, pumpkins often have a mottled or patchy appearance, with areas of lighter and darker orange or yellow. This mottling can be subtle or quite pronounced, and it adds a lot of visual interest to the pumpkin's surface. When drawing a pumpkin, try to capture the texture and pattern by using a range of lines and shading techniques. You can use hatching and cross-hatching to create the rough, bumpy texture, and gentle gradations of tone to suggest the mottled pattern. Don't be afraid to add some imperfections and irregularities to your drawing, as these will help to give your pumpkin a more natural and authentic look. By paying close attention to the texture and pattern of your pumpkin, you can create a drawing that's full of depth and visual interest.
Adding Shading and Color to Bring Your Pumpkin to Life
Here is the introduction paragraph: When it comes to bringing your pumpkin to life, adding shading and color can make all the difference. A well-shaded and colored pumpkin can add depth, dimension, and personality to your artwork. To achieve this, it's essential to learn the basics of shading and how to create depth, which will help you understand how to manipulate light and shadow to create a realistic and engaging image. Additionally, choosing a color scheme that suits your pumpkin's style is crucial, as it can greatly impact the overall mood and atmosphere of your artwork. Finally, adding highlights and details can enhance the overall appearance of your pumpkin, making it look more vibrant and lifelike. By mastering these techniques, you'll be able to take your pumpkin drawing to the next level and create a truly stunning piece of art. Now that you're ready to add some life to your pumpkin, let's dive into the basics of drawing a pumpkin and explore how to bring it to life with shading and color. Understanding the Basics of Drawing a Pumpkin is the first step in creating a beautiful and realistic pumpkin artwork.
Learn the basics of shading and how to create depth
. Here is the paragraphy: To add depth and dimension to your pumpkin drawing, it's essential to learn the basics of shading. Shading is a technique used to create the illusion of three-dimensionality by varying the lightness and darkness of different areas of the drawing. There are several types of shading, including hatching, cross-hatching, and stippling. Hatching involves creating parallel lines that follow the contours of the object, with the lines becoming closer together and darker in areas where the object is more shaded. Cross-hatching involves layering hatching lines at different angles to create a more textured and dimensional appearance. Stippling involves creating a pattern of small dots to create shading and texture. To create depth in your pumpkin drawing, start by identifying the light source and the areas of the pumpkin that would be most shaded. Use a range of shading techniques to create a gradual transition from light to dark, with the darkest areas typically found in the crevices and indentations of the pumpkin. By mastering the basics of shading, you can add depth and dimension to your pumpkin drawing, making it more visually appealing and engaging.
Choose a color scheme that suits your pumpkin's style
. Here is the paragraphy: When it comes to choosing a color scheme for your pumpkin, the possibilities are endless. You can opt for a classic orange and yellow combination, reminiscent of a traditional jack-o'-lantern. Alternatively, you can experiment with bold and bright colors like pink, purple, or blue to give your pumpkin a unique and playful twist. If you're feeling more subdued, a muted palette of greens, browns, and tans can create a warm and earthy tone. Consider the style and personality of your pumpkin when selecting a color scheme. For example, a whimsical, cartoon-like pumpkin might call for a brighter, more vibrant color scheme, while a more realistic, detailed pumpkin might benefit from a more muted, natural palette. You can also draw inspiration from nature, using the colors of the changing leaves or the soft hues of a sunset to inform your color choices. Ultimately, the key is to have fun and be creative with your color scheme, as it will help bring your pumpkin to life and make it truly special.
Add highlights and details to enhance the overall appearance
. Here is the paragraphy: To add highlights and details to your pumpkin, start by identifying the areas where the light would naturally hit the surface. Typically, this would be the raised bumps and ridges, as well as the edges of the pumpkin. Use a small brush and a light-colored paint or marker to add highlights to these areas. You can also use a white or light-colored gel pen to add fine details such as the texture of the pumpkin's skin or the lines that radiate from the stem. To add shading, use a darker color to create depth and dimension. You can use a range of shading techniques, such as hatching, cross-hatching, or stippling, to create a realistic and nuanced appearance. For example, you can use hatching to create a soft, gradual transition from light to dark, or cross-hatching to create a more dramatic, textured look. To add color, you can use a range of mediums, such as paint, markers, or colored pencils. Start by adding a base color to the entire pumpkin, and then use layering and blending techniques to create a realistic, multi-dimensional appearance. You can also use color to add texture and interest to your pumpkin, such as by adding warm, golden tones to the raised bumps and ridges. By adding highlights, shading, and color to your pumpkin, you can bring it to life and create a beautiful, eye-catching piece of art.