How To Make Paper Rings
Paper rings are a fun and creative way to add a personal touch to any occasion. Whether you're looking to create a unique wedding favor, a special birthday gift, or simply a decorative item for your home, paper rings are a great option. In this article, we will guide you through the process of making paper rings, from gathering the necessary materials and tools to customizing and decorating your finished product. To get started, you'll need to gather the right materials and tools, which we'll outline in the next section, Materials and Tools Needed. With the right supplies, you'll be able to follow our step-by-step process for making paper rings, and then customize and decorate them to fit your personal style. By the end of this article, you'll have the skills and knowledge to create beautiful paper rings that are sure to impress.
Materials and Tools Needed
To create beautiful and unique paper rings, you'll need the right materials and tools. The type of paper you choose is crucial, as it will determine the overall look and feel of your rings. You'll also need essential tools for cutting and shaping the paper into the desired form. Additionally, you may want to add some decorative elements to give your rings a personal touch. In this article, we'll explore the different types of paper suitable for making rings, the essential tools you'll need for cutting and shaping, and the additional materials you can use for decoration. Let's start by looking at the types of paper that are best suited for making rings.
Types of Paper Suitable for Making Rings
There are several types of paper that are suitable for making paper rings, each with its own unique characteristics and advantages. One popular option is cardstock, a sturdy and durable paper that can hold its shape well and is available in a wide range of colors and textures. Another option is construction paper, a versatile and affordable choice that is perfect for making colorful and playful rings. For a more elegant look, you can use scrapbook paper or patterned paper, which come in a variety of designs and patterns. If you want to add some extra texture and interest to your rings, you can use paper with a natural fiber content, such as cotton or hemp paper. Additionally, you can also use recycled paper or old book pages to create unique and eco-friendly rings. Regardless of the type of paper you choose, make sure it is not too thin or flimsy, as it may not hold its shape well. A paper with a weight of at least 80 gsm is recommended for making paper rings.
Essential Tools for Cutting and Shaping
Here is the paragraphy: To cut and shape your paper rings, you'll need a few essential tools. A craft knife or X-Acto knife is a must-have for making precise cuts in your paper strips. A cutting mat or other protective surface is also necessary to prevent damage to your work surface. A ruler or straightedge will help you achieve straight cuts and accurate measurements. A pencil or marker is useful for marking cut lines and patterns on your paper. A pair of scissors can also be used for cutting paper strips, especially if you're working with thicker paper or cardstock. A paper trimmer or guillotine cutter can be used to make quick, precise cuts in larger quantities of paper. A bone folder or similar tool can be used to create crisp folds in your paper strips. A shaping tool, such as a ring mandrel or a metal ring sizer, can be used to shape your paper rings into perfect circles. A sanding block or emery board can be used to smooth out any rough edges or bumps on your paper rings. Finally, a work surface, such as a desk or table, is necessary to provide a stable and comfortable workspace for cutting and shaping your paper rings.
Additional Materials for Decoration
Additional materials for decoration can elevate the overall aesthetic of your paper rings. Consider adding embellishments such as glitter, rhinestones, or sequins to give your rings a touch of sparkle. You can also use colored tape, stickers, or washi tape to add patterns and designs. For a more rustic look, try adding a few strands of twine or yarn to create a textured effect. If you want to add a personal touch, you can use photos, ticket stubs, or other small mementos to create a unique and meaningful design. Another option is to use metallic paint or markers to add a pop of color and shine. You can also experiment with different shapes and sizes of paper to create a more dynamic look. By incorporating these additional materials, you can take your paper rings from simple to stunning and make them truly special.
Step-by-Step Process of Making Paper Rings
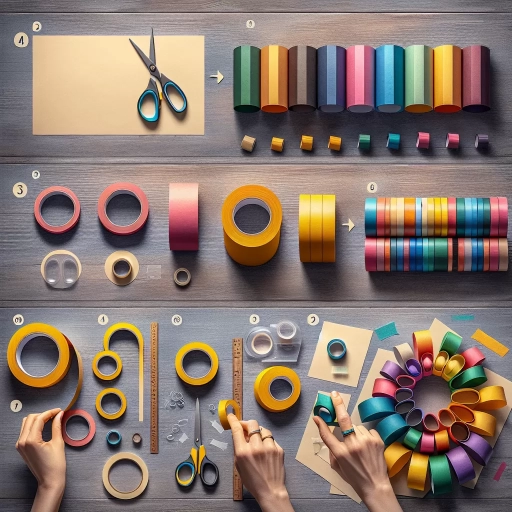
Here is the introduction paragraph: Making paper rings is a fun and creative activity that can be enjoyed by people of all ages. With just a few simple materials, you can create beautiful and unique rings that can be worn as jewelry or used as decorations. The process of making paper rings involves several steps, including measuring and cutting the paper strips, shaping and forming the ring, and securing the ring with glue or tape. By following these steps, you can create a wide range of paper rings in different sizes, shapes, and colors. In this article, we will guide you through the step-by-step process of making paper rings, starting with the first step: measuring and cutting the paper strips.
Measuring and Cutting the Paper Strips
To accurately measure and cut the paper strips, start by determining the desired width of your paper ring. A standard width is around 1-2 inches, but you can adjust this to suit your design. Using a ruler or a cutting mat with measurements, carefully mark the width on the paper strip. For a more precise cut, use a craft knife or a paper trimmer, and cut along the marked line. If you're using a craft knife, make sure to cut on a stable surface and apply gentle pressure to avoid tearing the paper. Alternatively, you can use scissors, but be cautious not to cut unevenly or at an angle. To ensure uniform strips, cut multiple strips at once, using a template or a cutting guide. This will help you achieve consistent widths and prevent errors. Additionally, consider cutting the strips slightly longer than needed, as this will give you room for adjustment during the assembly process. By taking the time to accurately measure and cut your paper strips, you'll be able to create uniform and professional-looking paper rings.
Shaping and Forming the Ring
The ring's shape and form are crucial in determining its overall appearance and durability. To shape and form the ring, start by wrapping the paper strip around a cylindrical object, such as a pen or pencil, to create a circular shape. Make sure the paper is evenly wrapped and smooth out any wrinkles or air pockets. Next, use a bone folder or similar tool to crease the paper along the edge of the ring, creating a sharp fold. This will help the ring hold its shape and prevent it from becoming misshapen. To add additional structure and support, apply a small amount of glue to the seam where the paper strip overlaps, holding the ring in place for a few seconds to allow the glue to set. Finally, use a pair of scissors or a craft knife to trim the excess paper from the seam, creating a clean and finished edge. By carefully shaping and forming the ring, you can create a sturdy and visually appealing paper ring that will last for a long time.
Securing the Ring with Glue or Tape
Securing the ring with glue or tape is a crucial step in the process of making paper rings. To do this, apply a small amount of glue or a piece of clear tape to the seam where the paper strip overlaps, making sure to align the edges carefully. For a more discreet finish, use a glue stick or a small dot of white glue, which will dry clear and not be noticeable. If using tape, choose a clear or transparent tape that will blend in with the paper. Apply gentle pressure to ensure the glue or tape adheres evenly, and hold the ring in place for a few seconds to allow it to set. This will create a strong and durable bond, securing the ring in its desired shape. It's essential to be patient and not rush this step, as a secure bond is necessary to prevent the ring from coming apart over time. By taking the time to properly secure the ring with glue or tape, you'll be able to enjoy your handmade paper ring for years to come.
Customizing and Decorating Your Paper Rings
Customizing and decorating your paper rings can be a fun and creative way to add a personal touch to your accessories. With a few simple materials and techniques, you can transform plain paper rings into unique and eye-catching pieces of art. One way to customize your paper rings is by adding colors and patterns with paint or markers. You can also embellish them with glitter, stickers, or other materials to give them a more elaborate look. Additionally, you can create unique designs by folding or quilling the paper to create intricate patterns and shapes. By exploring these different techniques, you can create one-of-a-kind paper rings that reflect your personal style and creativity. To get started, let's take a closer look at how you can add colors and patterns to your paper rings using paint or markers.
Adding Colors and Patterns with Paint or Markers
Adding colors and patterns to your paper rings can elevate their appearance and make them more visually appealing. You can use paint or markers to add colors and patterns to your paper rings. If you're using paint, make sure to use a paint that is suitable for paper and apply a thin coat to avoid making the paper too soggy. You can also use a paintbrush or a sponge to create different textures and effects. If you're using markers, choose markers that are vibrant and waterproof to ensure that the colors don't fade quickly. You can use markers to draw patterns, stripes, or polka dots, or to add a splash of color to a specific area of the ring. To add patterns, you can use stencils or stickers to create intricate designs, or you can freehand it and get creative. You can also experiment with layering different colors and patterns to create a unique and eye-catching look. Additionally, you can add a clear coat of varnish or sealant to protect the colors and patterns and make them more durable. By adding colors and patterns with paint or markers, you can give your paper rings a personalized touch and make them stand out.
Embellishing with Glitter, Stickers, or Other Materials
Embellishing with glitter, stickers, or other materials is a great way to add an extra touch of personality and whimsy to your paper rings. To get started, gather a variety of materials such as glitter, stickers, rhinestones, or even fabric scraps. You can also use natural materials like leaves, flowers, or feathers to create a more organic look. Once you have your materials, simply apply a small amount of glue or adhesive to the area of the ring where you want to add embellishments. Then, sprinkle or place your chosen materials onto the glue, making sure to spread them out evenly. For a more intricate design, you can use a small paintbrush to apply glue to specific areas of the ring and then add your embellishments. To add an extra layer of protection and make your embellishments more durable, consider applying a clear coat of varnish or sealant. This will help prevent your embellishments from falling off or getting damaged over time. With a little creativity and experimentation, you can create unique and eye-catching paper rings that reflect your personal style and add a touch of magic to any occasion.
Creating Unique Designs with Folding or Quilling
Creating unique designs with folding or quilling is an exciting way to add an extra layer of personalization to your paper rings. Folding involves creating intricate patterns and shapes by folding the paper in various ways, while quilling involves rolling and shaping narrow strips of paper into desired forms. To get started, you can experiment with different folding techniques, such as accordion folding, crimping, or twisting, to create unique textures and patterns. For quilling, you can use a quilling tool or a toothpick to roll and shape the paper strips into loose coils, tight scrolls, or loose leaf shapes. You can then arrange these shapes into intricate designs, such as flowers, leaves, or geometric patterns, to add a touch of elegance to your paper rings. To take your designs to the next level, you can also experiment with different paper colors, textures, and patterns, or add embellishments like glitter, stickers, or beads. With a little creativity and patience, you can create truly one-of-a-kind designs that make your paper rings stand out.