How To Draw A Barn
Here is the introduction paragraph: Drawing a barn can be a fun and rewarding experience, especially when done with precision and attention to detail. To create a realistic and captivating barn drawing, it's essential to understand the basics of drawing a barn, including its fundamental shapes and features. Before you begin sketching, it's crucial to have a solid grasp of the barn's basic structure, which will serve as the foundation for your entire drawing. In this article, we'll guide you through the process of drawing a barn, starting with the basics, then moving on to sketching the barn's basic shape and features, and finally adding depth, texture, and final details to bring your drawing to life. By following these steps, you'll be well on your way to creating a beautiful and authentic barn drawing. To get started, let's begin by understanding the basics of drawing a barn.
Understanding the Basics of Drawing a Barn
Drawing a barn can be a fun and rewarding experience, especially when you have a good understanding of the basics. To get started, it's essential to familiarize yourself with the different types of barn structures, including their shapes, sizes, and architectural features. This knowledge will help you to accurately depict the barn in your drawing. In addition to understanding barn structures, it's also crucial to choose the right drawing tools and materials, such as pencils, paper, and erasers, to ensure that your drawing turns out well. Furthermore, setting up your drawing space for efficiency is vital to help you stay focused and avoid distractions. By considering these factors, you'll be well on your way to creating a beautiful and realistic drawing of a barn. In this article, we'll explore the basics of drawing a barn, starting with the importance of familiarizing yourself with barn structures.
Familiarizing Yourself with Barn Structures
Familiarizing yourself with barn structures is essential before attempting to draw one. A barn typically consists of a rectangular or square shape with a sloping roof, often featuring a gambrel or gable design. The roof is usually covered with shingles or corrugated metal, and may include features such as skylights, vents, or a cupola. The walls are typically made of wood, metal, or a combination of both, and may feature windows, doors, and other openings. Understanding the different components of a barn, such as the foundation, walls, roof, and doors, will help you to accurately depict its structure in your drawing. Additionally, observing the textures, colors, and details of real barns can provide valuable inspiration and reference points for your artwork. By studying the architecture and design of barns, you can develop a deeper appreciation for the unique characteristics of these structures and create more authentic and detailed drawings.
Choosing the Right Drawing Tools and Materials
Choosing the right drawing tools and materials is crucial for creating a high-quality drawing of a barn. To start, you'll need a pencil with a range of hardness levels, such as 2H, HB, and 6B, to achieve varying line weights and shading. A sharpener is also essential to keep your pencils sharp and ready to use. For added detail and texture, consider using a range of drawing pens, including fine liners, brush pens, and markers. Look for pens with archival-quality ink to ensure your drawing remains vibrant and long-lasting. In addition to drawing tools, the right paper is also vital. Choose a high-quality paper with a smooth finish, such as hot press or vellum, to allow for precise lines and even shading. Consider using a paper with a weight of at least 80 gsm to prevent buckling or warping. Finally, don't forget to have an eraser and a blending stump on hand to correct mistakes and smooth out shading. By investing in the right drawing tools and materials, you'll be well on your way to creating a beautiful and detailed drawing of a barn.
Setting Up Your Drawing Space for Efficiency
Setting up your drawing space for efficiency is crucial to help you stay focused and avoid distractions while working on your barn drawing. Start by choosing a quiet and comfortable spot with good lighting, preferably natural light, to help you see the details of your drawing clearly. Invest in a good quality drawing table or desk that allows you to work at a comfortable height, and consider using a drawing board or lap desk if you prefer to work on a smaller scale. Organize your drawing tools and materials within easy reach, such as pencils, erasers, sharpeners, and paper, to save time and reduce clutter. A comfortable and ergonomic chair is also essential to prevent fatigue and discomfort during long drawing sessions. Additionally, consider using a reference image or still life setup to help you accurately draw the details of your barn, and keep a trash can and recycling bin nearby to keep your workspace clean and tidy. By setting up your drawing space efficiently, you'll be able to focus on bringing your barn drawing to life and achieve the best possible results.
Sketching the Barn's Basic Shape and Features
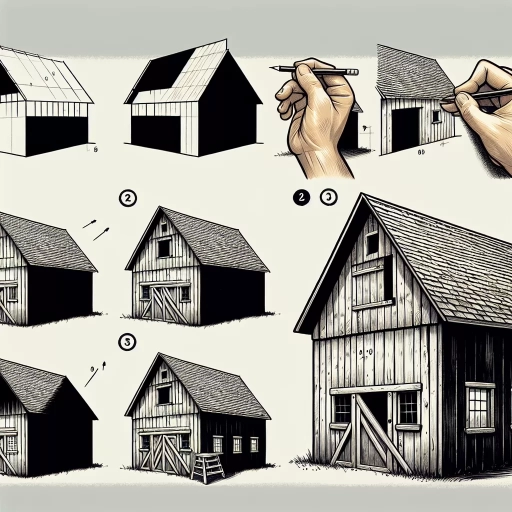
Sketching a barn's basic shape and features is a fundamental step in creating a realistic and detailed drawing. To achieve this, it's essential to break down the process into manageable parts, focusing on the overall structure, roof, and exterior details. First, you'll need to draw the rectangular base and walls, establishing the foundation of the barn. This will provide a solid framework for adding the roof's basic structure and angles, which will give your barn its distinctive shape and character. Finally, you'll want to include doors, windows, and other exterior details to add depth and visual interest to your drawing. By following these steps, you'll be able to create a well-proportioned and detailed sketch of a barn. Let's start by drawing the rectangular base and walls, the foundation of our barn.
Drawing the Rectangular Base and Walls
Here is the paragraphy: Drawing the rectangular base and walls of the barn is the next step in creating a basic shape. Start by sketching a large rectangle for the base of the barn, making sure it is tall enough to accommodate the height of the walls. The width of the rectangle should be roughly 1.5 to 2 times the height. Pay attention to the proportions to ensure the barn looks balanced. Once the base is drawn, add the walls by drawing two vertical lines on either side of the rectangle, making sure they are parallel to each other. The height of the walls should be roughly the same as the height of the base. Add a slight incline to the walls to give the barn a more rustic and traditional look. Make sure the walls are evenly spaced and symmetrical to maintain the barn's balance. By drawing the rectangular base and walls, you will start to see the basic shape of the barn take form.
Adding the Roof's Basic Structure and Angles
Adding the roof's basic structure and angles is a crucial step in drawing a realistic barn. To start, sketch the roof's outline, considering the barn's overall shape and size. Typically, a barn's roof is a simple gable or gambrel design, with two sloping sides that meet at a ridge in the middle. The slope of the roof can vary, but a common angle is around 30-40 degrees. To achieve this, draw a line from the peak of the roof to the edge of the eaves, using a ruler or a straightedge to ensure accuracy. The angle of the roof can be adjusted by moving the line up or down, depending on the desired pitch. Once the basic shape is established, add the roof's supporting beams, such as the rafters and trusses, which can be drawn as simple lines or more detailed structures, depending on the level of detail desired. The roof's overhang, or eaves, should also be included, typically extending 6-12 inches beyond the walls. By adding these basic elements, the barn's roof begins to take shape, providing a solid foundation for further details and embellishments.
Including Doors, Windows, and Other Exterior Details
When sketching the exterior of a barn, it's essential to include doors, windows, and other exterior details to add depth and character to your drawing. Start by adding the main entrance, which is usually a large sliding door or a pair of swinging doors. Consider the style of the barn and the type of door that would be most suitable. For example, a rustic barn might have a wooden door with a metal handle, while a modern barn might have a sleek, metal door with a automatic opener. Next, add windows to provide natural light and ventilation to the barn. The number and size of windows will depend on the size and purpose of the barn, but typically, barns have a few small windows on either side of the main entrance. Don't forget to include other exterior details such as a cupola or weather vane on the roof, a porch or overhang above the entrance, and any decorative trim or molding around the doors and windows. These details will help bring your drawing to life and give it a sense of authenticity. Additionally, consider adding some texture and shading to your drawing to give it a more realistic look. For example, you could add some wood grain texture to the doors and walls, or some shading to suggest the depth and dimension of the barn's features. By including these exterior details, you'll be able to create a detailed and engaging drawing of a barn that captures its unique character and charm.
Adding Depth, Texture, and Final Details to Your Barn Drawing
Adding depth, texture, and final details to your barn drawing can elevate it from a simple sketch to a captivating piece of art. To achieve this, it's essential to focus on three key elements: creating depth with shadows and light sources, adding texture to the barn's exterior and surroundings, and incorporating final details for realism and character. By mastering these techniques, you can create a drawing that invites the viewer to explore its every nook and cranny. By carefully manipulating shadows and light sources, you can create a sense of depth and dimensionality that draws the viewer's eye into the scene. This is especially important for a barn drawing, as the rustic, weathered texture of the wood and the surrounding landscape can be used to create a rich, immersive atmosphere. Let's start by exploring how to create depth with shadows and light sources, a crucial step in bringing your barn drawing to life.
Creating Depth with Shadows and Light Sources
Here is the paragraphy: Creating depth in your barn drawing can be achieved by incorporating shadows and light sources. Shadows add volume and dimension to your drawing, while light sources help to create a sense of atmosphere and mood. To create depth with shadows, start by identifying the light source in your scene. This could be the sun, a window, or a lamp. Once you've identified the light source, use a range of values (light and dark) to create shadows on the surfaces of your barn. The areas closest to the light source will be lighter, while the areas farthest away will be darker. You can also use shadows to create a sense of texture and depth on your barn's surfaces. For example, you can use hatching and cross-hatching techniques to create the illusion of wooden planks or stone walls. To add an extra layer of depth to your drawing, consider adding a background or atmosphere. This could be a simple gradient or a more detailed landscape. By incorporating shadows and light sources into your barn drawing, you can create a sense of depth and dimension that draws the viewer in.
Adding Texture to the Barn's Exterior and Surroundings
Adding texture to the barn's exterior and surroundings can elevate the overall visual appeal of your drawing. Start by adding wooden planks to the barn's walls, using a series of horizontal lines to create a rustic and weathered look. Vary the width and spacing of the planks to add depth and character. Next, add some texture to the roof by drawing a series of overlapping shingles, using a combination of curved and straight lines to create a layered effect. Don't forget to add some texture to the doors and windows, using a series of small lines to create a wooden grain effect. To add some texture to the surroundings, draw some trees and foliage using a combination of curved and wavy lines, adding some depth and dimension to the scene. You can also add some texture to the ground by drawing some grass and weeds, using a series of short and curved lines to create a soft and natural look. Finally, add some texture to the fence by drawing a series of vertical posts and horizontal rails, using a combination of straight and curved lines to create a rustic and weathered look. By adding texture to the barn's exterior and surroundings, you can create a more engaging and immersive drawing that draws the viewer in.
Incorporating Final Details for Realism and Character
Incorporating final details for realism and character is a crucial step in bringing your barn drawing to life. To add a sense of authenticity, consider including elements that reflect the barn's purpose, such as farm equipment, tools, and livestock. For example, you could draw a rusty old tractor parked outside, or a few chickens pecking at the ground near the entrance. Additionally, think about the textures and materials that make up the barn, such as weathered wood, rusty metal, and worn stone. You can suggest these textures through subtle shading and hatching techniques, or by incorporating visual elements like wooden planks, metal hinges, and stone foundations. To add character to your barn, consider incorporating unique features that reflect its history and personality, such as a crooked roofline, a leaning door, or a patchwork of repairs. You could also add some visual storytelling elements, like a old wagon wheel hanging on the wall, or a few strands of hay stuck in the doorframe. By incorporating these final details, you can create a barn drawing that feels lived-in, authentic, and full of character.