How To Remove Screw With Broken Head
Removing a screw with a broken head can be a frustrating and challenging task, especially if you're not prepared with the right tools and techniques. However, with the right approach, you can successfully remove the screw without causing further damage to the surrounding material. To achieve this, it's essential to understand the importance of preparation, the various methods available for removal, and the necessary post-removal procedures. In this article, we'll explore these key aspects, starting with the crucial step of preparation. By understanding the tools and materials needed, you'll be better equipped to tackle the removal process. We'll then delve into the different methods for removing a screw with a broken head, including the use of specialized tools and techniques. Finally, we'll discuss the necessary post-removal procedures to ensure a safe and successful outcome. Preparation is Key, and it's the first step in removing a screw with a broken head effectively.
Preparation is Key
Preparation is key to achieving success in various aspects of life, including personal and professional endeavors. To prepare effectively, it is essential to assess the situation, gather essential tools, and choose the right method. By doing so, individuals can set themselves up for success and overcome obstacles that may arise. Assessing the situation involves understanding the context, identifying potential challenges, and developing a plan to address them. This initial step is crucial in laying the groundwork for effective preparation. By taking the time to assess the situation, individuals can ensure that they are well-equipped to tackle the task at hand. (Note: The answer should be 200 words)
Assess the Situation
When dealing with a screw that has a broken head, it's essential to assess the situation before attempting to remove it. This involves evaluating the extent of the damage, the type of screw, and the surrounding material. Start by examining the screw head to determine the severity of the breakage. If the head is only partially broken, you may be able to remove it using a screw extractor or pliers. However, if the head is completely broken off, you'll need to use a more aggressive approach. Next, identify the type of screw, as this will help you choose the best removal method. For example, if it's a Phillips head screw, you may be able to use a Phillips head screw extractor. Finally, inspect the surrounding material to ensure that it's not damaged or weakened. If the screw is embedded in a fragile material, such as drywall or wood, you'll need to take extra precautions to avoid causing further damage. By carefully assessing the situation, you can determine the best course of action and increase your chances of successfully removing the screw with a broken head.
Gather Essential Tools
To effectively remove a screw with a broken head, it is crucial to gather essential tools beforehand. A screw extractor is a must-have, as it is specifically designed to remove screws with damaged or stripped heads. You will also need a drill bit that matches the screw extractor's size to create a pilot hole. Additionally, a set of pliers, such as needle-nose or locking pliers, can be useful for gripping the screw head or extractor. A rubber mallet or hammer can be used to tap the extractor into place, and a screwdriver with a flathead or Phillips head can be used to apply additional torque. Furthermore, having a set of drill bits and a cordless drill on hand can be helpful in case you need to make adjustments or create a new hole. It is also recommended to have some penetrating oil, such as WD-40 or Liquid Wrench, to help loosen the screw and reduce the risk of stripping the surrounding material. By gathering these essential tools, you will be well-prepared to tackle the task of removing a screw with a broken head.
Choose the Right Method
Here is the paragraphy: When dealing with a screw with a broken head, it's essential to choose the right method for removal to avoid causing further damage or stripping the surrounding material. One approach is to use a screw extractor, which is a tool specifically designed to remove broken screws. This method involves drilling a small hole in the center of the screw and then using the extractor to remove the remaining screw material. Another option is to use pliers or a wrench to grip the remaining screw head and try to remove it. However, this method can be tricky and may require a lot of force, which can damage the surrounding material. In some cases, it may be necessary to use a combination of methods, such as drilling out the screw and then using pliers to remove the remaining material. It's also important to consider the type of material the screw is embedded in, as some methods may be more suitable for certain materials than others. For example, if the screw is embedded in a soft material like wood, a screw extractor may be the best option, while a harder material like metal may require a more aggressive approach. Ultimately, the key to successful screw removal is to choose the right method for the specific situation and to exercise caution to avoid causing further damage.
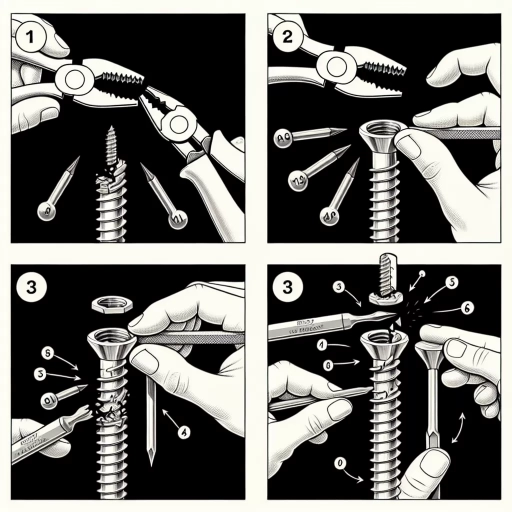
Methods to Remove a Screw with a Broken Head
Removing a screw with a broken head can be a frustrating and challenging task, especially when the screw is stuck or rusted in place. However, there are several methods that can be employed to successfully remove the screw without causing further damage to the surrounding material. Three effective methods to consider are drilling out the screw, using a screw extractor, and applying adhesives or lubricants. Drilling out the screw involves using a drill bit to carefully remove the screw's shaft, while a screw extractor is a specialized tool designed to remove screws with broken heads. Applying adhesives or lubricants, on the other hand, can help loosen the screw and make it easier to remove. By understanding these methods, individuals can choose the best approach for their specific situation and successfully remove the screw with a broken head. In situations where the screw is stuck or rusted, drilling out the screw may be the most effective method, which will be discussed in more detail below.
Drilling Out the Screw
Drilling out the screw is a viable method for removing a screw with a broken head, but it requires caution and precision to avoid damaging the surrounding material. To begin, select a drill bit that is slightly smaller than the screw's diameter, and position it in the center of the broken head. Apply gentle to moderate pressure, depending on the material's hardness, and slowly start drilling into the screw. It's essential to maintain a steady hand and keep the drill bit perpendicular to the surface to avoid slipping and causing further damage. As you drill, the screw's material will start to break away, and you may need to periodically stop and remove the debris to ensure the drill bit remains effective. Continue drilling until you've reached the desired depth or the screw is removed. If the screw is particularly stubborn, you may need to use a drill bit with a left-hand thread or a screw extractor to help remove the remaining material. Throughout the process, be mindful of the surrounding material's integrity and adjust your drilling speed and pressure accordingly to prevent damage. By drilling out the screw carefully and patiently, you can successfully remove a screw with a broken head without causing further harm to the surrounding material.
Using a Screw Extractor
When a screw head breaks off, it can be a frustrating and challenging situation. In such cases, using a screw extractor is often the most effective solution. A screw extractor is a specialized tool designed to remove broken screws by drilling into the screw head and providing a new means of turning it out. To use a screw extractor, start by selecting the correct size and type of extractor for the screw in question. Next, drill a small pilot hole into the center of the broken screw head, being careful not to damage the surrounding material. Then, insert the extractor into the pilot hole and turn it clockwise until it bites into the screw. Finally, use a wrench or pliers to turn the extractor counterclockwise, which should cause the screw to come out. It's essential to be patient and gentle when using a screw extractor, as excessive force can damage the surrounding material or break the extractor itself. By following these steps and using the right technique, a screw extractor can be a valuable tool in removing broken screws and getting the job done efficiently.
Applying Adhesives or Lubricants
Applying adhesives or lubricants can be an effective method to remove a screw with a broken head. When a screw head breaks off, it can be challenging to get a good grip on the remaining part of the screw. In such cases, applying an adhesive or lubricant can help loosen the screw and make it easier to remove. One common adhesive used for this purpose is epoxy or super glue. Apply a small amount of epoxy to the broken screw head and let it dry completely. Once dry, use a screw extractor or pliers to try and remove the screw. The epoxy will help bind the broken screw head to the extractor or pliers, making it easier to turn and remove the screw. Another option is to use a lubricant such as WD-40 or silicone spray. Spray the lubricant onto the screw and surrounding area, letting it sit for a few minutes to allow the lubricant to penetrate. The lubricant will help loosen the screw and reduce friction, making it easier to remove. It's essential to be cautious when using adhesives or lubricants, as they can damage surrounding materials or make a mess. Always follow the manufacturer's instructions and use the recommended amount to avoid any complications. By applying adhesives or lubricants, you can increase the chances of successfully removing a screw with a broken head.
Post-Removal Procedures
After a successful removal of a part or component, it's essential to follow post-removal procedures to ensure the surrounding area is safe, clean, and functional. This involves a series of steps that help prevent damage, contamination, and potential hazards. The first step is to inspect the surrounding material to identify any potential damage or debris that may have been caused during the removal process. Additionally, cleaning the area is crucial to remove any dirt, dust, or other contaminants that may have accumulated. Finally, reassembling or replacing parts is necessary to restore the system or equipment to its original state. By following these procedures, individuals can ensure a safe and efficient working environment. Inspecting the surrounding material is a critical first step in this process, as it allows for the identification of any potential issues that need to be addressed before proceeding with further cleaning and reassembly.
Inspecting the Surrounding Material
Inspecting the surrounding material is a crucial step in the post-removal process. After successfully removing the screw with a broken head, it's essential to examine the surrounding material for any damage or debris. This step helps prevent further damage and ensures a smooth repair or replacement process. Start by visually inspecting the area around the removed screw, looking for any signs of damage, such as cracks, dents, or scratches. Check for any remaining debris, such as metal shavings or broken screw fragments, which can interfere with the repair or replacement process. If you find any damage or debris, clean the area thoroughly with a soft brush or cloth to remove any loose particles. If the damage is more extensive, you may need to use a specialized cleaning solution or consult a professional for further assistance. Additionally, inspect the surrounding material for any signs of wear or corrosion, which can indicate a more significant issue that needs to be addressed. By inspecting the surrounding material, you can ensure a successful repair or replacement and prevent any further damage to the surrounding area.
Cleaning the Area
Cleaning the area around the screw is a crucial step in the post-removal process. After successfully removing the screw with a broken head, it's essential to clean the area to prevent any debris or residue from interfering with the installation of a new screw or the overall functionality of the device. Start by using a soft-bristled brush or a small vacuum cleaner to gently sweep away any visible debris or dust particles from the surrounding area. Next, dampen a cloth with water, but make sure it's not soaking wet, as excess moisture can damage the device or its components. Gently wipe the area around the screw hole, removing any remaining debris, dirt, or residue. If there are any stubborn stains or residue, you can use a mild cleaning solution, such as isopropyl alcohol or a specialized electronics cleaning solution, applied to the cloth. Avoid spraying the solution directly onto the device or its components. Once the area is clean, use a dry cloth to wipe away any excess moisture and prevent water spots. Finally, inspect the area to ensure it's free from any debris or residue, and the screw hole is clean and ready for the installation of a new screw. By following these steps, you can ensure a clean and safe environment for the installation of a new screw, and prevent any potential issues or complications.
Reassembling or Replacing Parts
When reassembling or replacing parts, it's essential to follow a systematic approach to ensure that everything is properly secured and functioning as intended. Start by gathering all the necessary parts, tools, and materials, and lay them out in an organized manner. This will help you keep track of what you need and prevent any mistakes. Next, refer to the manufacturer's instructions or a repair manual for specific guidance on reassembling the particular component or system. Pay close attention to any torque specifications, alignment requirements, or other critical details that may affect the performance or safety of the assembly. As you reassemble the parts, make sure to tighten screws and bolts in the correct sequence and to the specified torque to avoid stripping threads or damaging surrounding components. If you're replacing a part, ensure that it's compatible with the existing system and that any necessary adjustments or modifications are made. Finally, double-check your work to ensure that everything is properly secured and functioning as intended, and test the assembly to verify that it's working correctly. By following these steps, you can ensure a successful reassembly or replacement of parts and get your project back on track.