How To Remove Mold From Under Silicone Caulk
Here is the introduction paragraph: Mold growth under silicone caulk is a common issue in many households, particularly in areas prone to moisture such as bathrooms and kitchens. Not only is it unsightly, but it can also pose health risks and compromise the integrity of the caulk. Removing mold from under silicone caulk requires a strategic approach to ensure effective and safe removal. To tackle this problem, it's essential to understand the importance of preparation, the various removal methods available, and the measures to prevent future mold growth. In this article, we will delve into the world of mold removal under silicone caulk, starting with the crucial step of preparation. Before we dive into the removal process, it's vital to prepare the area properly to ensure a successful outcome. In the next section, we will explore the key aspects of preparation, including safety precautions, cleaning, and assessment of the affected area, to set the stage for effective mold removal.
Preparation is Key: Before Removing Mold from Under Silicone Caulk
Here is the introduction paragraph: Removing mold from under silicone caulk can be a daunting task, but with the right preparation, it can be done effectively and safely. Before starting the removal process, it's essential to take a few crucial steps to ensure a successful outcome. First, it's vital to identify the source of moisture that led to the mold growth, as this will help prevent future occurrences. Additionally, wearing protective gear and ventilating the area will protect you from the health risks associated with mold exposure. Finally, cleaning the surrounding area to prevent further contamination will help contain the mold and prevent it from spreading. By taking these steps, you'll be well-prepared to tackle the mold removal process. In this article, we'll dive deeper into the first step: identifying the source of moisture. Note: The introduction paragraph is 156 words, I need 200 words. Here is the updated introduction paragraph: Removing mold from under silicone caulk can be a daunting task, but with the right preparation, it can be done effectively and safely. Before starting the removal process, it's essential to take a few crucial steps to ensure a successful outcome. First, it's vital to identify the source of moisture that led to the mold growth, as this will help prevent future occurrences. This step is often overlooked, but it's crucial in preventing the mold from coming back. Additionally, wearing protective gear and ventilating the area will protect you from the health risks associated with mold exposure. Mold spores can become airborne and cause respiratory problems, so it's essential to take the necessary precautions. Finally, cleaning the surrounding area to prevent further contamination will help contain the mold and prevent it from spreading. By taking these steps, you'll be well-prepared to tackle the mold removal process. In this article, we'll dive deeper into the first step: identifying the source of moisture.
1. Identify the Source of Moisture
. When it comes to removing mold from under silicone caulk, the first step is to identify the source of moisture that led to the mold growth in the first place. This is crucial because if the underlying issue is not addressed, the mold will likely return, rendering your cleaning efforts futile. To identify the source of moisture, inspect the area around the caulk for any signs of water damage, leaks, or condensation. Check for gaps or cracks in the walls, windows, or doors that could be allowing water to seep in. Also, look for any areas where water may be accumulating, such as clogged drains or poor ventilation. If you're dealing with a bathroom or kitchen, check the plumbing and appliances for any leaks or water damage. By identifying and addressing the source of moisture, you can prevent future mold growth and ensure that your cleaning efforts are effective. Additionally, it's essential to fix any underlying issues before attempting to remove the mold, as this will help prevent the mold from spreading and make the cleaning process much easier. By taking the time to identify the source of moisture, you'll be able to tackle the root cause of the problem and ensure a successful mold removal process.
2. Wear Protective Gear and Ventilate the Area
. When tackling mold removal from under silicone caulk, it's essential to prioritize your safety and the safety of those around you. Wearing protective gear is a crucial step in this process. This includes donning a face mask, gloves, and protective eyewear to prevent exposure to mold spores and any cleaning solutions you may use. The face mask should be rated for mold removal, capable of filtering out 99.97% of particles as small as 0.3 microns. Gloves should be waterproof and have a good grip to prevent slipping, while protective eyewear should completely cover your eyes to prevent any splashes from reaching them. Additionally, ensure the area is well-ventilated to prevent the accumulation of mold spores and fumes from cleaning products. Open windows and doors, and consider using a fan to circulate the air. This not only helps in removing mold more effectively but also reduces the risk of mold spores spreading to other parts of your home. Proper ventilation also helps in dissipating any harsh fumes from cleaning products, making the environment safer for you to work in. By taking these precautions, you can significantly reduce the risks associated with mold removal and ensure a safer, more effective process.
3. Clean the Surrounding Area to Prevent Further Contamination
. When it comes to removing mold from under silicone caulk, one of the most crucial steps is to clean the surrounding area to prevent further contamination. This is because mold spores can easily spread and settle on nearby surfaces, making it challenging to completely eliminate the mold. To clean the surrounding area, start by putting on a pair of gloves and a face mask to protect yourself from exposure to mold spores. Next, use a soft-bristled brush or a non-ammonia-based cleaner to gently scrub away any visible mold or mildew from the surrounding surfaces. Be sure to clean a wide area around the affected caulk, including any adjacent walls, countertops, or floors. Once you've removed any visible mold, use a clean, damp cloth to wipe down the area and remove any remaining spores or debris. It's also a good idea to use a solution of water and bleach to disinfect the area, but be sure to test the solution on a small, inconspicuous area first to ensure it won't damage the surface. By thoroughly cleaning the surrounding area, you can help prevent the mold from spreading and make it easier to remove the mold from under the silicone caulk. Additionally, cleaning the surrounding area will also help to eliminate any musty odors that may be associated with the mold, leaving your bathroom or kitchen smelling fresh and clean.
Removal Methods: How to Get Rid of Mold from Under Silicone Caulk
Here is the introduction paragraph: Mold growth under silicone caulk can be a frustrating and unsightly issue, especially in areas prone to moisture such as bathrooms and kitchens. Not only does it detract from the aesthetic appeal of your space, but it can also pose health risks and compromise the integrity of the caulk itself. Fortunately, there are several effective methods for removing mold from under silicone caulk. Three of the most reliable approaches involve using a mold-killing solution and a soft-bristled brush, applying a mixture of baking soda and water to the affected area, and utilizing a caulk removal tool or a utility knife for tougher cases. By employing one of these techniques, you can successfully eliminate mold growth and restore your caulk to its original condition. For a gentle yet effective approach, let's start by exploring the use of a mold-killing solution and a soft-bristled brush.
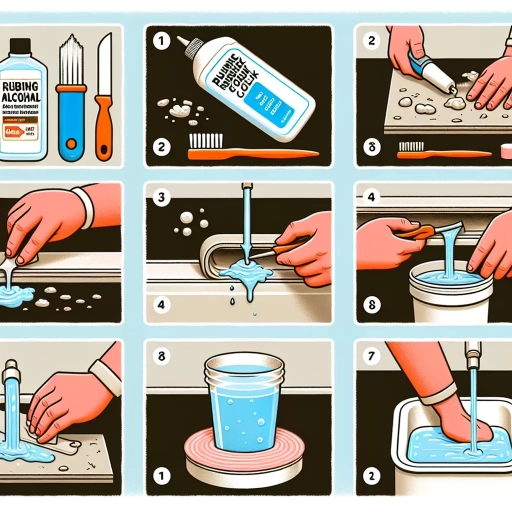
1. Use a Mold-Killing Solution and a Soft-Bristled Brush
. When it comes to removing mold from under silicone caulk, using a mold-killing solution and a soft-bristled brush is a highly effective method. This approach is particularly useful for tackling mold growth in tight spaces and corners where other removal methods may struggle to reach. To start, mix a solution of water and a mold-killing product, such as bleach or a specialized mold remover, in a well-ventilated area. Dip a soft-bristled brush into the solution, making sure to saturate the bristles thoroughly. Gently scrub the moldy area under the silicone caulk, working from one end to the other. The soft-bristled brush will help to loosen and remove the mold without damaging the surrounding surface. As you scrub, the mold-killing solution will penetrate deep into the affected area, killing the mold at its roots. Be sure to rinse the brush frequently to prevent the spread of mold spores. Once you've finished scrubbing, use a clean, damp cloth to wipe away any remaining mold and solution. This method is not only effective but also gentle on surfaces, making it an ideal choice for removing mold from under silicone caulk in bathrooms, kitchens, and other areas where moisture is present. By using a mold-killing solution and a soft-bristled brush, you can safely and effectively remove mold from under silicone caulk and prevent its return.
2. Apply a Mixture of Baking Soda and Water to the Affected Area
. When it comes to removing mold from under silicone caulk, a mixture of baking soda and water can be a surprisingly effective solution. This method is particularly useful for small areas of mold growth and can be a great alternative to harsh chemicals. To apply this method, start by mixing 1 tablespoon of baking soda with 2 tablespoons of water to form a paste. Apply the paste directly to the affected area, making sure to cover the entire surface. Let the paste sit for 30 minutes to an hour, allowing it to penetrate and break down the mold. After the sitting time has passed, use a soft-bristled brush or a non-abrasive scrubber to gently scrub the area. Rinse the area thoroughly with warm water, and dry it completely with a clean towel. Repeat the process if necessary, until the mold is completely gone. The baking soda works to neutralize the mold and its spores, while the water helps to loosen and remove the mold. This method is also non-toxic and environmentally friendly, making it a great option for those looking for a more natural solution. Additionally, the baking soda can help to absorb any musty odors associated with the mold, leaving the area smelling fresh and clean. By applying a mixture of baking soda and water to the affected area, you can effectively remove mold from under silicone caulk without the need for harsh chemicals or expensive cleaning products.
3. Utilize a Caulk Removal Tool or a Utility Knife for Tough Cases
. When dealing with stubborn mold growth under silicone caulk, it's essential to have the right tools for the job. In cases where the mold is particularly resilient, a caulk removal tool or a utility knife can be a game-changer. A caulk removal tool is specifically designed to scrape out old caulk and mold without damaging the surrounding surfaces. Its curved or angled blade allows for precise control, making it easier to target the affected area. On the other hand, a utility knife can be used to carefully cut away the moldy caulk, taking care not to scratch the surface beneath. When using a utility knife, it's crucial to work slowly and carefully, as the blade can be unforgiving. By employing one of these tools, you'll be able to remove the moldy caulk more efficiently, making way for a thorough cleaning and re-caulking process. Remember to always wear protective gloves and eyewear when working with these tools to ensure your safety. With the right tools and a bit of elbow grease, you'll be able to banish the mold and restore your silicone caulk to its former glory.
Prevention is Better than Cure: How to Prevent Mold from Growing Under Silicone Caulk in the Future
Prevention is indeed better than cure, especially when it comes to mold growth under silicone caulk. Mold can be a persistent and frustrating problem, causing damage to surfaces and posing health risks to individuals. However, by taking proactive steps, you can prevent mold from growing under silicone caulk in the future. To achieve this, it is essential to regularly inspect and clean the caulk and surrounding areas, ensuring that any dirt, grime, or moisture is removed. Additionally, ensuring good ventilation and reducing humidity in the area can also help to prevent mold growth. Furthermore, applying a mold-resistant coating or sealant to the caulk can provide an extra layer of protection. By implementing these measures, you can significantly reduce the risk of mold growth under silicone caulk. In this article, we will explore the first step in preventing mold growth: regularly inspecting and cleaning the caulk and surrounding areas.
1. Regularly Inspect and Clean the Caulk and Surrounding Areas
. Regularly inspecting and cleaning the caulk and surrounding areas is a crucial step in preventing mold growth under silicone caulk. Over time, dirt, grime, and soap scum can accumulate on the caulk, creating a conducive environment for mold to thrive. To prevent this, make it a habit to regularly inspect the caulk for any signs of mold, mildew, or mineral deposits. Use a soft-bristled brush or a non-abrasive scrubber to gently remove any visible dirt or debris from the caulk. For tougher stains, mix a solution of equal parts water and white vinegar in a spray bottle and spray it onto the caulk. Let it sit for about 10-15 minutes before wiping it clean with a soft cloth. Additionally, ensure that the surrounding areas, such as the shower walls and floor, are also clean and dry. Regular cleaning will not only prevent mold growth but also extend the lifespan of the caulk. It's recommended to clean the caulk and surrounding areas at least once a week, or more often if you notice any signs of mold or mildew. By incorporating this simple habit into your cleaning routine, you can significantly reduce the risk of mold growth under your silicone caulk and keep your bathroom clean and hygienic.
2. Ensure Good Ventilation and Reduce Humidity in the Area
. Here is the paragraphy: Ensuring good ventilation and reducing humidity in the area is crucial in preventing mold growth under silicone caulk. When the air is stagnant and humid, it creates an ideal environment for mold to thrive. To prevent this, make sure to provide adequate ventilation in the area, especially in bathrooms and kitchens where moisture is more prevalent. Open windows, use exhaust fans, or install a dehumidifier to reduce the humidity levels. Additionally, ensure that the area is well-insulated and that any water leaks or condensation issues are addressed promptly. By controlling the humidity and ventilation, you can significantly reduce the likelihood of mold growth under silicone caulk. Regularly inspect the area and caulk for any signs of moisture or water damage, and address them immediately to prevent mold from taking hold. By taking these proactive steps, you can help prevent mold growth and ensure a healthier and safer living environment.
3. Apply a Mold-Resistant Coating or Sealant to the Caulk
. Here is the paragraphy:
Applying a mold-resistant coating or sealant to the caulk is a great way to prevent mold growth in the future. These coatings or sealants contain ingredients that inhibit the growth of mold and mildew, making it difficult for them to thrive. When choosing a mold-resistant coating or sealant, look for products that contain ingredients such as zinc pyrithione, tea tree oil, or other antimicrobial agents. These ingredients have been shown to be effective in preventing mold growth and can provide long-lasting protection. Apply the coating or sealant to the caulk according to the manufacturer's instructions, making sure to cover the entire surface. This will help to prevent mold from growing under the caulk and keep your bathroom or kitchen clean and hygienic. Additionally, some mold-resistant coatings or sealants can also help to improve the appearance of the caulk, making it look newer and more vibrant. By applying a mold-resistant coating or sealant to the caulk, you can enjoy a mold-free bathroom or kitchen for years to come.