How To Draw A Lightning Bolt
Here is the introduction paragraph: Drawing a lightning bolt can be a fun and creative activity, but it requires some skill and technique to get it right. To create a realistic and visually appealing lightning bolt, you need to understand the basics of drawing one, including the shape, size, and proportions. Once you have a good grasp of the basics, you can start sketching the lightning bolt, using a variety of lines and curves to capture its dynamic movement. Finally, refining and enhancing your drawing can help bring your lightning bolt to life, adding texture, shading, and other details to make it stand out. In this article, we will explore these three key steps in detail, starting with the foundation of drawing a lightning bolt: understanding the basics.
Understanding the Basics of Drawing a Lightning Bolt
Drawing a lightning bolt can be a challenging yet rewarding experience for artists of all levels. To create a realistic and captivating lightning bolt, it's essential to understand the basics of drawing one. This involves familiarizing yourself with the shape and structure of a lightning bolt, choosing the right drawing tools and materials, and observing real-life lightning bolts for inspiration. By mastering these fundamental elements, you'll be able to capture the dynamic energy and power of a lightning bolt on paper. In this article, we'll delve into the basics of drawing a lightning bolt, starting with the foundation of understanding its shape and structure. By grasping this fundamental concept, you'll be able to build a strong foundation for your artwork and create a lightning bolt that's both visually striking and realistic. Let's begin by exploring the shape and structure of a lightning bolt, which is the first step in creating a stunning and authentic representation of this natural phenomenon.
Familiarizing Yourself with the Shape and Structure
Familiarizing yourself with the shape and structure of a lightning bolt is crucial in drawing a realistic and accurate representation. A lightning bolt is essentially a massive electrical discharge that occurs during thunderstorms, and its shape is characterized by a zigzag or forked pattern. The bolt typically originates from a cumulonimbus cloud and extends towards the ground, sometimes branching out into multiple paths. To draw a lightning bolt, it's essential to understand its basic structure, which consists of a main channel, known as the return stroke, and several smaller branches, called leaders. The return stroke is the brightest and most visible part of the lightning bolt, while the leaders are fainter and more diffuse. By grasping the shape and structure of a lightning bolt, you'll be able to create a more authentic and detailed drawing.
Choosing the Right Drawing Tools and Materials
Choosing the right drawing tools and materials is crucial for creating a realistic and detailed lightning bolt. To start, you'll need a pencil with a range of hardness levels, such as a 2B, 4B, and 6B, to achieve varying line weights and shading. A sharpener is also essential to keep your pencils sharp and ready to use. For added texture and depth, consider using a charcoal pencil or a sketching pen with a flexible tip. A blending stump or tortillon can help smooth out rough edges and create subtle transitions between shades. When it comes to paper, look for a high-quality, smooth surface that can handle a range of mediums, such as cartridge paper or hot press watercolor paper. A drawing board or sketchpad can provide a comfortable and stable surface to work on. Additionally, a ruler or straightedge can help you create sharp, defined lines, while a protractor or angle measurer can aid in achieving precise angles and measurements. By investing in the right tools and materials, you'll be well-equipped to capture the dynamic energy and movement of a lightning bolt in your drawing.
Observing Real-Life Lightning Bolts for Inspiration
Observing real-life lightning bolts can be a thrilling experience that sparks creativity and inspires artistic expression. Witnessing the raw power and energy of a lightning bolt can evoke a sense of awe and wonder, making it an excellent reference point for drawing. By observing the shape, movement, and behavior of lightning bolts, artists can gain a deeper understanding of their structure and dynamics. This, in turn, can help inform their drawings, allowing them to capture the essence and drama of these electrifying natural wonders. Whether it's the zigzagging path, the burst of light, or the sound of thunder that accompanies it, observing real-life lightning bolts can provide a wealth of inspiration for artists looking to draw these incredible phenomena. By studying the way lightning bolts interact with their surroundings, artists can also develop a greater appreciation for the role of light, shadow, and texture in their drawings. Ultimately, observing real-life lightning bolts can be a powerful catalyst for creativity, helping artists to tap into the raw energy and emotion that these natural wonders evoke.
Sketching the Lightning Bolt
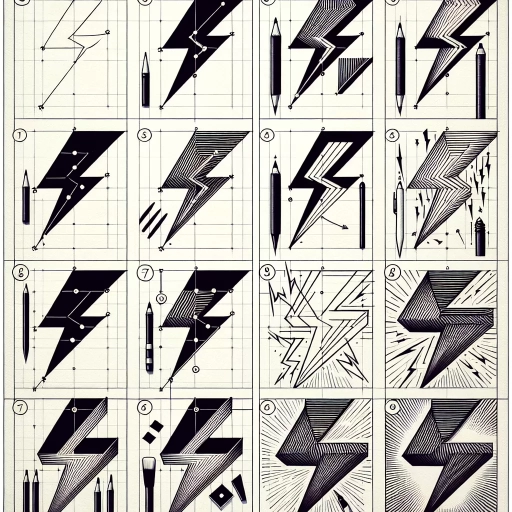
Sketching a lightning bolt can be a fun and creative activity, allowing artists to capture the raw energy and power of nature. To create a realistic and dynamic lightning bolt sketch, there are several key elements to consider. First, it's essential to create a rough outline of the lightning bolt's path, taking into account the direction and movement of the bolt. Next, adding jagged edges and branching lines can help to convey the bolt's intense energy and unpredictability. Finally, incorporating movement and energy into the sketch can help to bring the lightning bolt to life. By considering these key elements, artists can create a sketch that truly captures the essence of a lightning bolt. In this article, we'll explore each of these elements in more detail, starting with the first step: creating a rough outline of the lightning bolt's path.
Creating a Rough Outline of the Lightning Bolt's Path
When creating a rough outline of the lightning bolt's path, start by sketching a series of zigzagging lines that resemble a jagged path. This will help you visualize the overall shape and direction of the lightning bolt. Begin at the top of the page, where the lightning bolt originates, and work your way down, allowing the lines to zig and zag in a random, yet fluid motion. As you sketch, consider the speed and energy of the lightning bolt, allowing the lines to become more erratic and dynamic as they descend. You can also experiment with varying the thickness and texture of the lines to convey a sense of power and intensity. Don't worry too much about precision at this stage – the goal is to capture the overall movement and energy of the lightning bolt, rather than creating a perfect, symmetrical shape. By creating a rough outline, you'll be able to refine and detail your drawing in the next stages, adding depth, texture, and dimension to your lightning bolt.
Adding Jagged Edges and Branching Lines
Adding jagged edges and branching lines to your lightning bolt drawing can add a sense of energy and dynamism to the overall image. To create jagged edges, start by adding small, sharp points along the length of the bolt, making sure to vary the size and spacing of the points to create a sense of randomness. You can also add small, curved lines that connect the points, giving the bolt a more organic and natural look. For branching lines, start by adding small, thin lines that extend out from the main bolt, making sure to vary the length and direction of the lines to create a sense of movement and energy. You can also add small, curved lines that connect the branching lines to the main bolt, giving the image a more cohesive and dynamic look. By adding these details, you can create a lightning bolt drawing that is full of energy and movement, and that captures the raw power and intensity of a lightning storm.
Incorporating Movement and Energy into the Sketch
Incorporating movement and energy into your sketch is crucial to capture the dynamic nature of a lightning bolt. To achieve this, focus on conveying a sense of speed and power through bold lines and expressive gestures. Start by using a range of line weights and styles to suggest the bolt's trajectory and velocity. Thicker, darker lines can indicate the bolt's core, while lighter, more delicate lines can represent the surrounding energy and sparks. Consider using hatching and cross-hatching techniques to create a sense of texture and depth, adding to the overall energy of the piece. Additionally, experiment with loose, expressive brushstrokes or scribbles to capture the chaotic, unpredictable nature of lightning. By incorporating these elements, you can create a sketch that not only accurately represents a lightning bolt but also conveys the raw power and energy it embodies.
Refining and Enhancing Your Lightning Bolt Drawing
Refining and enhancing your lightning bolt drawing requires attention to detail and a willingness to experiment with different techniques. To take your drawing to the next level, consider adding shading and texture to create depth and dimension, experimenting with different line styles and techniques to add visual interest, and incorporating background elements to enhance the scene. By incorporating these elements, you can create a more dynamic and engaging drawing that captures the energy and power of a lightning bolt. One of the most effective ways to add depth and dimension to your drawing is by adding shading and texture, which can help to create a sense of volume and weight. By carefully considering the placement and intensity of shading and texture, you can create a more realistic and engaging drawing that draws the viewer in. Note: The answer should be 200 words.
Adding Shading and Texture to Create Depth and Dimension
Adding shading and texture to your lightning bolt drawing can elevate it from a simple outline to a dynamic and visually striking image. To create depth and dimension, start by identifying the areas of the bolt where the light would naturally hit and where it would be in shadow. Use a range of shading techniques, such as hatching and cross-hatching, to create a gradient of values that give the bolt a sense of volume and texture. You can also add texture to the bolt by incorporating subtle patterns and details, such as wispy tendrils of electricity or rough, rocky surfaces. To take your shading and texture to the next level, experiment with different tools and media, such as charcoal, ink, or digital drawing software. By combining these techniques with your refined outline, you can create a lightning bolt drawing that crackles with energy and seems to leap off the page. Additionally, pay attention to the background of your drawing, as a well-executed background can help to enhance the overall sense of depth and dimension. Consider using a subtle gradient or a soft, atmospheric effect to create a sense of distance and context for your lightning bolt. By carefully balancing your shading, texture, and background, you can create a drawing that is both visually striking and nuanced.
Experimenting with Different Line Styles and Techniques
Experimenting with different line styles and techniques can elevate your lightning bolt drawing to the next level. To create a more dynamic and expressive piece, try varying the thickness and texture of your lines. For example, you can use a range of pencils, from 6H to 6B, to achieve a range of values and create a sense of depth and dimension. Alternatively, you can experiment with different brush pens or markers to achieve a more fluid and spontaneous look. Another technique to try is hatching and cross-hatching, which involves creating a series of closely spaced lines that follow the contours of the lightning bolt. This can add a sense of energy and movement to your drawing. You can also try stippling, which involves creating a pattern of small dots to build up texture and shading. By experimenting with different line styles and techniques, you can add visual interest and create a unique and captivating lightning bolt drawing. Additionally, you can also try to combine different techniques to achieve a more complex and intriguing effect. For instance, you can use hatching and cross-hatching to create the main body of the lightning bolt, and then use stippling to add texture and shading to the edges. By pushing the boundaries of traditional drawing techniques, you can create a truly striking and memorable lightning bolt drawing.
Incorporating Background Elements to Enhance the Scene
Incorporating background elements can elevate your lightning bolt drawing from a simple illustration to a captivating scene. To create a more immersive atmosphere, consider adding a dark and ominous sky with thick, grey clouds that seem to swirl around the lightning bolt. The clouds can be rendered in soft, feathery brushstrokes, with subtle hints of blue and purple to convey a sense of foreboding. In the distance, a silhouette of a cityscape or a mountain range can add depth and context to the scene. The lightning bolt itself can be depicted as illuminating the surrounding environment, casting an eerie glow on the clouds and the landscape below. To enhance the sense of drama, you can also include some visual effects such as rain, hail, or wind-blown debris, which can be suggested through loose, expressive lines and splatters of ink or paint. By incorporating these background elements, you can create a more dynamic and engaging lightning bolt drawing that draws the viewer's eye and sparks their imagination.