How To Remove Toilet Seat
 Navigating the seemingly complex task of removing and replacing a toilet seat doesn't have to be daunting or a cause for calling your plumber. With a few essential tips, a steady hand, and the right tools, you can accomplish this in a relatively short time. In this article, we'll guide you through the basics of understanding a toilet seat, the detailed steps on how to remove it yourself, and finally instill best practices and recommendations when it comes to replacing your seat, ensuring you’re equipped to tackle this task with ease. Not only will you gain valuable DIY know-how, but you'll also save money by minimizing professional service calls. So let's plunge into the world of toilet seats, starting with understanding its fundamental basics.
Understanding the Basics of a Toilet Seat
Understanding the basics of a toilet seat may seem simplistic, but it is far from it. With today's advances, the humble toilet seat has metamorphosed into an innovative bathroom fixture that amalgamates both functionality and style. This article delves into the nuances of a toilet seat, its anatomy, the variety available, and the common issues that one might encounter. The first segment, "Anatomy of a Toilet Seat", propels your understanding further about their structure and various parts that they comprise. From the familiar hinged structure to lesser-known elements, it is crucial to understand this fixture literally inside out. It is this knowledge that can aid in picking out the most fitting stylish and functional model for your bathroom. In "Different Types of Toilet Seats", we will explore the array of options available in the market. Ranging from bidets, heated seats, to ones with built-in nightlights. Each type is tailor-made to meet unique individual preferences and specific needs. The subsequent segment will address the "Common Problems and Their Signs" associated with toilet seats. Understanding these issues will help you in taking preemptive measures and quick redressals. It will equip you with the expertise to troubleshoot and fix minor grievances without necessitating professional help. Stay tuned as we dive into "Anatomy of a Toilet Seat", and kickstart our detailed investigation into the complexities of this indispensable household fixture. Unravel the mysteries of a toilet seat and metamorphose your bathroom experience to the next level!
Anatomy of a Toilet Seat
The anatomy of a toilet seat is intricate, comprised of numerous parts that synergize to deliver functionality. Central to every toilet seat are the actual seat itself and the lid, designed with comfort and convenience in mind. Toilet seats can be made from various materials including plastic, wood, and even cushioned vinyl, with the primary factor being durability and ease of cleaning. The lid serves a dual role - offering an aesthetic appeal while also shielding the toilet bowl when not in use. Beneath the surface, the robustness of a toilet seat often comes down to its hinges. These small but important components enable the movement of the seat and the lid, facilitating their lift and drop. Made mostly from plastic or metal, these hinges are designed to withstand regular usage. Some modern toilet seats include soft-close hinges which prevent the lid and the seat from slamming shut, thereby reducing noise and potential damage. Another fundamental part of the toilet seat anatomy lies in the bumpers. These small pieces, often made from rubber or plastic, are attached to the underside of the toilet seat. They serve to prevent direct contact between the toilet bowl and seat, reducing wear and offering a more comfortable seating position. Finally, the mounting bolts or screws are significant contributors to the toilet seat's integrity. These are used to attach the seat to the bowl via the hinges, securing the arrangement. Often, these screws are hidden by caps for aesthetic reasons but can be accessed easily if the seat needs to be removed or replaced. Understanding these components provides a thorough grasp of the anatomy of a toilet seat, and comes handy when considering a replacement or simply for maintenance purposes. The individuality of a toilet seat lies not only in the material or color used but also in these fundamental components that, together, deliver the overall functionality of a toilet seat. Remember, a well-maintained toilet seat promises longevity and hygienic conditions, making it an imperative part of household sanitation.
Different Types of Toilet Seats
Understanding the complexities and variety of toilet seats is fundamental when considering how to remove them. There are several types of toilet seats that each come with their unique designs, so it's essential to grasp the diversity before proceeding with any removal methods. One of the most common types of toilet seats is the standard round seat. This type is usually found in older homes and presents a simple, no-nonsense design. Because of their simplicity, they are generally easier to remove and replace. Elongated toilet seats, on the other hand, offer a contemporary design and are known for being more comfortable because of their larger sitting area. The process to remove them might require a bit more finesse due to their extended structure. Alternatively, open-front toilet seats are typically seen in public restrooms. The open design is primarily for hygienic reasons, and you might often find them being referred to as "split seats." Closed front toilet seats are more common in residential settings, attributed to their comfort and aesthetics. Then there are soft-close toilet seats, a popular type due to their unique technology that prevents the seat from slamming down. Removal of such seats generally requires a bit more attention to avoid damaging the soft-close mechanism. Heated or bidet toilet seats present a more luxury option, offering various features like warming, cleanliness, and often, a soft-close feature. Their removal process is a bit more complex due to the electrical components that come with them. Understanding these various toilet seat types helps identify what strategies to use during removal and further allows you to make an informed decision when replacing your seat. An incorrect replacement can hinder comfort, functionality, and possibly lead to future issues. Therefore, gaining an insightful comprehension of the different types plays a crucial part in mastering the basics of a toilet seat.
Common Problems and Their Signs
The functionality of a toilet seat might seem quite straightforward, but like any other item that is frequently used, it is susceptible to a range of common problems that could significantly impair its utility over time. Recognizing these issues and their corresponding signs is essential in maintaining not just the seat's functionality but also ensuring the comfort and hygiene of its users. One of the most common complications that users often encounter is a loose toilet seat. This issue frequently arises due to prolonged use and frequent movement. It is easily identifiable by unwanted shifts or wobbles while in use, potentially creating discomfort or even risking minor accidents. Maintaining the toilet seat's stability is, therefore, fundamental for user safety. Another widely prevalent problem is the cracking of a toilet seat. Different factors can contribute to this issue- regular wear and tear, age, or using abrasive cleaning solutions. If your toilet seat is sporting visible cracks, splits, or is chipped, it can cause discomfort and even lead to scratches or scuffs. Stains and discoloration, while they may seem purely cosmetic, may signify a more deep-rooted issue like bacterial or fungal growth. This problem can not only make your toilet seat aesthetically displeasing but can also pose potential health risks. Regular cleaning and maintenance can prevent this issue. Lastly, the functionality of the toilet seat hinges should not be neglected. If the seat cannot stay up or its closing mechanism has become faulty, it's a clear sign that the hinges need attention. Hinge problems create inconveniences and can lead to further wear and tear if not corrected timely. In summary, the common problems of a toilet seat, namely looseness, cracking, discoloration, and hinge malfunctioning, can pose significant discomfort and hygiene issues if not identified and rectified promptly. By recognizing these signs early, one can ensure the durability and functionality of the toilet seat, leading to a more comfortable user experience.
Step-by-Step Guide: How to Remove a Toilet Seat
In this step-by-step guide, we delve into the nitty-gritty of how to remove a toilet seat, an essential skill for every homeowner. Through careful guidance and insightful tips, you will not only learn the process, but also understand its integral components. Our structure unfolds in three substantive sections: firstly, 'Identifying the Toilet Seat Fasteners', where we demystify these crucial elements and discuss their role in anchoring your toilet seat. This stage is fundamental as it paves the way for our second installment, 'Unscrewing the Bolts: Techniques and Tools Needed'. Here, we provide a comprehensive outline of the tools required and efficient techniques to employ, ensuring a smooth and effortless bolt removal process. Lastly, we methodically walk you through 'Properly Detaching the Seat from the Toilet', ensuring your toilet seat is removed seamlessly and damage-free. These in-depth stages will equip you with the knowledge and the confidence to handle your toilet seat replacement or cleaning needs independently. Now, let’s dive in, starting with the key to any successful toilet seat removal—identifying the toilet seat fasteners.
Identifying the Toilet Seat Fasteners
Identifying the toilet seat fasteners is a critical step that allows for the successful removal of a toilet seat. The fasteners are small fixtures typically located at the back of the toilet seat, serving as the connecting link between the seat and the toilet itself. They come in a variety of shapes and forms, from plastic hinges to metallic screws, that enhances the stability of the toilet seat. The type of fasteners used largely depends on the model and make of the toilet. Most traditional toilet seats use standard fasteners that can be unscrewed with a simple screwdriver, while others, especially modern designs, may employ more complex fastening systems hidden beneath the caps. It's essential to accurately identify these fixtures because incorrect or forced attempts at removal could potentially result in the damage of the toilet bowl or the seat. Care must also be taken when dealing with plastic fasteners, as they can easily be broken if mishandled. A good approach is to determine the type of fastener by checking the manufacturer’s guide or consulting online resources. Verifying the kind of fasteners your seat has will inform what tools you’ll need for the process. Standard fasteners typically require only a screwdriver or sometimes a wrench, while other types may require specialized tools. Learning to properly identify your toilet seat fasteners is not only a key competence in bathroom maintenance; it also paves the way for a smooth and successful toilet seat removal. The process may seem intricate, yet it is manageable with the right information, patience, and care. At the end, a clear understanding of these fasteners will save you valuable time and effort while ensuring your toilet seat removal is a hassle-free one. Please note that recognizing the fasteners is just the beginning, further steps towards the actual removal of the toilet seat await as you make progress.
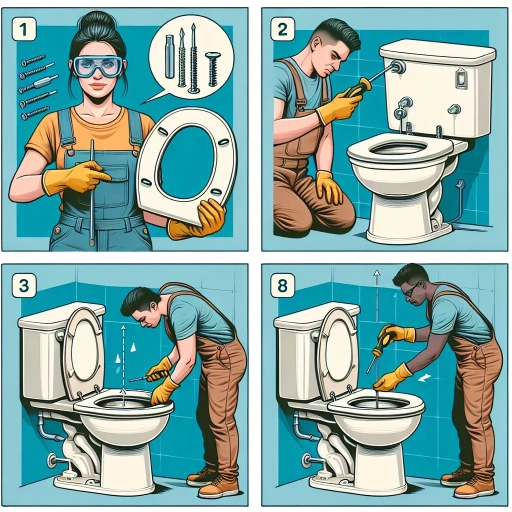
Unscrewing the Bolts: Techniques and Tools Needed
Unscrewing the Bolts: Techniques and Tools Needed
When it comes to removing a toilet seat, the crucial first step involves unfastening the bolts holding it in place. This step may seem simple, but without the correct techniques and tools, you may find yourself grappling with stubborn bolts. The process starts by identifying the type of bolts utilized in your toilet seat's assembly. Majority of toilet seats employ plastic or metal bolts, which are fixed in place by nuts on the toilet's underside. It's imperative to equip yourself with the appropriately sized screwdriver or a wrench, depending on the type of bolt used. Screwdrivers help in holding the bolt head firm while you untwist the nut using a wrench. In situations where the bolts are plastic, applying too much force may damage them. Therefore, it's important to use caution and finesse, not excessive force. On the flip side, if you're dealing with rusted metal bolts, a spray of a decent rust penetrating oil comes in handy before you attempt turning them. Allow the oil to soak for a few minutes to loosen the rust. If the bolts continue to put up resistance, it's recommended to gradually increase your force or use gripping tools like locking pliers for better leverage. Moreover, to efficiently remove a toilet seat, understanding the bolting mechanism of your specific model is crucial. Some seats use concealed bolts, which require popping open a cap on the toilet seat to access the screw heads. For others, you might need to reach the toilet's underside to loosen the nuts. In essence, unscrewing the bolts is key in the process of toilet seat removal. Using the appropriate technique and tools for your particular toilet model will ensure efficient completion of this task. By approaching the task with preparation and patience, you'll find that the process is simple, and you'll be ready to proceed with the next steps of your toilet seat removal.Properly Detaching the Seat from the Toilet
When it comes to home maintenance tasks, a necessary yet often overlooked one is learning how to properly detach the seat from the toilet. Many individuals might feel a bit squeamish about this procedure, however, it is an integral part of maintaining the cleanliness and functionality of this household staple. Properly detaching the toilet seat not only promotes a more hygienic bathroom but also provides an opportunity to replace it with a newer, more comfortable, or high-tech model. In the process of removing a toilet seat, the initial step involves correct identification of the attachments that secure the seat to the toilet. These attachments are typically located at the back of the toilet seat. They are usually composed of two main parts – a bolt and a nut. The bolt runs down from the seat and the nut is fastened on the end underneath the toilet bowl. It's a straightforward yet crucial step, as complete knowledge of the components ensures you also know which tools you need. Usually, a wrench or a screwdriver can do the job, depending on your specific model. One important tip when detaching the seat from the toilet is to clean the area first. You're likely to encounter a considerable amount of dust, germs, or even mildew. By cleaning first, you are creating a more sanitary work environment and preventing the spread of these contaminants to other areas of your bathroom. Next, carefully unscrew the nuts using your wrench or screwdriver while holding onto the bolt from the top, to prevent it from spinning. It's recommended to do this gently, as hastily stripping the bolt can cause further complications. If the nuts are made of plastic and prove challenging to remove due to wear and tear, you may need to resort to cutting them off with a hacksaw. Finally, once the screws or nuts have been freed, you can lift the seat right off the toilet. Do this cautiously to avoid scratching the toilet bowl. With the seat removed, you can now proceed to install a new one or do a thorough cleaning. In conclusion, properly detaching the toilet seat may seem like a daunting task, but by following these steps and precautions, you can ensure that it is done efficiently and hygienically. Understanding the process not only simplifies this task but also empowers you to perform optimal bathroom maintenance. This knowledge reaffirms the ability to maintain and enhance the comfort and cleanliness of your personal sanctuary - the bathroom. Think of it as not just removing a toilet seat, but also as part of a larger narrative of taking ownership and responsibility of your home maintenance, ensuring a clean, comfortable, well-maintained home for you and your family.
Replacing Your Toilet Seat: Best Practices and Recommendations
When it's time to swap out an old, stained, or pitted toilet seat, it's critical to approach the project with a clear understanding and a well-thought plan. This comprehensive guide, "Replacing Your Toilet Seat: Best Practices and Recommendations" will illuminate the path forward, outlining necessary insights on the process. The article is organized in three pivotal subtopics for a systematic approach: "Choosing the Right Replacement: Factors to Consider," "How to Install a New Toilet Seat," and "Maintaining Your New Toilet Seat." These sections are carefully designed to provide answers to your queries, offer valuable advice, and most importantly, to revamp your restroom with a new, improved toilet seat. We commence this toilet seat replacement journey with a critical stage - choosing the right replacement. This decision requires a strategic evaluation of various components. By considering several key factors, you significantly enhance your bathroom experience, simultaneously ensuring a seamless toilet seat replacement process. Stay connected, as our next segment will delve into the science of selecting the perfect toilet seat to meet your needs, aesthetics, and budget.
Choosing the Right Replacement: Factors to Consider
Choosing the right replacement toilet seat may seem a straightforward task, but there are several factors that must be considered to ensure the best selection. This forms a significant part of the overall toilet seat replacement process and can directly impact the functionality, comfort, and aesthetics of your bathroom. The first factor to consider is the size and shape of your toilet. Standard seats state the measurements in their descriptions, however, elliptical and long oval seats too, exist in the market and you would not want a mismatch. Therefore, it's crucial to measure your existing toilet’s length, width, and bolt space precisely before embarking on the quest for a new toilet seat. Next, focus should be given to the material and the durability of the seat. Plastic seats, for instance, are affordable, lightweight, and resistant to wear and tear. On the other hand, wooden seats provide a classic, stylish look but may not be as resistant to moisture. Specialty materials such as cushioned vinyl, polypropylene, or antimicrobial seats also exist and may be worthwhile to considered based on the needs and preferences of your household. Moreover, different seat designs come with varied features that can enhance comfort and convenience. Soft-closing seats prevent loud slamming, while heated seats may offer a luxury feel. There are also toilet seats with built-in nightlights, perfect for those midnight visits to the bathroom. Consideration should also be given to the color and style of the toilet seat. This factor might seem trivial but selecting a seat that matches the decor of your bathroom can influence the overall aesthetic considerably. Ensure you choose a color and style that complements other fixtures and accessories in your bathroom. Overall, selecting the right replacement is not merely about finding a suitable seat that fits your toilet. It includes taking into account the size, durability, additional features, and aesthetics. By considering all these factors, you can ensure a perfect selection, guaranteeing not just functionality, but, enhanced comfort and a pleasing visual harmony with the bathroom decor. These important points should be incorporated in your new toilet seat replacement journey, leading to a more informed and satisfying decision.
How to Install a New Toilet Seat
Installing a new toilet seat might seem like a daunting task, especially if you are doing it for the first time; however, it can be a straightforward process if done correctly. It is an easy DIY job that requires no professional assistance. Before you begin, it's essential to purchase a seat that suits the model and style of your commode, as seats are not universally fitting. Once you have the right seat, gather all the necessary tools –usually a screwdriver and sometimes a wrench. The process begins with positioning the replacement seat over the toilet bowl such that the holes on the sides of the bowl align with those on the seat. A well-aligned seat is critical to the installation process as it ensures the seat remains firm and safe to use. Next, fit the bolts through the aligned holes- these bolts come in the package of your new toilet seat. They are your primary tools for securely attaching the seat to the bowl. Once in place, you will need to fasten the bolts with the supplied nuts - ensure to tighten them enough to keep the seat secure but avoid over-tightening as it could lead to the cracking of the porcelain. The complexity of installing a new toilet seat can vary based on the model type. For instance, some modern toilet seats come with quick-release buttons that make the process even easier. Such models allow you to install the hinges and the seat separately, making the whole process even easier and quicker. However, if your toilet seat comes without these quick-release buttons, fret not. Screw-in models, though might take a tad more time, are still relatively straightforward to install. Remember that a firmly installed toilet seat will not only improve the overall aesthetic of your bathroom but also enhance the safety and sanitation standards. Despite the minor variations that may exist in specific models, the key steps remain the same - align, fit, and fasten. By following these simple steps, you can ensure a perfectly installed toilet seat that complements your bathroom decor, provides comfort, and most importantly, functions correctly. In conclusion, installing a new toilet seat is a manageable task that delivers a significant impact. It is an everyday home improvement project that anyone can undertake. Cracked or worn-out toilet seats can be unsightly and a potential health hazard. Hence, its importance cannot be overstated. So, roll up your sleeves and take that step in transforming the look and hygiene of your bathroom by replacing your toilet seat. It's easier than you think!
Maintaining Your New Toilet Seat
Maintaining Your New Toilet Seat Maintaining your new toilet seat effectively can extend its lifespan, ensure its comfort, and keep your bathroom looking pristine. Regular maintenance not only reduces wear and tear but also helps in maintaining the overall hygiene. Let's delve into some key aspects that can aid in maintaining your new toilet seat efficiently. First and foremost, correct usage is paramount. It may seem rudimentary, but ensuring the seat is always used properly will inhibit unnecessary harm. Avoid standing or putting excessive pressure on it – toilet seats can crack or warp under weight not intended for their design. Cleaning your toilet seat regularly is also vital. A consistent cleaning regimen does not just provide a shining surface, but it is pivotal in removing lurking germs or bacteria, contributing to the cleanliness of your bathroom. Use gentle, non-abrasive cleaners that are safe for your specific toilet seat's material. These non-abrasive cleaners, while diluted, still have the power to eliminate stains, dirt, and bacteria, ensuring the seat remains sanitary. Chemical-based cleaners may discolour the seat or cause it to deteriorate over time, whereas natural products like white vinegar can clean effectively without causing harm. In case your toilet seat becomes loose over time, tighten the screws securely but make sure not to overtighten as it may lead to cracks. Use a proper-sized screwdriver or wrench to prevent damage to the bolt heads. Should the seat become too worn or damaged despite your best efforts at maintenance, toilet seat replacement is a straightforward DIY task, or you can always hire a professional. Additionally, embracing preventative measures can prove beneficial. Protect your seat with a cover when not in use or consider using a cushioned seat. It not only deters the accumulation of dust but also inhibits potential damage. Through the continuous application of these practices, maintaining your new toilet seat becomes an effortless task, providing lasting comfort, appearance, and hygiene for your bathroom. The longevity of your toilet seat depends much upon how you take care of it. After all, preserving the condition of your bathroom fittings is an essential part of maintaining a comfortable home. So, make sure you pay attention to all these aspects to ensure that you derive maximum utility and satisfaction from your new toilet seat.