How To Make An Envelope With Printer Paper
In today's digital age, sending handwritten letters and cards has become a rare yet thoughtful gesture. One way to add a personal touch to your correspondence is by creating your own envelopes using printer paper. Not only is this a cost-effective and eco-friendly option, but it also allows you to express your creativity and add a unique touch to your mail. In this article, we will guide you through the process of making an envelope with printer paper, covering the necessary materials and tools needed, providing step-by-step instructions, and offering tips and variations to help you create a one-of-a-kind envelope. To get started, let's take a look at the materials and tools needed to make your own envelope.
Materials and Tools Needed
Here is the introduction paragraph: When it comes to creating a variety of projects, having the right materials and tools is essential. Whether you're working on a craft, a DIY project, or a school assignment, having the necessary supplies can make all the difference in the quality of your work. In this article, we'll take a closer look at some of the most common materials and tools needed for various projects, including printer paper, scissors, and glue or tape. By understanding what you need and how to use it, you can ensure that your projects turn out professional and polished. First, let's start with the foundation of many projects: printer paper. Here is the 200 words supporting paragraph for Printer Paper: Printer paper is a staple in many offices, schools, and homes. It's used for printing documents, creating art projects, and even making crafts. When choosing printer paper, there are a few things to consider. First, think about the weight of the paper. Standard printer paper is usually 20-24 pounds, but you can also find heavier weights like 32 pounds or more. Heavier paper is great for projects that need to be more durable, like brochures or posters. You should also consider the brightness of the paper. Brighter paper will make your prints look more vibrant, while duller paper can give them a more muted tone. Finally, think about the finish of the paper. Matte paper is great for projects that need to be easy to write on, while glossy paper is perfect for projects that need to be visually striking. By choosing the right printer paper for your project, you can ensure that it turns out looking professional and polished. Here is the 200 words supporting paragraph for Scissors: Scissors are a fundamental tool for many projects, from cutting paper and fabric to opening packages and more. When it comes to choosing scissors, there are a few things to consider. First, think about the type of material you'll be cutting. If you'll be cutting thick or heavy materials, you'll want to choose scissors with strong, sharp blades. If you'll be cutting delicate materials, you may want to choose scissors with thinner, more precise blades. You should also consider the size of the scissors. Larger scissors are great for big projects, while smaller scissors are perfect for detail work. Finally, think about the comfort of the scissors. Look for scissors with comfortable grips and smooth action, so you can cut for hours without getting tired. By choosing the right scissors for
Printer Paper
Here is the paragraphy: Printer paper is a versatile and essential material for various printing needs, including crafting, office work, and educational purposes. It is available in different types, sizes, and textures, making it suitable for various applications. The most common types of printer paper include standard A4 and letter sizes, as well as specialty papers such as glossy, matte, and textured finishes. The weight of printer paper is usually measured in grams per square meter (gsm), with heavier weights indicating higher quality and durability. For crafting and making envelopes, a medium-weight paper (around 80-100 gsm) is often preferred, as it provides a good balance between print quality and foldability. When selecting printer paper, consider the intended use, desired print quality, and the type of printer being used to ensure the best results.
Scissors
Scissors are a fundamental tool in various crafting and DIY projects, including making an envelope with printer paper. A good pair of scissors is essential for achieving clean cuts and precise edges. When selecting scissors for this project, consider the type of material you will be cutting. For printer paper, a pair of sharp, dedicated paper scissors or craft scissors would be ideal. These scissors typically have a sharp, pointed tip and a curved or angled blade, allowing for smooth, accurate cuts. It's also important to choose scissors with comfortable, ergonomic handles that fit well in your hand, reducing fatigue and strain during extended use. Additionally, consider the size of the scissors, as larger scissors may be more suitable for cutting larger sheets of paper, while smaller scissors are better suited for more intricate cuts and details. By investing in a good pair of scissors, you'll be able to achieve professional-looking results and make the envelope-making process more efficient and enjoyable.
Glue or Tape
Glue or tape is a crucial material needed to make an envelope with printer paper. There are various types of glue and tape available, each with its own unique characteristics and uses. For this project, a simple white glue or a clear tape would be sufficient. White glue, also known as PVA glue, is a popular choice for paper crafting because it dries clear and is easy to apply. It is also non-toxic and washable, making it a great option for projects that will be handled frequently. On the other hand, clear tape is a quick and easy way to attach the envelope's flaps together. It is also a good option if you want to create a more permanent bond. When choosing between glue and tape, consider the look and feel you want to achieve. If you want a more rustic or handmade look, glue may be the better option. If you want a cleaner and more polished look, tape may be the way to go. Regardless of which one you choose, make sure to apply it sparingly and evenly to avoid any mess or wrinkles.
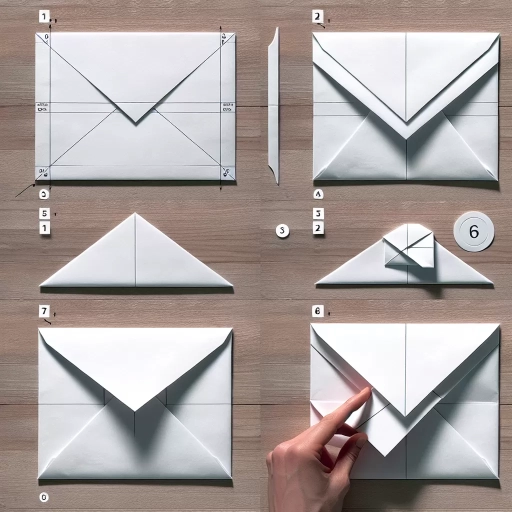
Step-by-Step Instructions
Here is the introduction paragraph: Creating a beautiful and functional paper envelope from scratch can be a fun and rewarding experience. With a few simple steps, you can create a unique and personalized envelope that adds a special touch to your correspondence. In this article, we will guide you through the process of creating a paper envelope, from folding the paper to creating the envelope shape and securing the flaps. By following these step-by-step instructions, you will be able to create a beautiful and functional paper envelope that is sure to impress. To get started, let's begin with the first step: folding the paper.
Folding the Paper
Folding the paper is a crucial step in creating a functional and visually appealing envelope. To begin, take the printer paper and fold it in half lengthwise, creating a crease in the middle. This initial fold helps to establish a clear center point and ensures that the subsequent folds are symmetrical. Next, open the paper back up and fold the top left and right corners down so that they meet at the middle crease. The folds should be crisp and sharp, with the edges aligning perfectly. This step helps to create the envelope's flap and begins to define its shape. Now, fold the bottom left and right corners up so that they meet at the middle crease, making sure to align them with the top corners. This fold helps to create the envelope's base and adds depth to its structure. Finally, fold the top and bottom edges of the paper in towards the middle crease, making sure to align them with the corners. This final fold helps to create a neat and tidy envelope shape, with crisp edges and a clear flap. By following these simple folds, you can create a sturdy and functional envelope that is perfect for mailing letters, cards, and other small items.
Creating the Envelope Shape
Here is the paragraphy: To create the envelope shape, start by folding the top right and left corners of the paper down so that they meet at the middle crease. The folds should be symmetrical and about 1 inch deep. Next, fold the bottom right and left corners up so that they meet at the middle crease, making sure to align them with the top corners. The folds should be about 1 inch deep as well. Then, fold the top and bottom edges of the paper in towards the middle crease, making sure to align them with the corners. The folds should be about 0.5 inches deep. Finally, fold the right and left edges of the paper in towards the middle crease, making sure to align them with the top and bottom edges. The folds should be about 0.5 inches deep. You should now have a rectangular shape with a flap at the top. To create the envelope shape, fold the flap down along the middle crease, making sure to tuck it under the rectangular shape. You should now have a compact envelope shape with a sealed flap.
Securing the Flaps
Securing the flaps of your handmade envelope is a crucial step to ensure that your letter or card remains safe and secure inside. To do this, you can use a variety of methods, depending on the type of envelope you are making and the materials you have available. One common method is to use a small piece of tape to hold the flaps in place. Simply apply a small amount of tape to the underside of the flap and press it firmly onto the envelope. This will create a strong bond that will keep the flap closed. Alternatively, you can use a small dot of glue or a glue stick to attach the flap to the envelope. This method is especially useful if you are using a decorative paper or cardstock that you don't want to damage with tape. Another option is to use a small staple or a paper clip to hold the flap in place. This method is quick and easy, but it may not be as secure as using tape or glue. Regardless of the method you choose, make sure to apply gentle pressure to avoid creasing or damaging the envelope. By securing the flaps of your handmade envelope, you can ensure that your letter or card arrives at its destination safely and securely.
Tips and Variations
When it comes to creating unique and personalized items, there are several tips and variations that can be employed to make your creations stand out. One of the most effective ways to add a personal touch is by incorporating personal elements, such as photos, names, or special messages. Another approach is to experiment with different paper sizes, which can add an extra layer of creativity and visual interest to your designs. Additionally, trying out various designs and techniques can also help to create one-of-a-kind pieces. By incorporating these elements, you can create truly special and meaningful items that reflect your personality and style. For instance, adding a personal touch to your creations can make them even more special and meaningful, and this can be achieved by incorporating personal elements, such as photos, names, or special messages, which will be discussed in more detail in the next section.
Adding a Personal Touch
Adding a personal touch to your handmade envelope can make it even more special and meaningful to the recipient. One way to do this is by incorporating a personal message or the recipient's name into the design. You can use a marker or a pen to write a heartfelt message or the recipient's name on the envelope, making it a one-of-a-kind piece. Another way to add a personal touch is by using a photo or a piece of artwork that is meaningful to the recipient. You can print out a small photo or artwork and glue it onto the envelope, creating a unique and personalized design. Additionally, you can also use different colors, patterns, and textures to make the envelope more visually appealing and reflective of the recipient's personality. For example, if the recipient loves bright colors, you can use a brightly colored paper or add colorful stamps to the envelope. If the recipient prefers a more subtle look, you can use a plain white paper and add a simple yet elegant design. By adding a personal touch to your handmade envelope, you can show the recipient that you care and put thought into the gift, making it an even more special and meaningful gesture.
Using Different Paper Sizes
Using different paper sizes can greatly enhance the creativity and versatility of your envelope-making endeavors. While standard letter-sized paper (8.5 x 11 inches) is a popular choice, exploring other paper sizes can lead to unique and visually appealing envelope designs. For instance, using A4 paper (210 x 297 mm) can create a more compact and elegant envelope, perfect for sending small gifts or invitations. On the other hand, larger paper sizes like A3 (297 x 420 mm) or 11 x 17 inches can be used to create oversized envelopes that make a statement. You can also experiment with square paper sizes, such as 6 x 6 inches or 15 x 15 cm, to create a more modern and trendy envelope design. When working with different paper sizes, be sure to adjust your folding and cutting techniques accordingly to ensure a precise and professional finish. Additionally, consider the recipient's mailbox size and the postage requirements when choosing a paper size, as larger envelopes may require additional postage. By experimenting with various paper sizes, you can add an extra layer of creativity and personality to your envelopes, making them truly special and memorable.
Experimenting with Designs
Experimenting with designs is a great way to add a personal touch to your handmade envelopes. With printer paper, the possibilities are endless, and you can try out various patterns, colors, and textures to create unique and eye-catching designs. One idea is to use a template or a stencil to create intricate designs, such as florals, geometric shapes, or abstract patterns. You can also experiment with different folding techniques, such as accordion folds or origami-inspired designs, to add an extra layer of visual interest. Additionally, you can incorporate other materials, like washi tape, stickers, or even fabric, to add texture and dimension to your envelopes. Another approach is to use a combination of solid colors and patterns to create a bold and playful look. For example, you can pair a bright red envelope with a white polka dot liner or a blue envelope with a yellow stripe. The key is to have fun and be creative, and don't be afraid to try out new and unconventional designs. By experimenting with different designs, you can create one-of-a-kind envelopes that reflect your personality and style, making them a special and meaningful way to send mail to friends and loved ones.