How To Draw A Moose
Understanding the Basics: Sketching a Moose
Studying a Moose's Characteristics
In approaching any drawing task, it's essential to observe and understand the subject's defining features. A moose is a large creature with a humped back, long legs, broad snout, large ears, and impressive antlers. Prior to drawing, spend some time observing images or videos of moose in various pose. Familiarize yourself with their unique characteristics – notice the proportion of their body parts, understand the complexity of their antlers, and how they carry themselves. This initial study will provide invaluable information for your sketching.
- Larger ears and snout clearly distinguish moose from other members of the deer family
- A moose's legs are disproportionally larger, allowing it to wade in deep water and snow
- The antlers are a key characteristic - they are broad and flat unlike the pointed antlers seen on a deer
Setting up the Initial Sketch
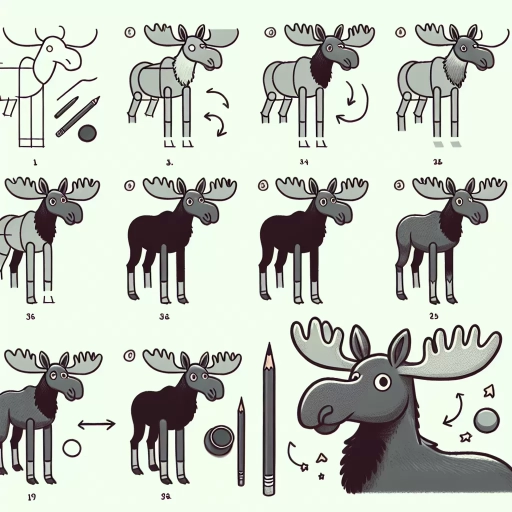
Once familiar with the moose's characteristics, commence with a light, rough sketch to capture the creature's overall shape and proportions. Use lines and circles to create a basic framework. For instance, the body can be depicted as a large oval, with smaller circles indicating the joints on legs. The head can be identified as another circle and the ears and snouts as extensions. This initial sketch is a guide, allowing you to visualize the final result while providing a structure to build upon. Corrections or adjustments can be easily made at this stage without impacting the final product.
- This framework method simplifies the complex shape of a moose into manageable pieces
- Provide more shape to the moose by lightly sketching in the legs, head, and antlers
- Remember to keep the initial sketch light, so these guide lines can be erased easily later on
Refining the Moose Drawing
From your initial sketch, it's now time to refine and add detail to your drawing. Pay extra attention to the shape of a moose's ears, snout, and particularly the antlers in this step, since these are key defining characteristics. Add depth and dimension to the body by indicating muscle lines and fur texture. Use shading to create a sense of volume and realism in your sketch. Once done, you can erase the initial guide lines, refine any areas as necessary, and darken your lines for a final, polished look.
- Draw and refine your moose's antlers, they may seem complex, but they are just a series of curves joining together at different points
- Do not forget to illustrate the fur texture. This can be indicated by simple lines or subtle shading
- Include a hint of surroundings like grass or stream to add context to the drawing of a moose
Adding Colors: Bringing Your Moose to Life
Selecting a Color Palette
Coloring breathes life into your drawing, turning a sketch into a lively, realistic scene. Choosing colors that are true to the moose's real-life counterpart will result in a more convincing, aesthetically pleasing outcome. The moose's fur varies from a brown to dark brown, while their antlers are a mix of beige and grey. The local environment can also inform your color choices - consider the shades of green grass, blue streams, or a colorful sunset to illustrate surroundings.
- Note the variations in the color of a moose, the fur may transition from light to dark brown
- Though mostly beige or gray, the moose's antlers will display hints of other colors such as white or brown based on age and time of year
- The surrounding context can add depth to the drawing while also encapsulating the moose's natural habitat
Applying the Colors
Applying colors should be done with care and patience. Start with lighter colors and gradually move on to darker shades for depth and shadow. Begin with the moose's body, using various shades of brown. Lighter shades can be used to indicate light reflecting off the fur, while darker ones can display depth and shadow. Next, tackle the antlers with a combination of beige and grey colors. Lastly, paint the surroundings to complete the scene. At this stage, the moose should come to life as a vibrant, 3D image.
- Start coloring with a light base, adding darker colors to depict depth and shadows
- Color the antlers keeping the texture in mind - they're usually rougher than the body, hence will absorb more light making them darker in places
- Coloring the surrounding environment last helps in maintaining the focus on the moose and will synchronize the overall color scheme
Final Touches
Finally, it's time for retouching and final finishing. Inspect your completed drawing thoroughly. Add any further required details such as more fur texture, shadows, or highlights. Enhance the definition where needed by adding more color contrast. Once satisfied with the overall look, you might want to name or sign your work. After these final steps, the drawing is completed, and you'll have a colorful, lively drawing of a moose that you can be proud of.
- Retouching can enhance the overall visual appeal
- Shadows and highlights play a crucial role in making the image three-dimensional
- Adding a signature to your work gives it a personal touch and credits you as the artist.
Moose Drawing Tips and Tricks
Mastering the Art of Patience
Remember that art is not a race. Making an appealing drawing requires patience and time. Your first attempt may not be perfect, and that's okay. The key is to remain patient and to keep practicing. Each new drawing will improve your understanding of the form and the composition; you'll notice your drawings will get progressively better. It's okay to make mistakes - they often lead to unexpected discovery and learning opportunities.
- Patience plays a crucial role in drawing, a rushed drawing may lack fine details and accuracy
- Do not hesitate in making mistakes, each one is a new learning avenue, making you a better artist
- Practice aids in improvement, so each new sketch will build on your skills and understanding.
Using References for Help
References are useful tools for artists, beginner or professional. A reference image helps in understanding the complexity of the subject and its finer details. A combination of different references can provide a diverse understanding of the subject from various angles or positions. By combining these elements, you can create a unique piece of art. Just be careful not to infringe on copyright laws if you plan to make your work public.
- References can aid in capturing the actual form and help in refining your drawing
- Different references can provide a 360-degree view of the subject, inspiring you to explore different angles and poses
- While using reference images, ensure the images are copyright-free if you plan to publish your drawing.
Experimenting with Mediums
Art is all about experimentation. Don't limit yourself to just one medium. Exploring different types of colors like watercolor, pastels, or colored pencils can lead to various effects and outcomes. Likewise, digital drawing tools offer an array of effects and a limitless palette. Each medium will provide a unique texture and feel to your moose drawing, allowing you to express your artistic style.
- Different mediums offer a broad spectrum of colors and textures that can enhance the final outcome
- Experimenting with various mediums contributes to your development as an artist
- Digital drawing tools are a viable modern option, providing a broad array of effects and a limitless color palette to explore.