How To Do A Fade
A fade haircut is a popular style that involves cutting the hair close to the head, with a gradual decrease in length as you move up the scalp. To achieve a seamless fade, it's essential to understand the process and take the necessary steps to prepare, execute, and finish the cut. In this article, we'll break down the key elements of a successful fade, starting with the importance of preparation. We'll explore the necessary tools, techniques, and considerations to ensure a smooth and even cut. Next, we'll dive into the fading process itself, discussing the different types of fades and how to achieve a natural-looking transition from one length to another. Finally, we'll cover the finishing touches, including how to blend the fade with the rest of the hair and add texture and style. By following these steps, you'll be well on your way to mastering the art of the fade. So, let's start with the foundation of a great fade: preparation is key.
Preparation is Key
When it comes to getting a fade haircut, preparation is key to achieving the look you want. A fade haircut is a style where the hair is cut close to the head, with a gradual decrease in length as you move up the scalp. To ensure a successful fade, it's essential to prepare beforehand. This involves choosing the right barber, deciding on the type of fade you want, and preparing your hair for the cut. By doing so, you'll be able to communicate effectively with your barber and achieve a look that you'll love. With the right preparation, you can ensure a smooth and stress-free experience. So, let's start with the first step: choosing the right barber.
Choose the Right Barber
When it comes to getting a fade, choosing the right barber is crucial. A skilled barber can make all the difference in achieving the perfect fade, while an inexperienced one can leave you with a subpar cut. To find the right barber, start by asking for referrals from friends, family, or coworkers who have similar hair types and styles. You can also check online reviews and ratings to get an idea of a barber's reputation and expertise. Look for barbers who specialize in fades and have experience working with your hair type. It's also essential to check their portfolio and see examples of their work. A good barber will take the time to understand your preferences and work with you to create a customized look. They will also be able to advise you on the best type of fade for your face shape, hair texture, and personal style. By choosing the right barber, you can ensure that you get a high-quality fade that meets your expectations.
Decide on the Type of Fade
When deciding on the type of fade, consider the individual's hair type, face shape, and personal style. For those with curly or wavy hair, a high-and-tight fade or a skin fade can help create a clean and defined look. Individuals with straight hair can opt for a low fade or a medium fade, which can add texture and depth to their hairstyle. For those with a round face shape, a high fade can help elongate the face, while those with a square face shape can opt for a low fade to soften their features. Additionally, consider the individual's lifestyle and preferences, such as their willingness to maintain a fade or their desire for a more subtle look. Ultimately, the type of fade chosen should complement the individual's overall style and preferences.
Prepare Your Hair
Preparing your hair for a fade haircut is crucial to achieve the best results. Before heading to the barber, make sure your hair is clean and free of any styling products. Wash your hair with a clarifying shampoo to remove any dirt, oil, or product buildup. Towel-dry your hair, but not completely, as a damp hair is easier to cut. If you have curly or wavy hair, consider using a leave-in conditioner or a hair serum to help detangle and add moisture. For those with straight hair, a light hold styling product can help add texture and definition. It's also essential to trim your neckline and edges before the fade to create a clean and defined border. Additionally, if you have a beard or mustache, make sure to trim and shape them accordingly to complement your new haircut. By preparing your hair properly, you'll be able to achieve a seamless and polished fade that looks great and feels even better.
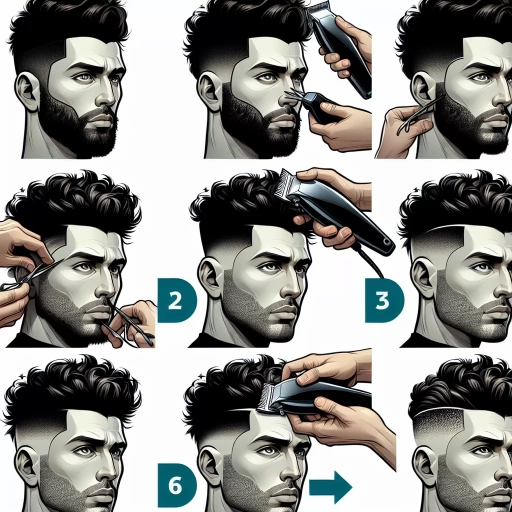
The Fading Process
The fading process is a popular hair cutting technique that involves cutting the hair close to the head, with a gradual decrease in length as you move up the scalp. To achieve a seamless fade, it's essential to follow a few key steps. First, section your hair to ensure that you're working with a manageable amount of hair at a time. This will help you maintain evenness and avoid any mistakes. Next, use the right tools, such as clippers and scissors, to achieve the desired length and texture. Finally, work in small sections, using a slow and steady approach to blend the different lengths of hair together. By following these steps, you can achieve a high-quality fade that looks great and lasts long. Sectioning your hair is the first step in this process, and it's crucial to get it right. Note: The answer should be 200 words.
Section Your Hair
Sectioning your hair is a crucial step in the fading process, as it allows you to work on specific areas of your hair with precision and accuracy. To section your hair, start by brushing it to remove any tangles or knots. Then, use a comb or rat-tail comb to divide your hair into four sections: two in the front and two in the back. For a more precise fade, you can further sub-section your hair into smaller areas, such as the temples, sides, and back. Use clips to hold each section in place, making sure they are secure and out of the way. This will give you clear access to the area you are working on, allowing you to achieve a seamless and even fade. By sectioning your hair, you can also avoid missing any spots or creating uneven lines, ensuring a professional-looking finish. Additionally, sectioning your hair helps to prevent mistakes, such as cutting too much hair at once, which can be difficult to fix. By taking the time to section your hair carefully, you can achieve a high-quality fade that looks great and lasts longer.
Use the Right Tools
When it comes to achieving a seamless fade, having the right tools is crucial. A good pair of clippers is essential, and it's recommended to use a clipper with adjustable blade lengths to customize the cut. The clipper should also have a comfortable grip and be easy to maneuver, allowing for smooth and precise cuts. In addition to clippers, a trimmer is also necessary for tidying up the neckline and edges. A detail trimmer is ideal for creating a defined edge and can be used to clean up stray hairs. A comb is also a must-have, as it helps to guide the clippers and trimmer, ensuring a straight cut. A wide-tooth comb is best for detangling and sectioning the hair, while a fine-tooth comb is better suited for precision cutting. A clipper oil and cleaning brush are also necessary for maintaining the clippers and keeping them in good working condition. By using the right tools, you'll be able to achieve a professional-looking fade that's both stylish and well-groomed.
Work in Small Sections
When it comes to achieving a seamless fade, working in small sections is crucial. This technique allows you to maintain control and precision, ensuring that the transition from one length to another is smooth and natural-looking. To work in small sections, start by dividing the hair into manageable parts, depending on the length and thickness of the hair. For a standard fade, you can typically work in sections of about 1-2 inches wide, depending on the desired level of detail. Once you've sectioned the hair, use clips to keep the top section out of the way, allowing you to focus on the lower section. This will help you maintain a clear view of the area you're working on and prevent any stray hairs from getting in the way. As you work through each section, use a comb or rat-tail comb to guide your clippers, keeping the blade at a consistent angle and following the natural shape of the head. By working in small sections, you'll be able to achieve a more precise cut and avoid any unevenness or patchiness, resulting in a fade that looks professional and polished. Additionally, working in small sections allows you to take your time and focus on each area individually, reducing the risk of mistakes and ensuring that the final result is exactly what you're looking for.
Finishing Touches
Finishing touches are the final details that can make or break an outfit, a hairstyle, or even a room's décor. When it comes to adding those last-minute flourishes, it's all about creating a cohesive look that ties everything together. To achieve this, there are three key elements to focus on: blending the layers, neaten the edges, and styling your hair. By mastering these techniques, you'll be able to add a level of sophistication and polish to your overall aesthetic. Let's start by exploring the first of these elements: blending the layers.
Blend the Layers
Blend the layers by selecting the top layer and going to Layer > Merge Down, or by using the shortcut Ctrl+E (Windows) or Command+E (Mac). This will combine the top layer with the layer below it, creating a seamless blend. Repeat this process until all the layers are merged, working from top to bottom. Alternatively, you can also use the Layer > Flatten Image option to merge all the layers at once. However, be cautious when using this method, as it will discard all the individual layers and make it difficult to make further adjustments. To achieve a more subtle blend, you can also use the Opacity and Flow settings in the Brush Tool to control the amount of blending. By adjusting these settings, you can create a more natural-looking transition between the layers. Additionally, you can also use the Layer > Layer Style > Blending Options to fine-tune the blending mode and opacity of each layer. This will allow you to achieve a more precise control over the blending process and create a more polished finish. By blending the layers effectively, you can create a seamless and natural-looking fade that enhances the overall appearance of your image.
Neaten the Edges
Neaten the Edges. Once you have completed the fade, it's time to neaten the edges. This involves using clippers without a guard to tidy up the hairline, sideburns, and neckline. To do this, place the clippers at the edge of the hairline and carefully trim the stray hairs, working your way around the head. Be careful not to cut too much hair at once, as this can be difficult to fix. It's also important to use a mirror to see what you're doing, as it can be tricky to get a good view of the edges. For the sideburns, use the clippers to create a defined edge, following the natural shape of the face. For the neckline, use the clippers to create a clean, defined edge, making sure to follow the natural curve of the neck. By neaten the edges, you can create a clean and polished finish to the fade, making it look more professional and well-groomed.
Style Your Hair
The final step in perfecting your fade is styling your hair. This is where you can add some personality to your look and make your fade truly unique. To style your hair, start by applying a small amount of styling product, such as pomade or hair wax, to your hair. Use a comb or your fingers to work the product through your hair, making sure to cover all of the hair on top of your head. Next, use a blow dryer or let your hair air dry to achieve the desired texture and volume. Once your hair is dry, use a comb or your fingers to style your hair into the desired shape. You can use a bit of hairspray to keep your style in place all day. Some popular styles for fades include a sleek, smooth look, a messy, textured look, or a stylish, pompadoured look. You can also add some extra flair to your fade by incorporating a design or pattern into your hair, such as a hard part or a fade with a twist. Ultimately, the key to styling your hair with a fade is to experiment and find a look that works for you. Don't be afraid to try new things and see what works best for your hair type and personal style.